The most frequently asked questions about the Sales Script Prompter service:
- Working with the script
- - How to create a script
- - How to edit a script
- - How to insert fields into the script
- - Script and call editor settings
- Creating and Importing Custom Fields
- - How to create fields
- - How to import fields from CRM
- Creating standard phrases and adding them to the script
- - How to create and use standard phrases in scripts
- Work in the CRM
- - Widget for Mozilla Firefox
- - Zoho CRM
- - Kommo CRM
- - Bitrix24 CRM
- - Pipedrive CRM
- Working in call mode
- - How to make a script call
- - How to fill in the fields in a call
- Working with reports
- - Scripts report
- - Call report
- - Performance Report
- Working with the voice trainer
- - What a voice trainer is for and how to work with it
- Work with employees
- - Designer's authority
- - Authority of the operator
- - How to add employees
- - How to block and delete employees
- - How to provide rights for staff to use scripts
- Service payment
- - How to pay for the service
- Account deleting
- - How to delete an administrator account
- - How to delete an employee's account
Working with the script
How to create a script
Option 1 - Use a script template
-
Go to your account and click the "Import script from file" button.

- You will be offered two options - to download a script in the format of the Sales Script Prompter service or from other formats. If your script differs from the format in which scripts are saved in Sales Script Prompter, you will be offered to transfer scripts (this service is paid). If your script is saved in ScriptDesigner format, you will be prompted to select it on the computer where it is saved or drag it with the mouse to the script import window area.


-
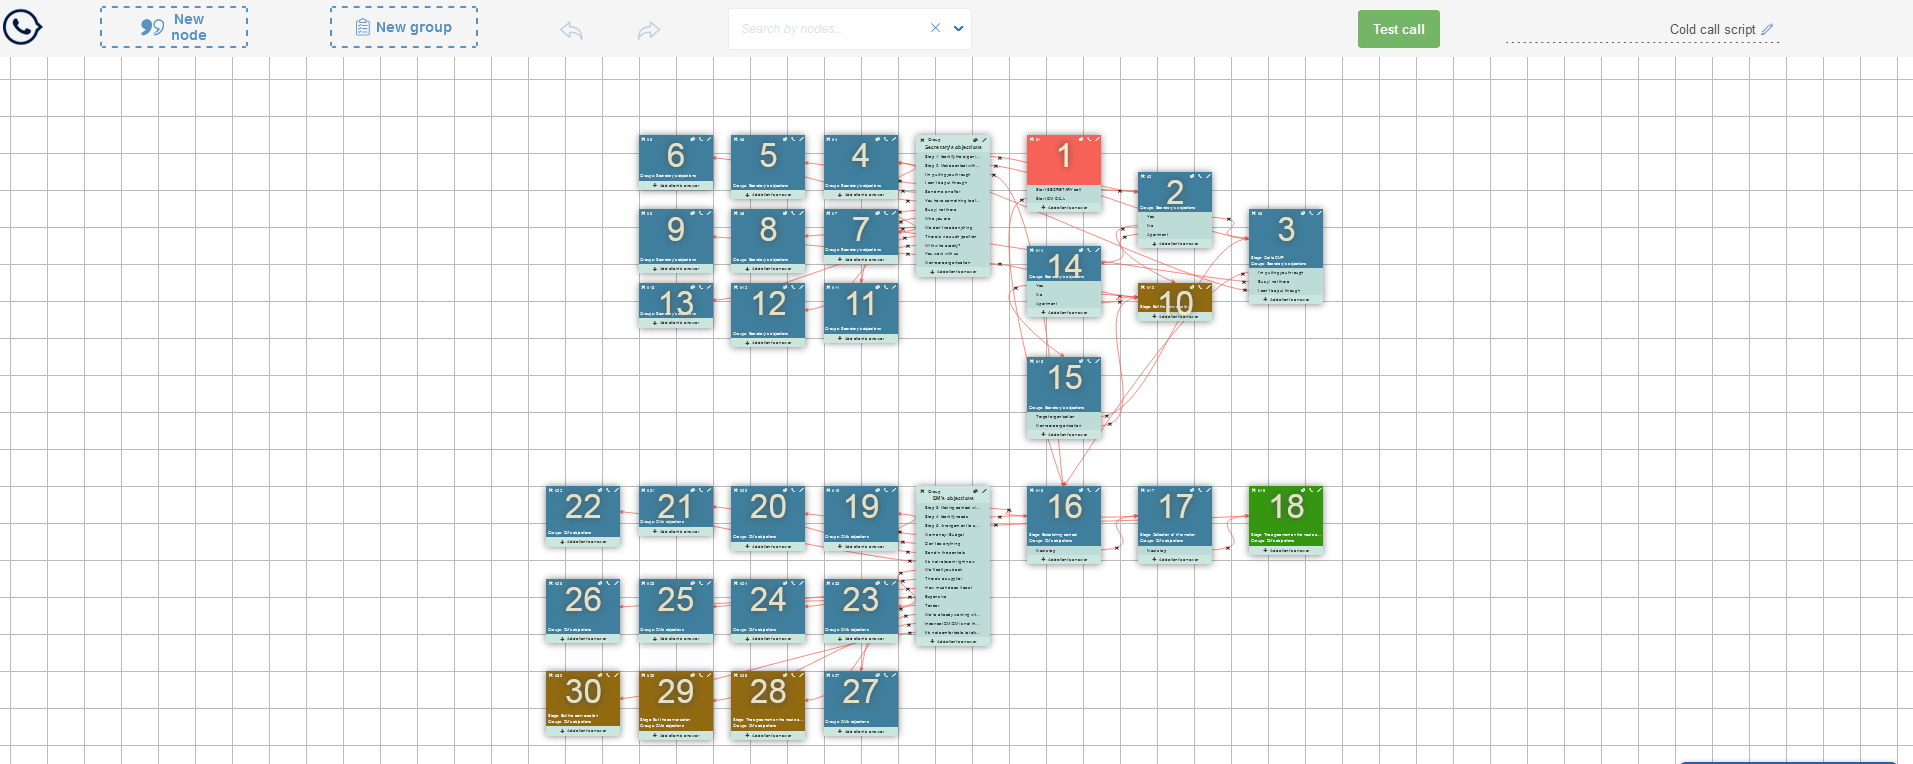
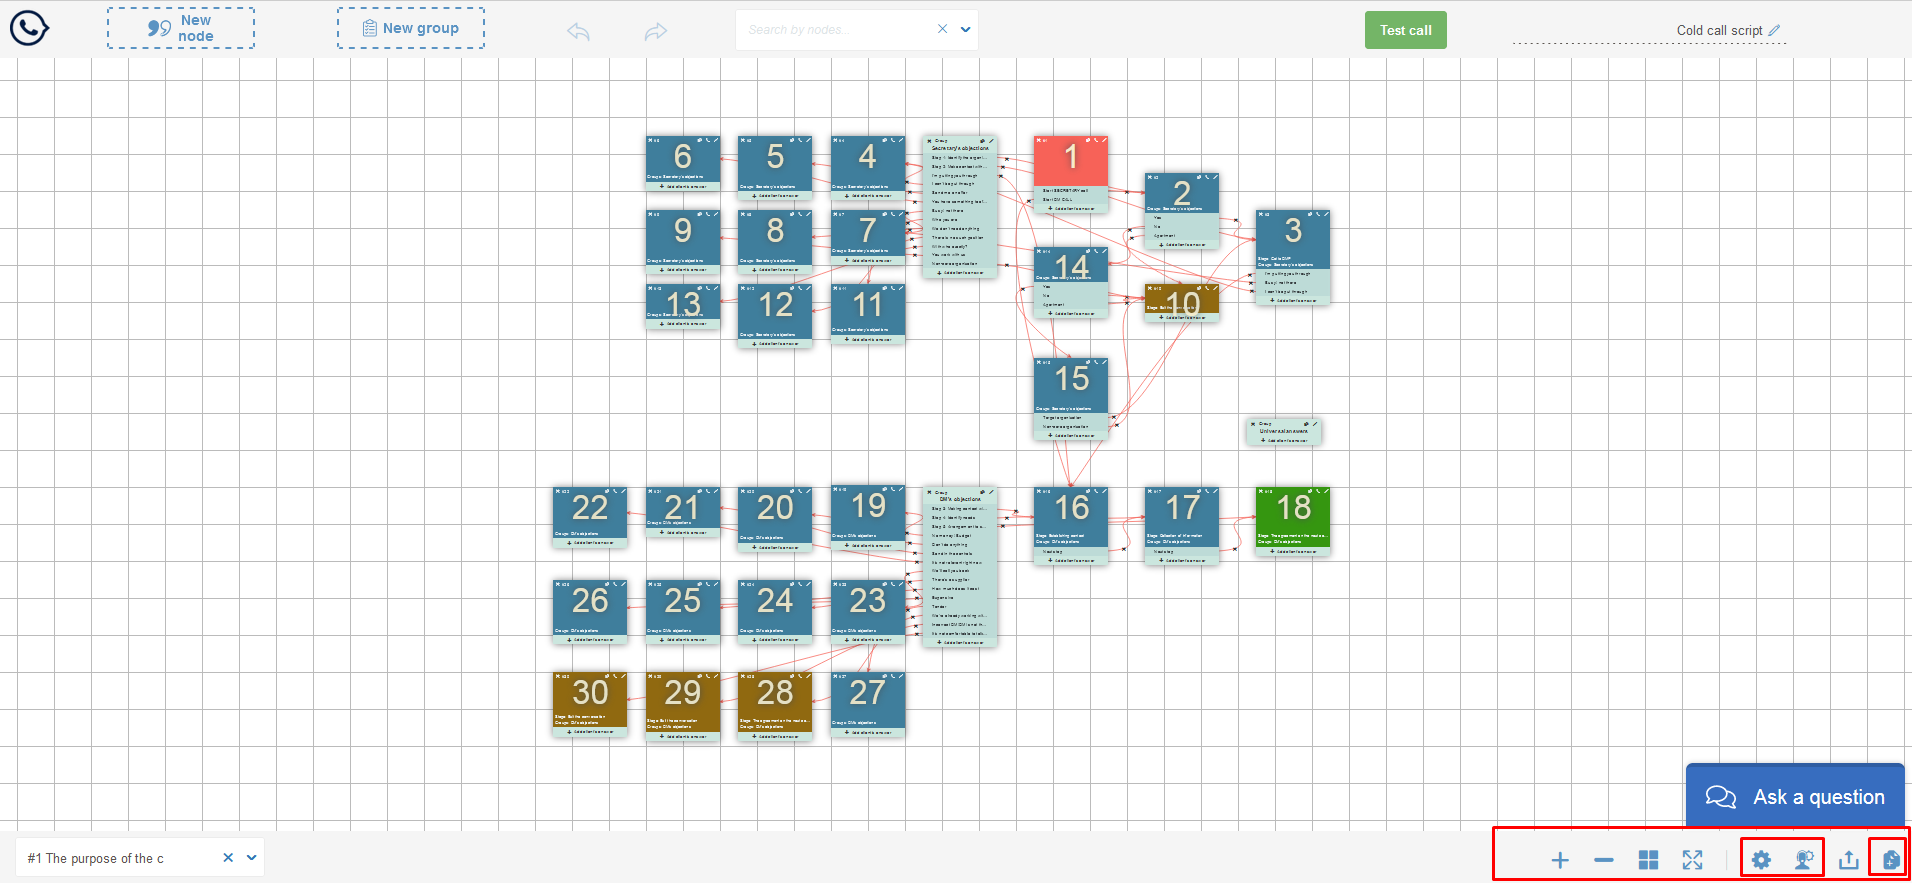
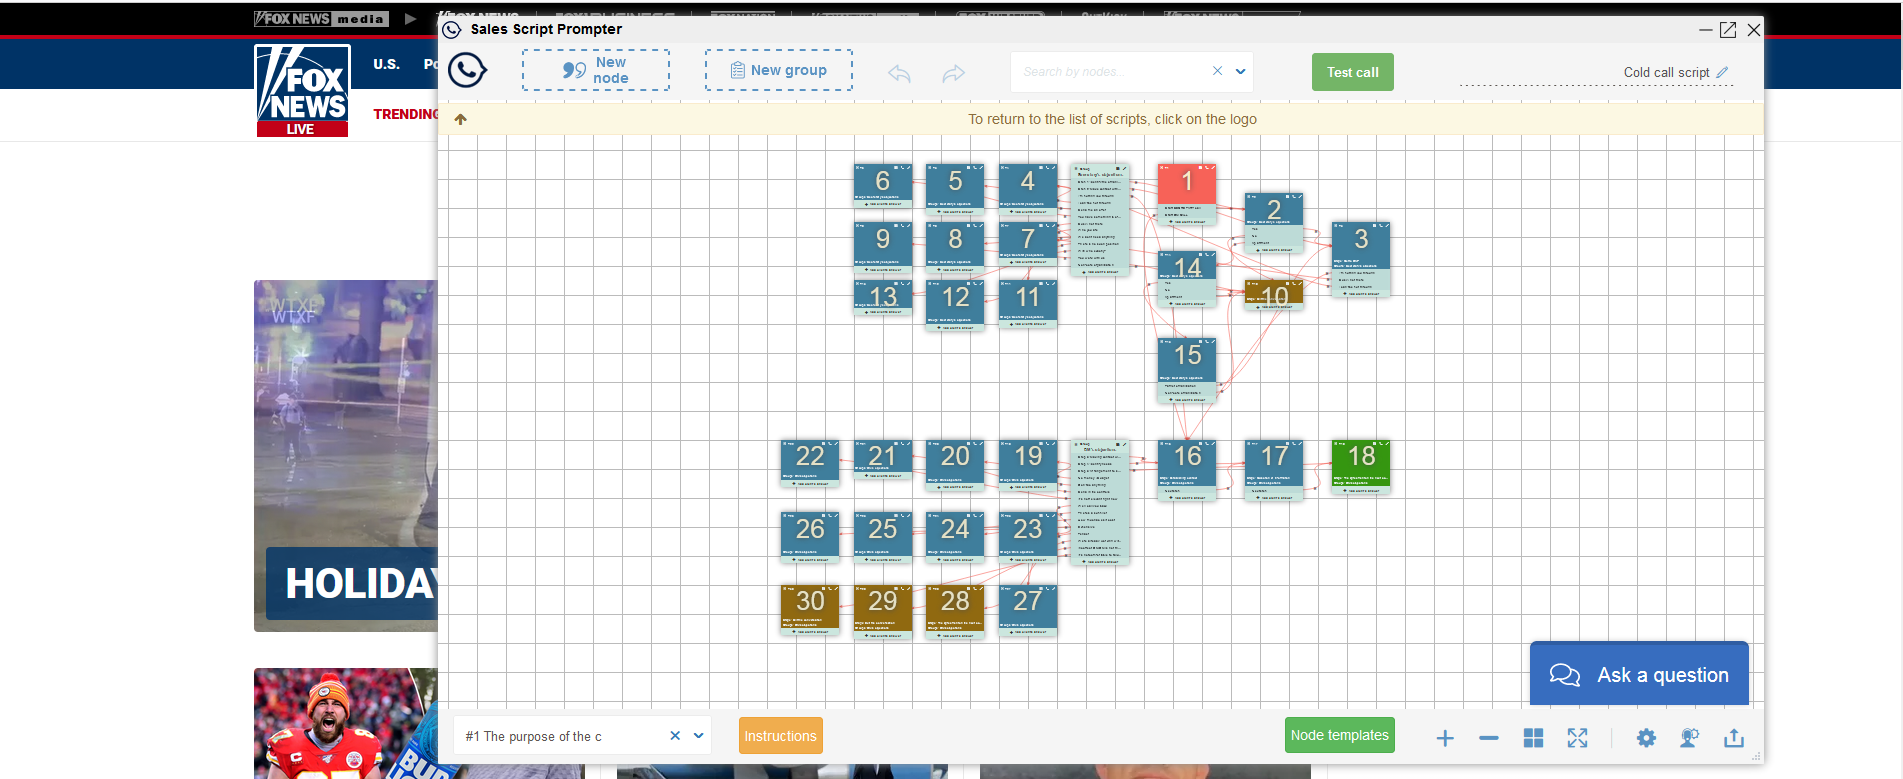
The tree of the loaded script will open once you've selected a script to import and clicked the "Start" button. Each script is made up of nodes that are linked to one another. The node includes the phrase that the manager says (top blue part of the node) and the customer response options (light blue lines below the manager's phrase). Each customer response option is associated with the manager's phrase (another node or script). To make the script larger, twist the mouse wheel. You can create and edit nodes, answers, groups of answers and rename the script by clicking on the field with the script name in the upper right corner. To exit script editing mode, click the tube icon in the upper left corner.
-
The control panel in your personal account displays a list of scripts. To the right of the script name there are buttons to control the script you need, when you put your mouse over the button you will see a tooltip, which allows you to understand what action you can perform with the script by clicking on this or that button.
Press the handset button to start the call mode.
To continue editing the script, click the pencil button.
Unnecessary scripts are moved to the archive (folder button).
You can also copy, export the script and set up access to it for employees.

Option 2 - Create your own script from scratch.
-
Go to your account and click on "Create Script" in the upper left corner.

-
This opens an empty script window that you can work with, creating nodes, answers, and groups of answers. You can rename the script by clicking on the field with the script name in the upper right corner. To exit the script editing mode, click on the tube icon in the upper left corner.

-
On the control panel in your personal account you will see a list of scripts. There are buttons to control the script you require to the right of the script name. When you hover your cursor over the button, a tooltip appears that explains what action you can perform with the script by clicking on different buttons.
Press the handset button to start the call mode.
To continue editing the script, click the pencil button.
Unnecessary scripts are moved to the archive (folder button).
You can also copy, export the script, set up access to it for employees.
How to edit a script
-
Go to your account, select the script you want to edit and click the pencil button. You will enter script editing mode. Adjusting the scale of the script in the editor is carried out using the mouse wheel.
-
It is possible to create a new node:
- by clicking on the "New Node" button,
- by double-clicking on an empty workspace in the script editor,
- by grabbing the "New Node" button with your mouse and dragging it into the script workspace to where you want the node.

- To minimize the risks of reducing the editor's performance on low-power computers, on volumetric scripts a mechanism is used to disable the exposure of connections between nodes automatically. That is, at the stage of creating the hundredth node, at You, the arrows will disappear. If they are more important to you than quick work in the editor, you can turn them on again in the «Editor settings» by clicking on the gear in the lower right corner and then removing the check mark from the «Enable fast script loading» checkbox. Similarly, at earlier stages of script creation, if you want to speed up the editor's work, you can use this checkbox to remove the exposure of connections.

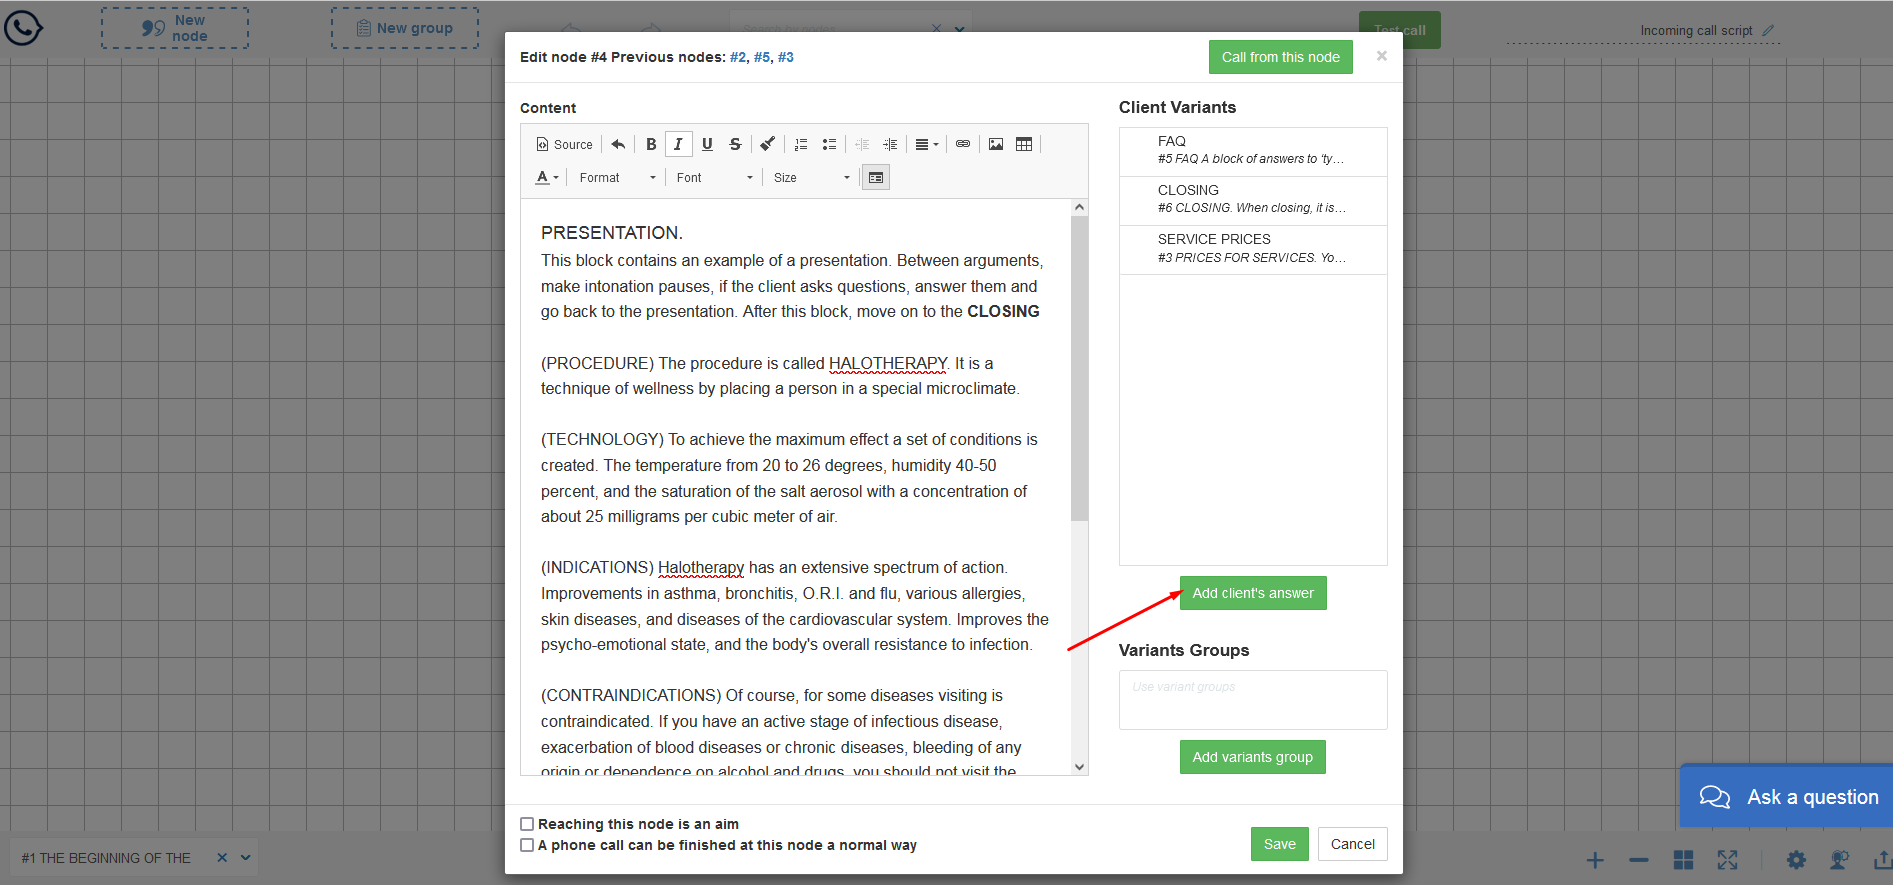
- The node window opens, in which you should write the purpose of the call and the first operator phrase (if it is the first node in the script) or the operator phrase (according to the logic of the script). If this is the first node in this script, after clicking the "Save" button, you will be prompted to mark this node as the first one to call. By choosing a different node in the editor's lower left corner, you may always alter the beginning node for the call. The node with the manager's phrase is created.
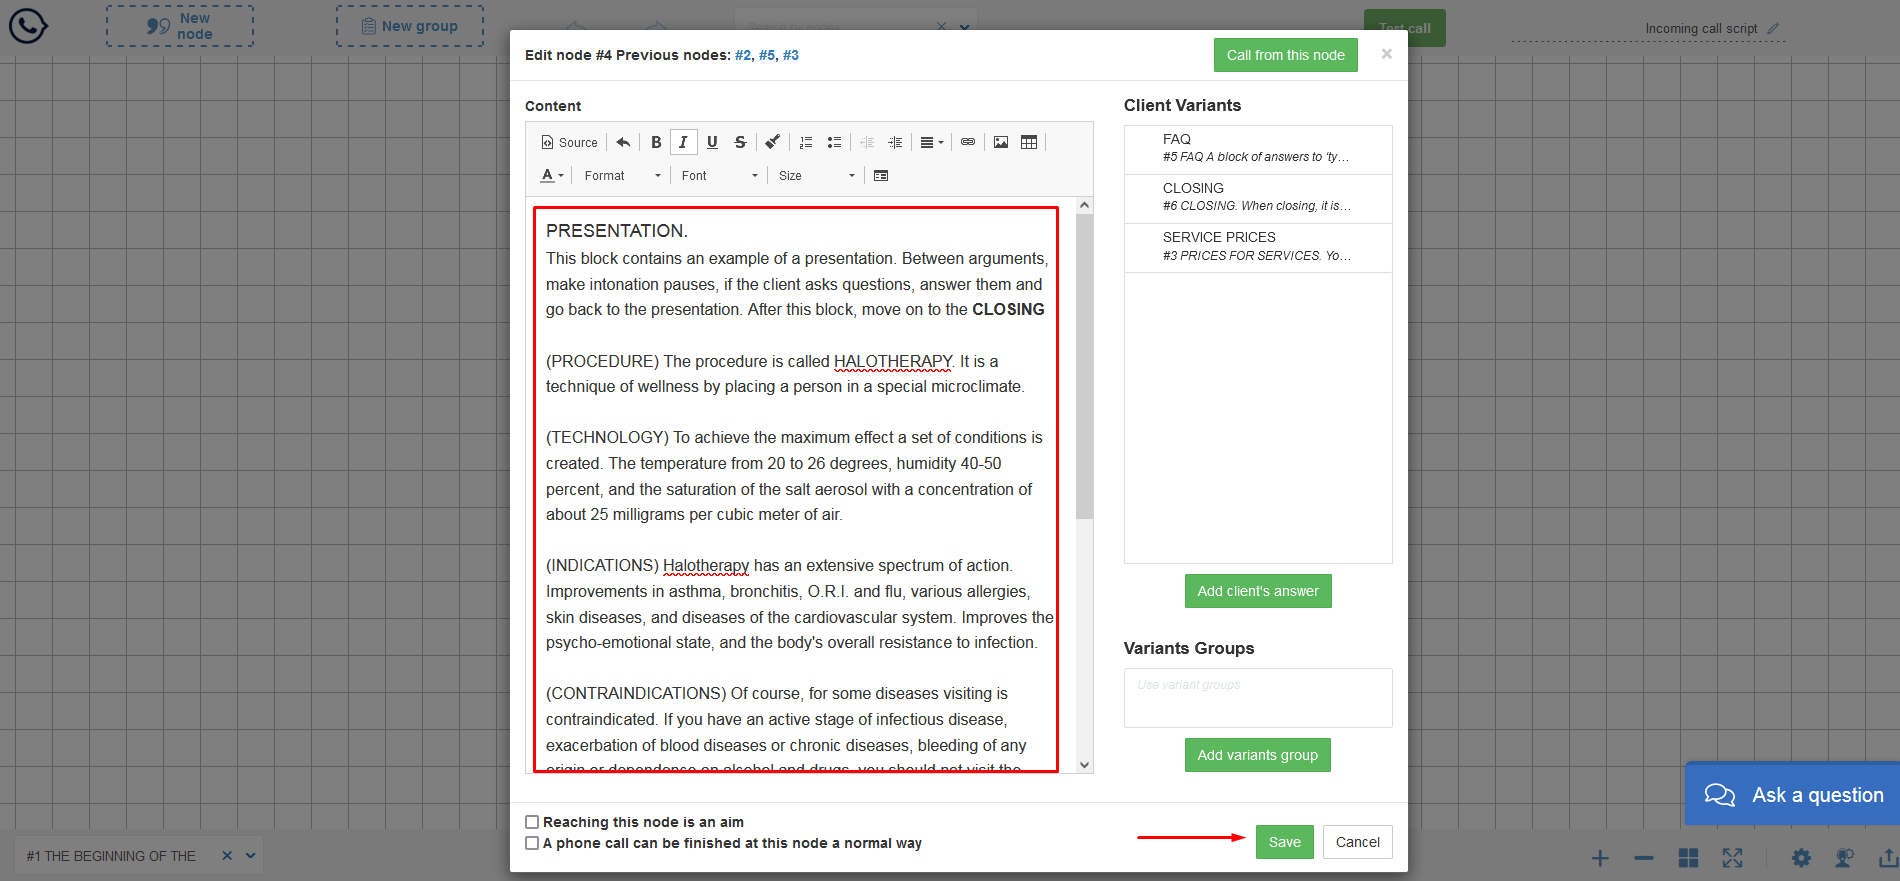
- You can add a customer response in two ways:
- By clicking the (+) "Add client's answer" button in the editor itself, under the operator's text in the node you are interested in.
 - By clicking the (+) "Add client's answer" button in the editor itself, under the operator's text in the node you are interested in.
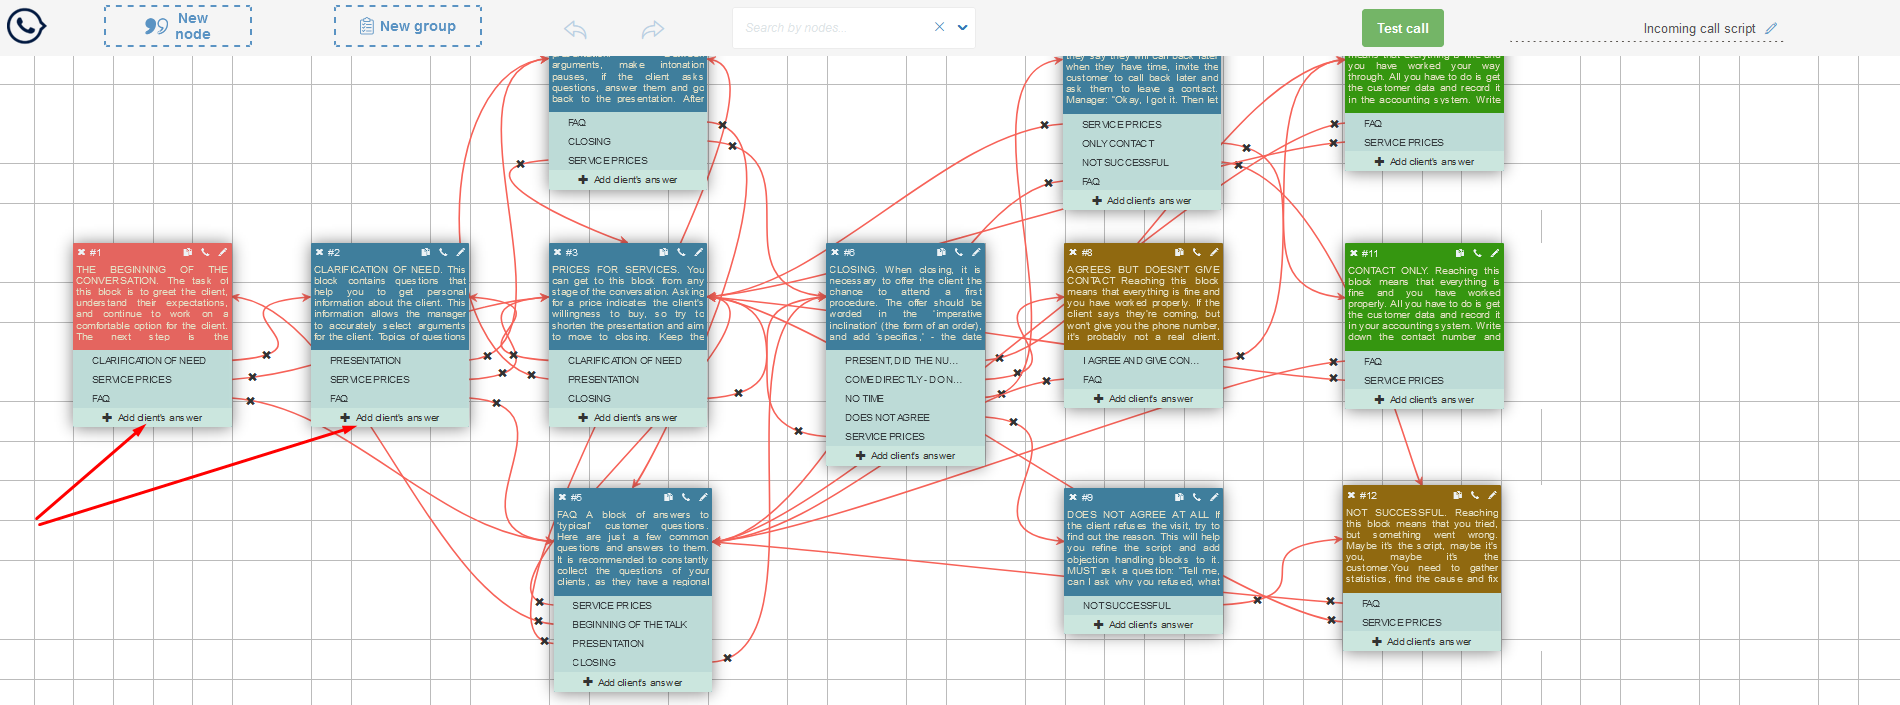
In the modal window that opens, you need to fill in the text field with the client's answer, and select from the list the node or other script to which the client's answer will lead. After clicking the "Save" button, this answer will appear in the script editor and connect two nodes with a red arrow.
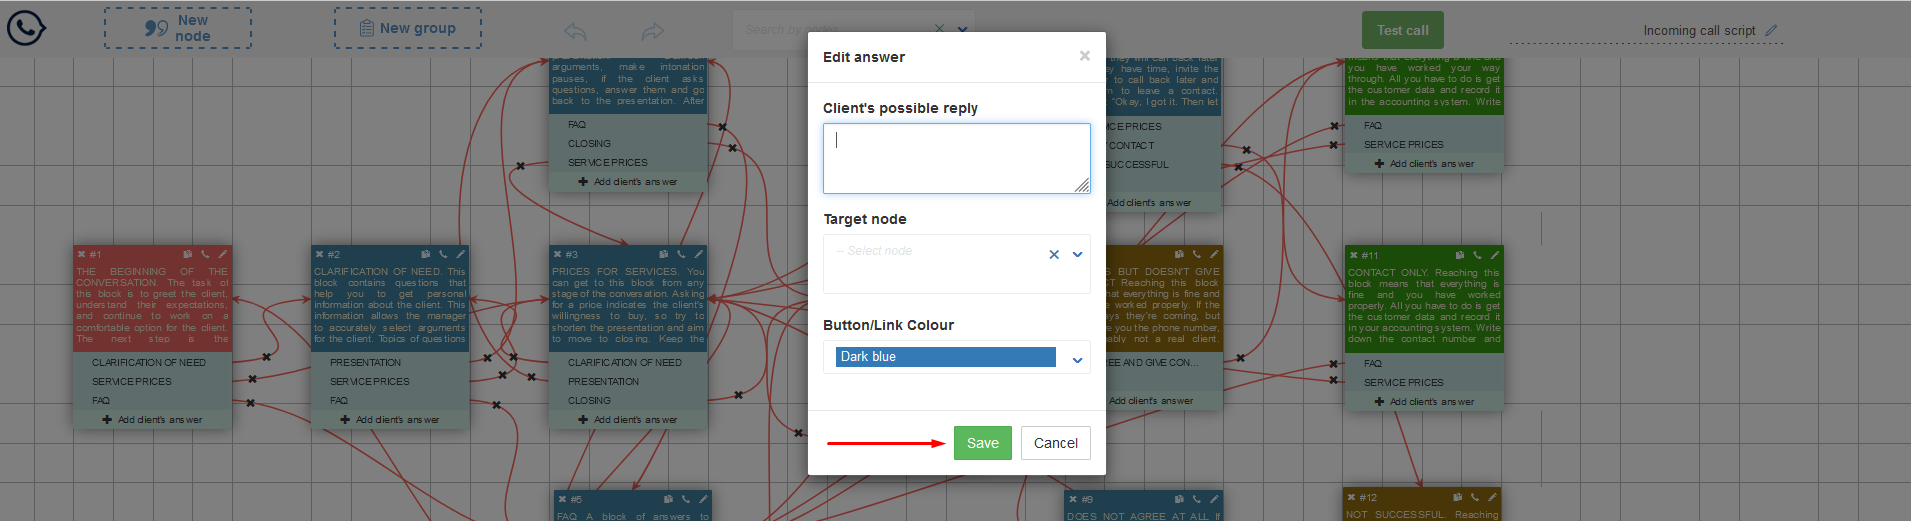
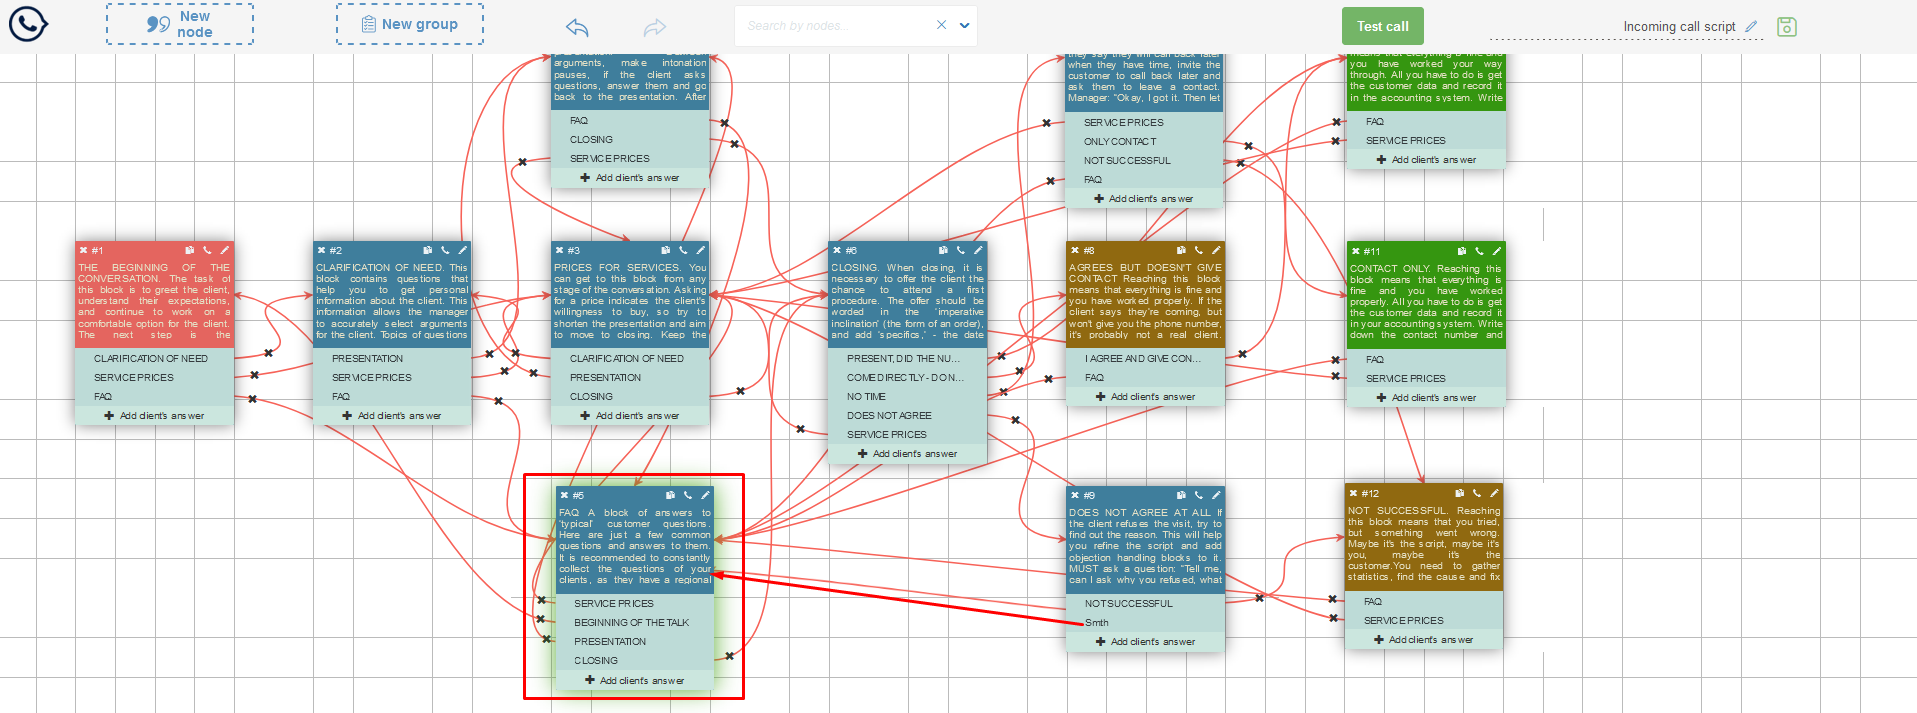
You can not specify the target node/script when creating the response (for example, if you haven't yet created the node to which the answer should lead), but do it using the editor. To do this, click on the center of the client response line and pull the red line to the desired node until the blue part turns green. This means that the connection between the nodes is established.

- It is possible to remove the link between the answer and the node:
- by entering Response Editor mode (the pencil icon to the right of the text in the editor);
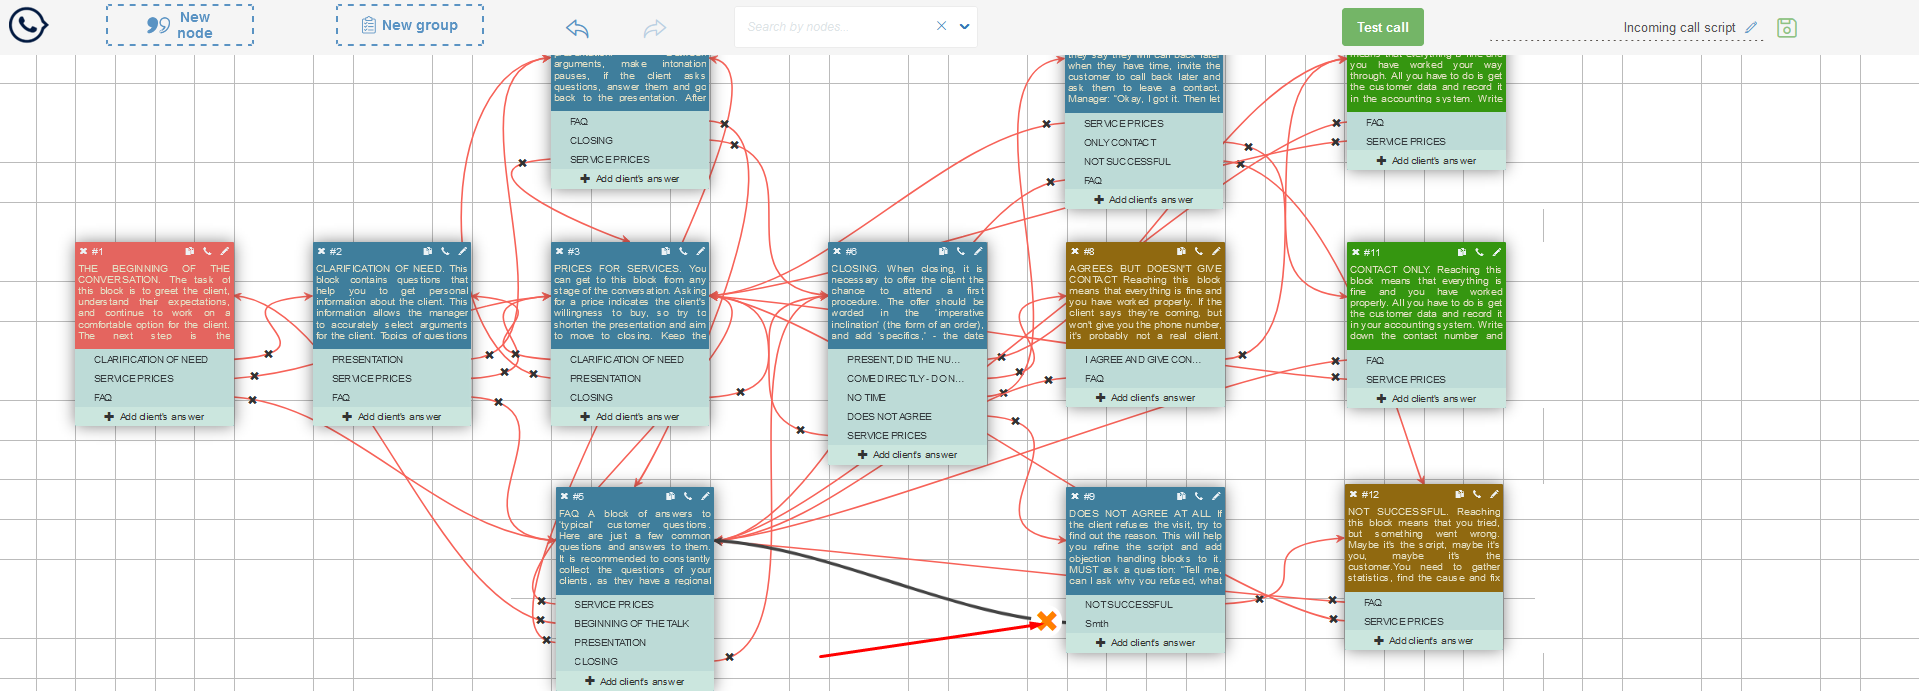
- in the script editor itself by clicking the black cross that links the answer to the node.
-
Response groups are meant for scripting those replies that may be heard at various phases of a discussion (configurable to be presented in several (all) nodes). They are are formed by dragging the "New Group" caption into the editor field. In the edit window of the group you can set its name. Answers are added to the group by pressing the "Add client answer" button. If the "Use in all nodes" checkbox is active, this group of responses will be bound to all nodes of the script.

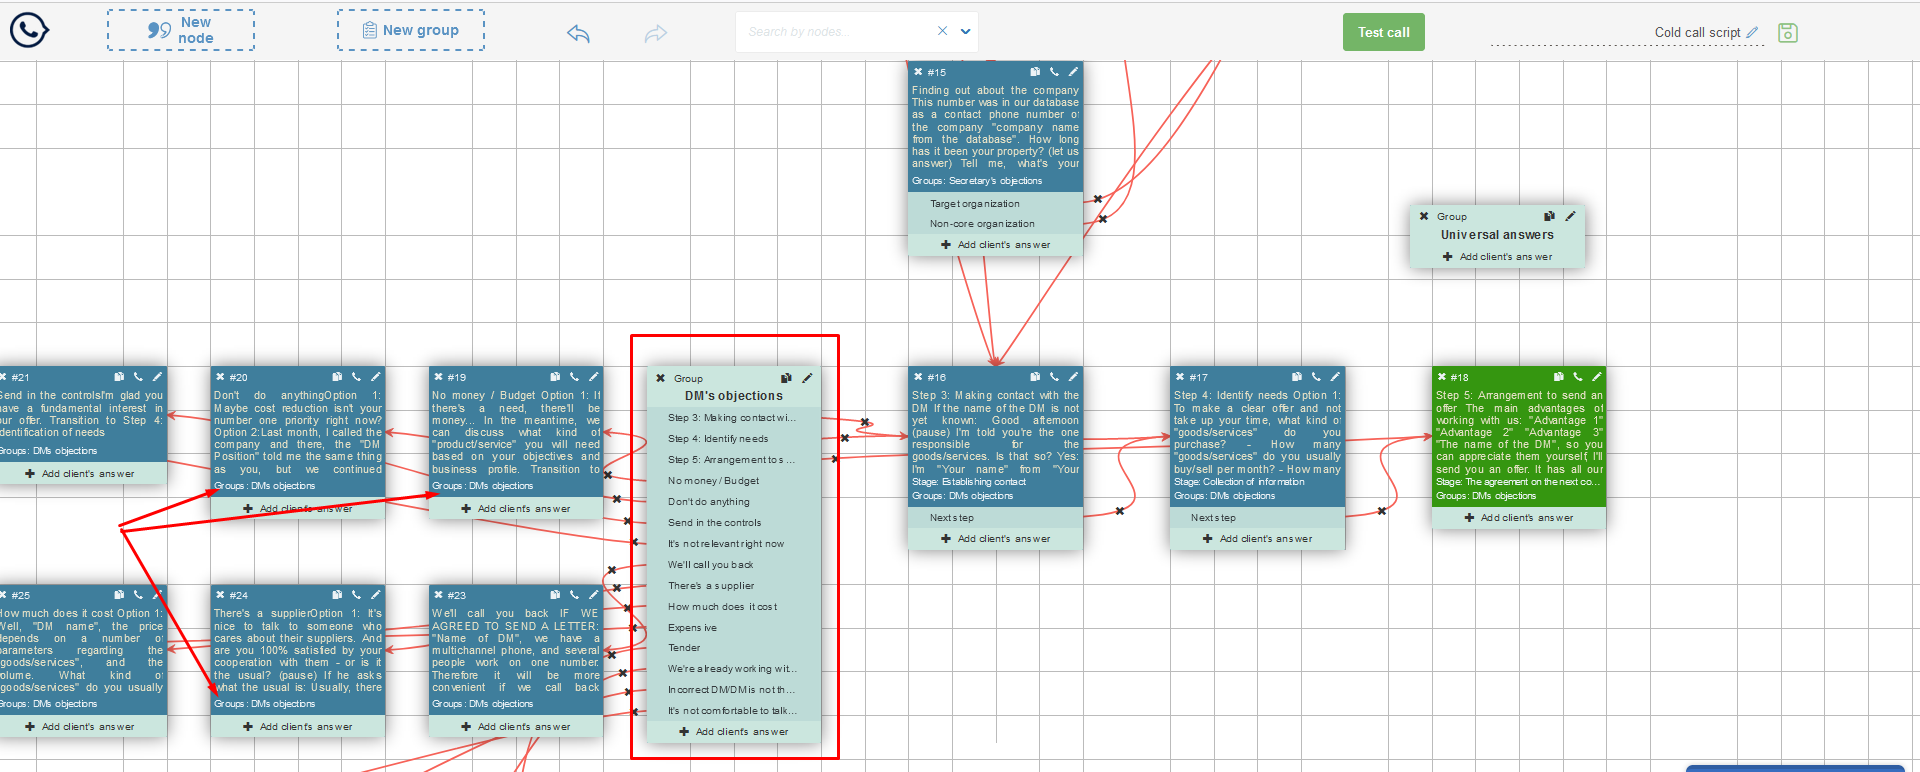
You can link a group of answers to a node by opening the node for editing and selecting the desired answer group for it. Then click the "Save" button.
You can delete a group binding from a node by pressing the "Backspace" or "Delete" key.
-
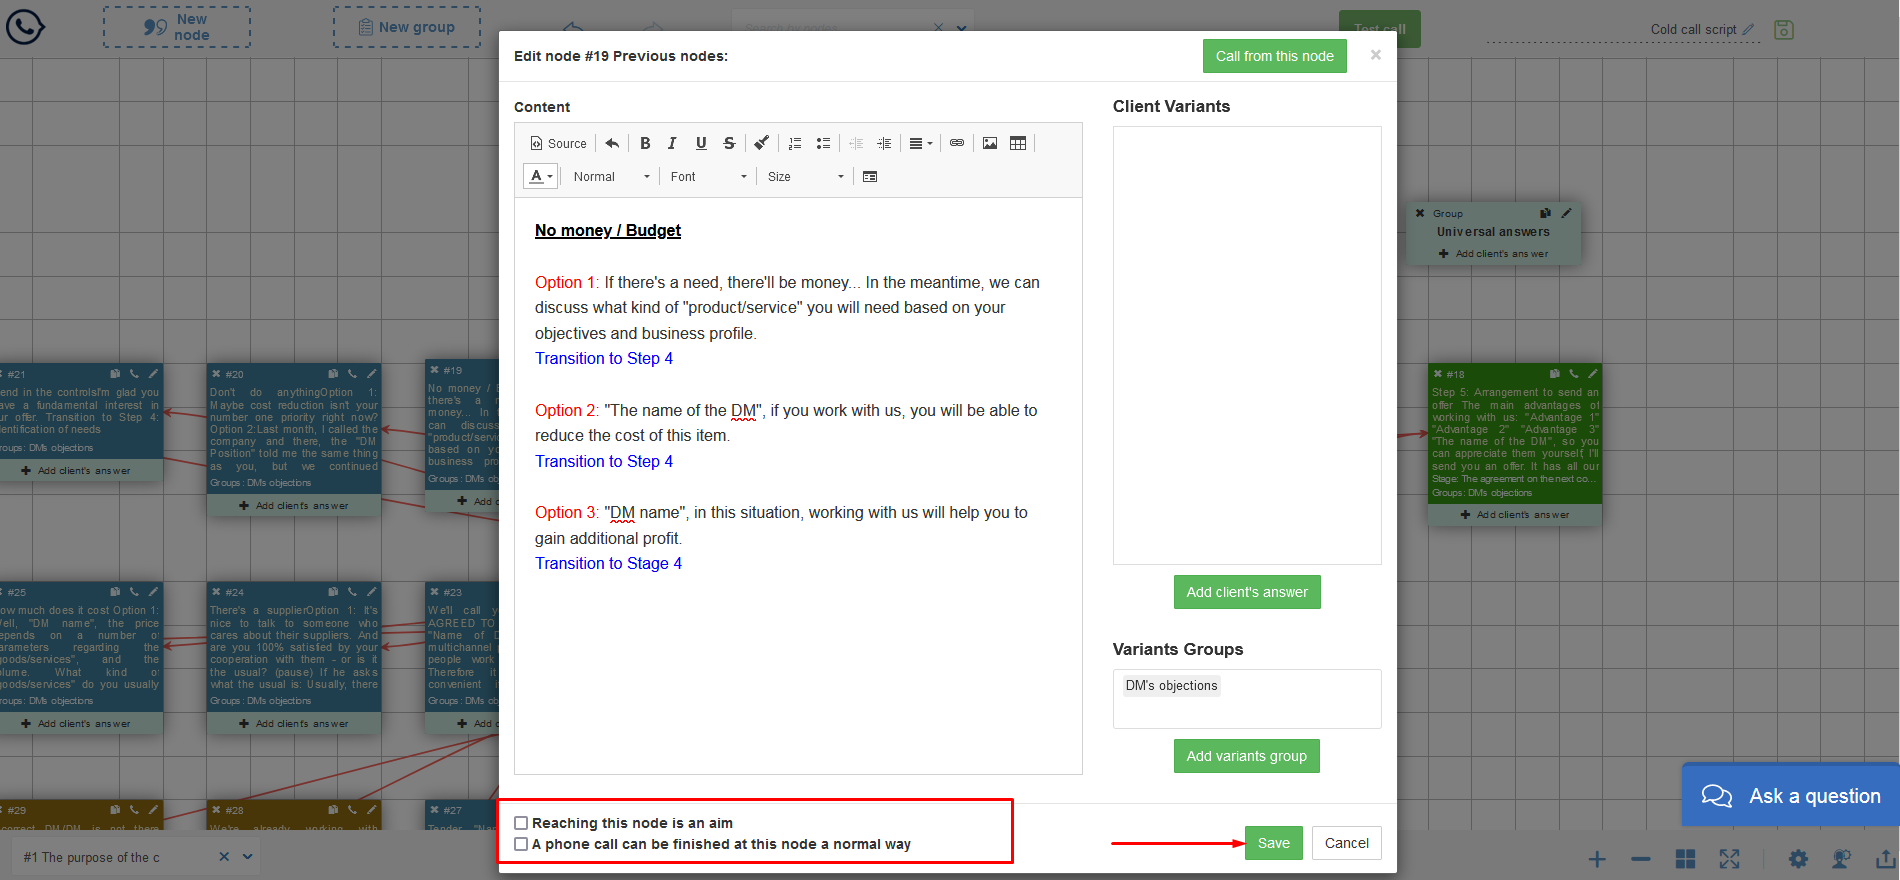
How to mark a node to end a conversation: open the node for editing and to the left of the "Save" button click one of the two checkboxes:
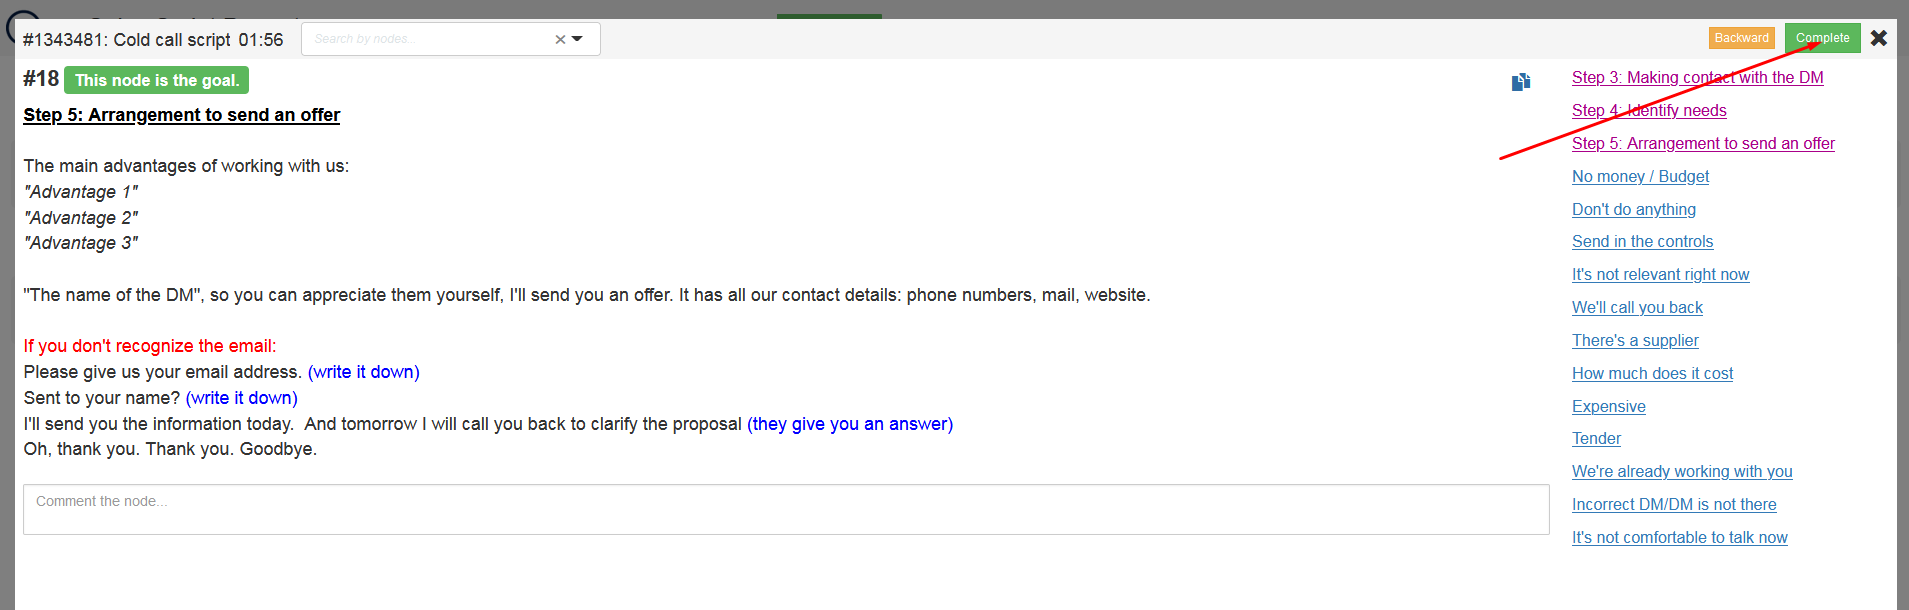
- "Reaching this node is an aim" is the ideal situation when an operator achieves a goal, such as making an appointment with a manager to meet a customer or sending a commercial proposal.
- "A phone call can be finished at this node a normal way" - in this situation there is no goal achievement, but the result is perceived in a regular way (for example, there was a call to new customers, it turned out that you already work with this company).
-
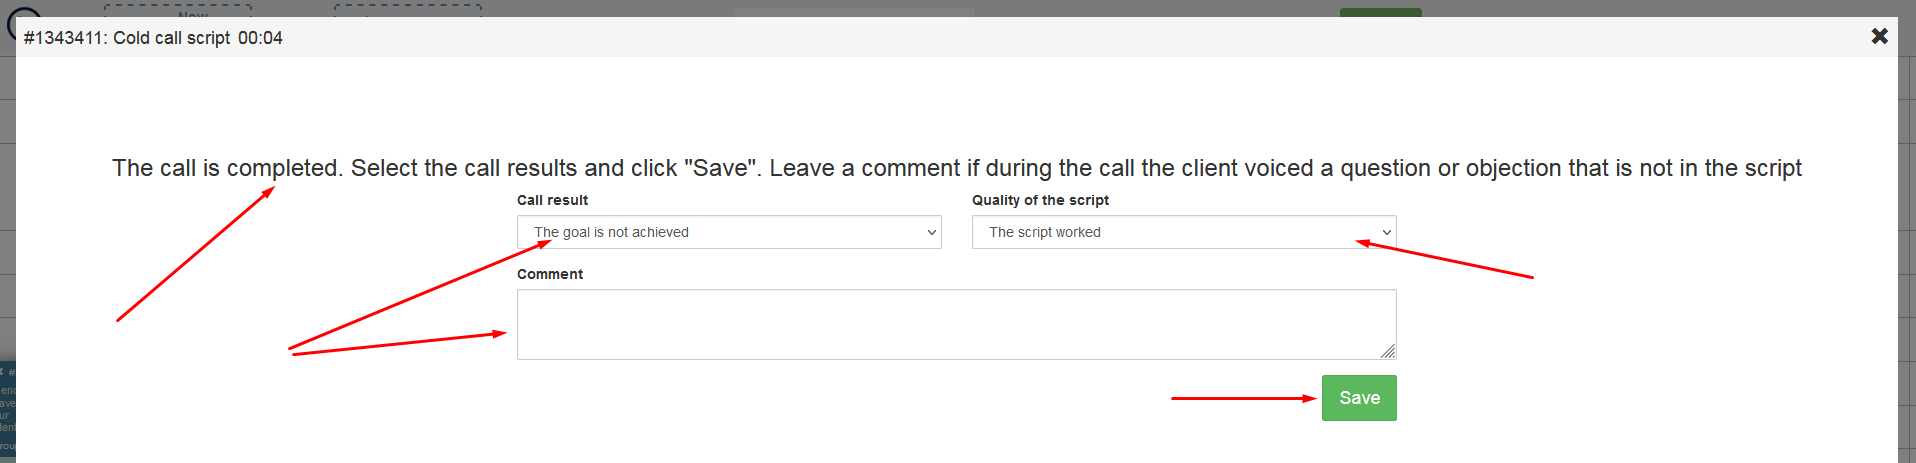
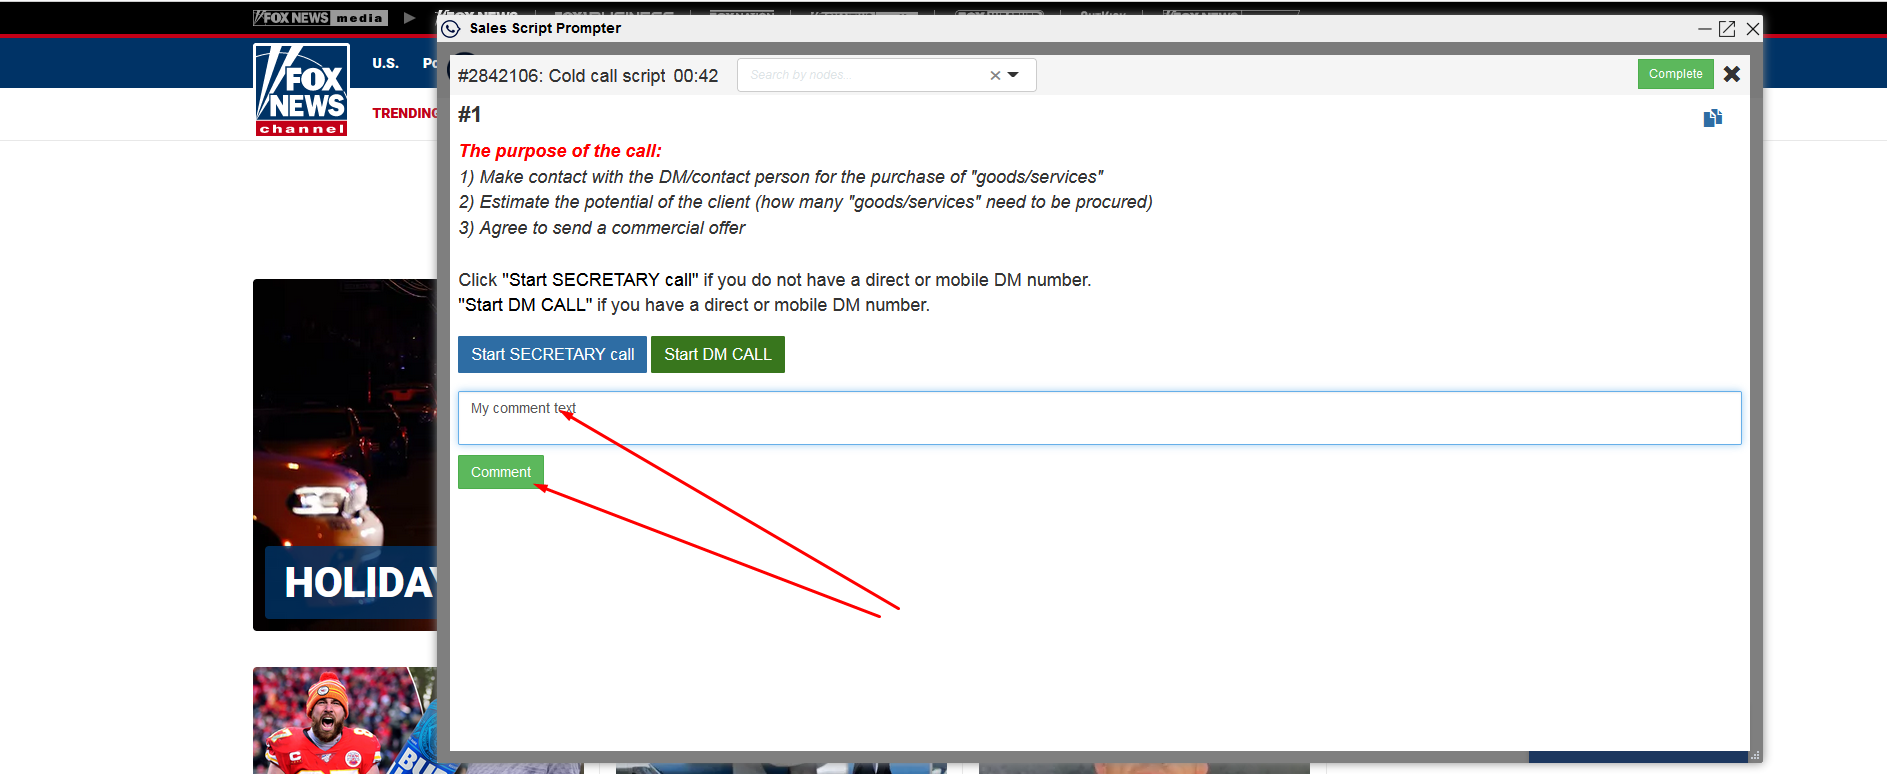
To see the script in action, click the "Test call" button. In the window that opens, click on the "Start call" button. You will see the script in the form in which operators / sales managers will work with it. Click on the customer response options and move on to the next phrases. At the end, click "Complete."

-
The "Call completed" window will be displayed. The results of the call will be displayed here - whether the script worked successfully or broke, whether it reached its goal or not, as well as a field for possible operator's comments.
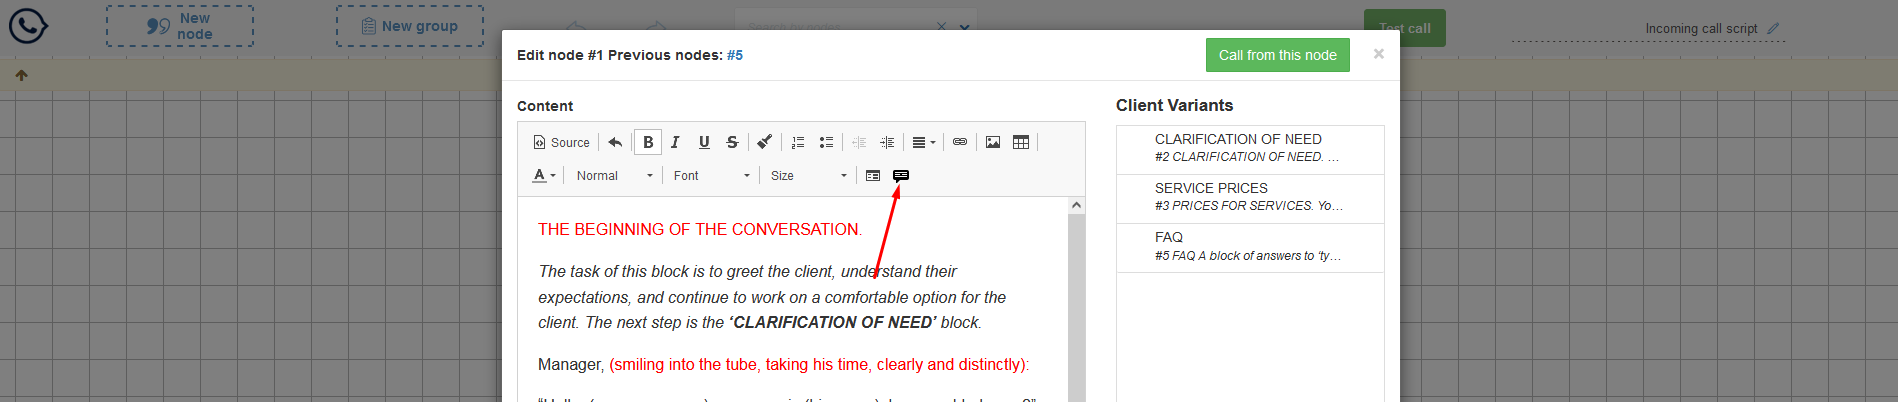
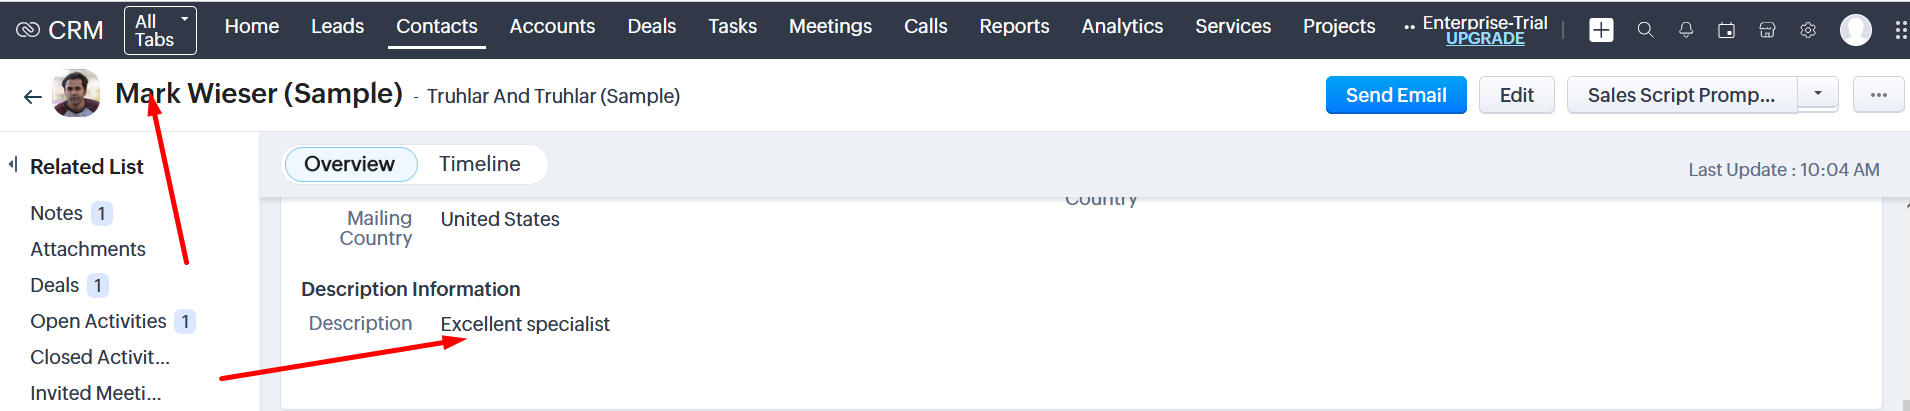
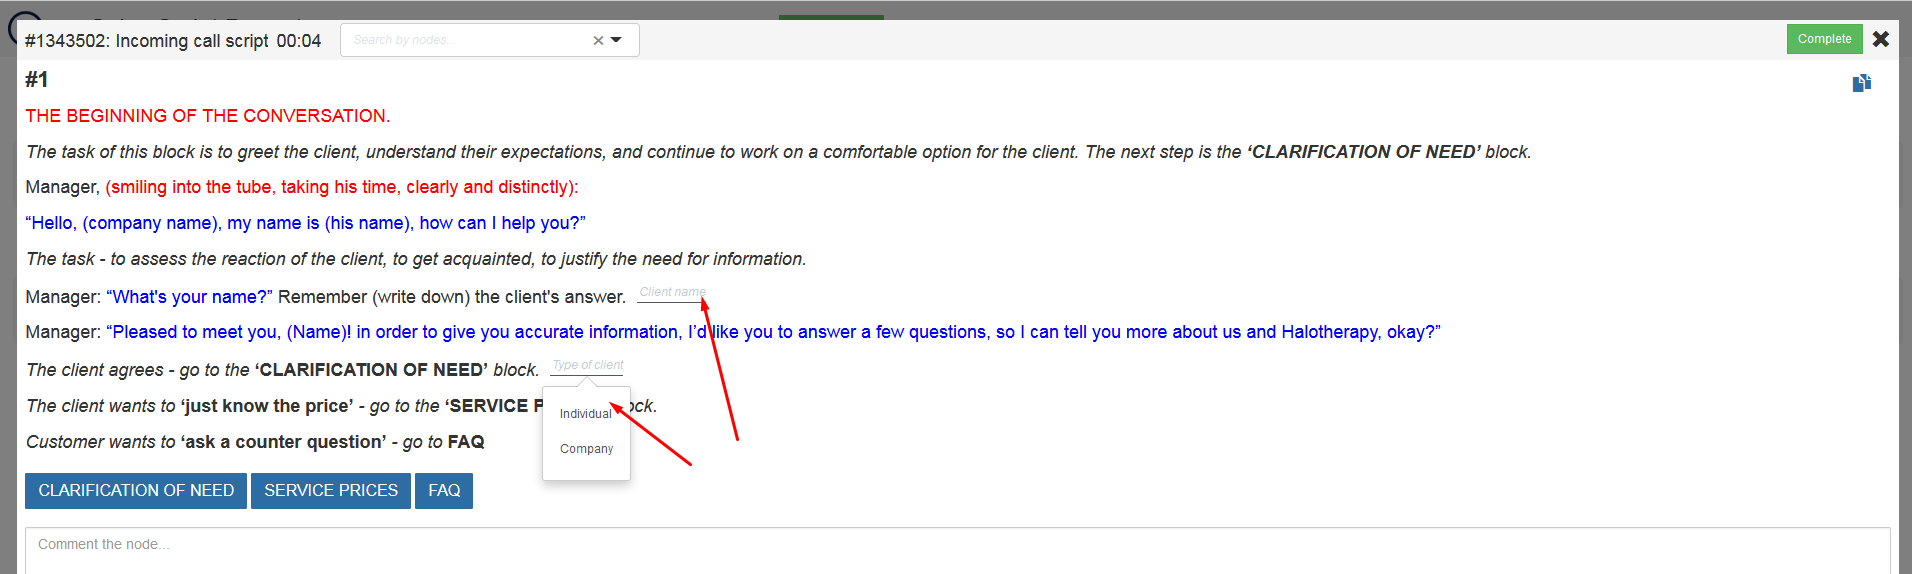
How to insert fields into the script
-
Go to your account, select the script you want to edit and click the pencil button. You will enter script editing mode.
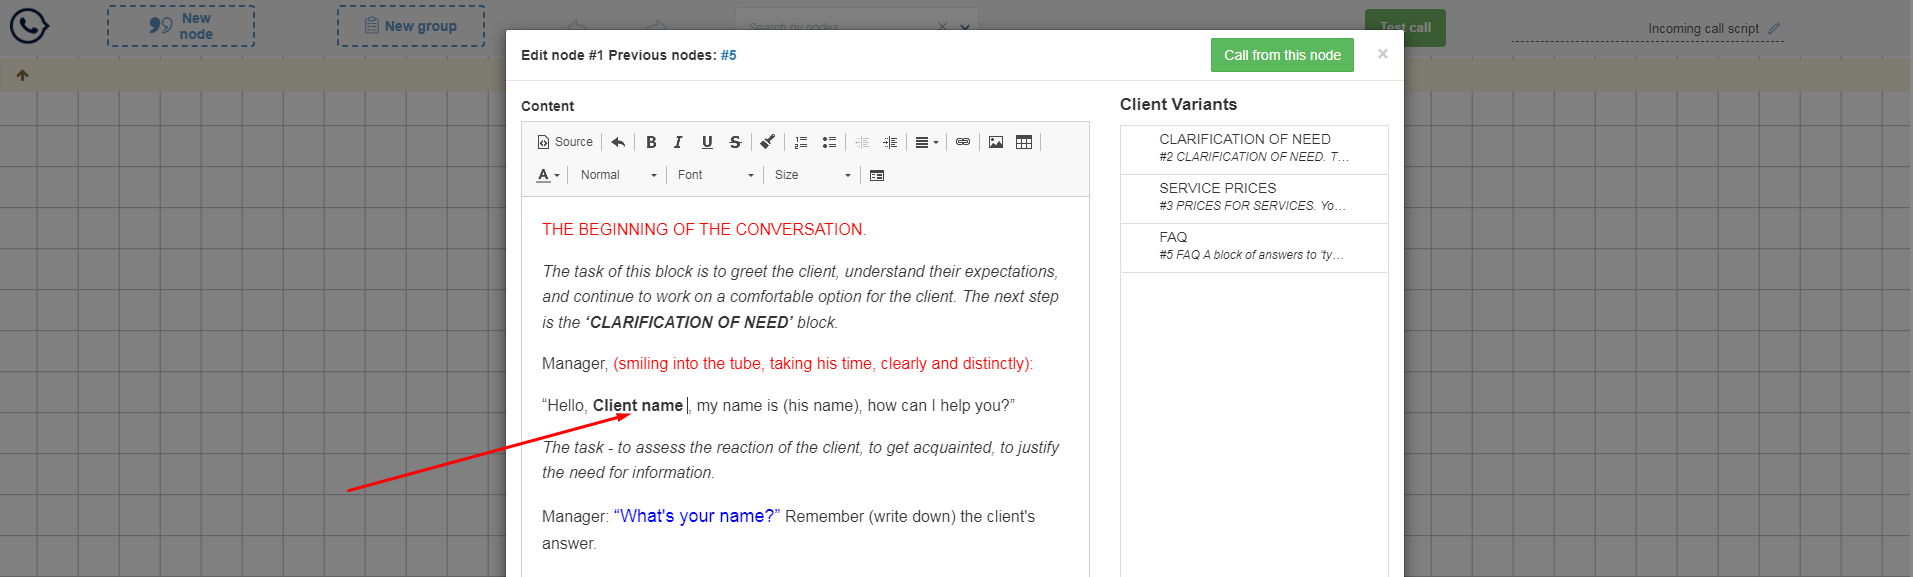
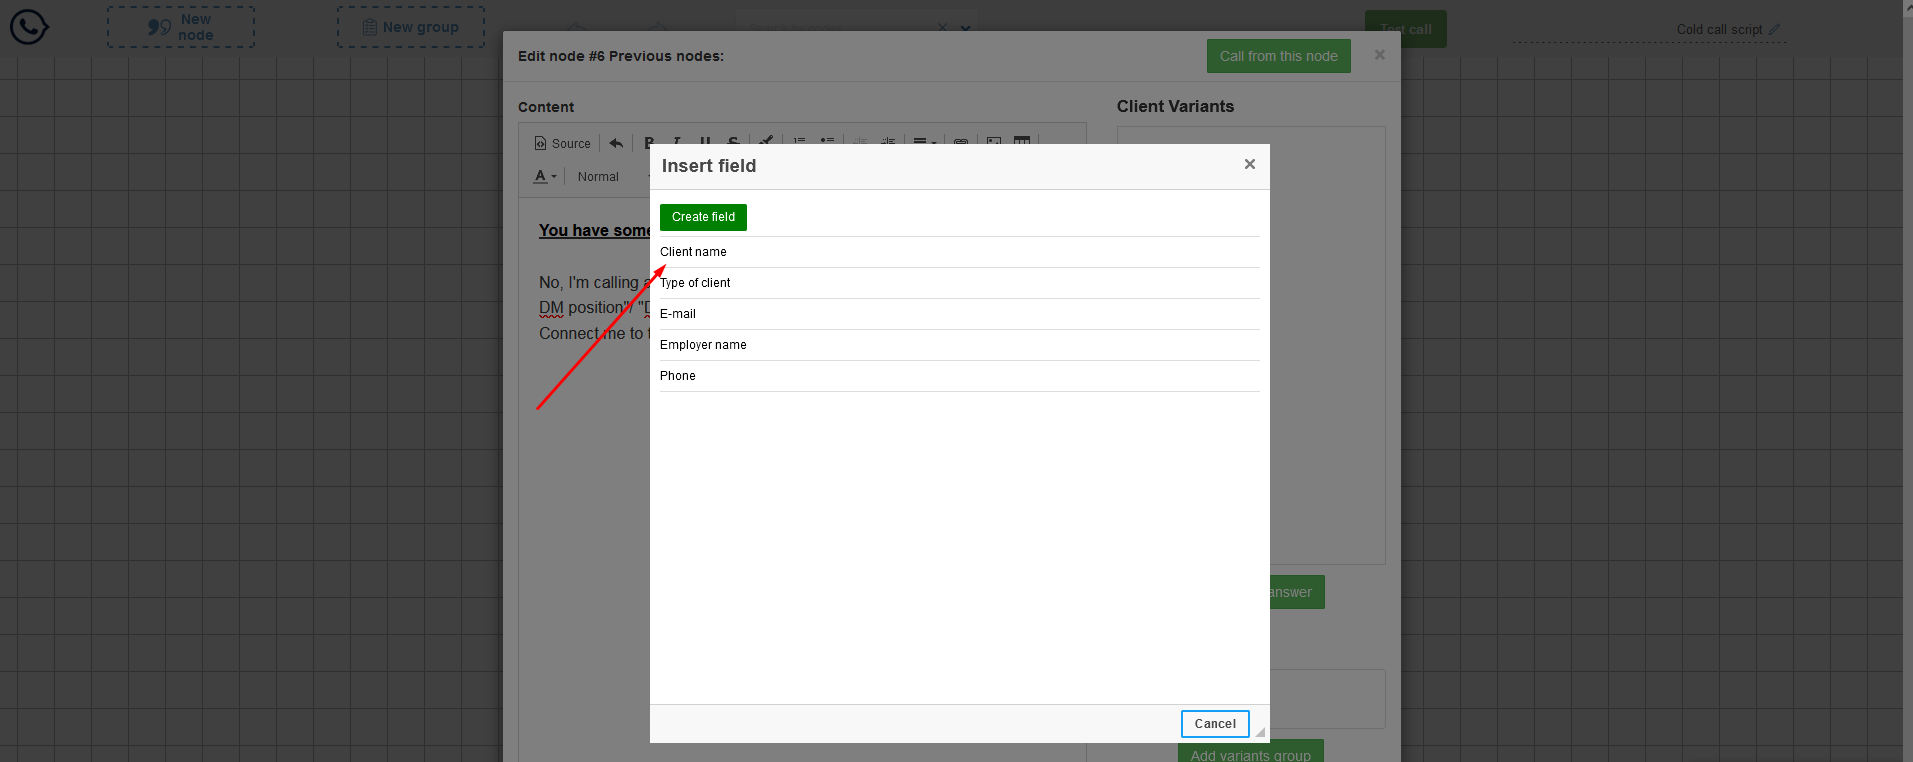
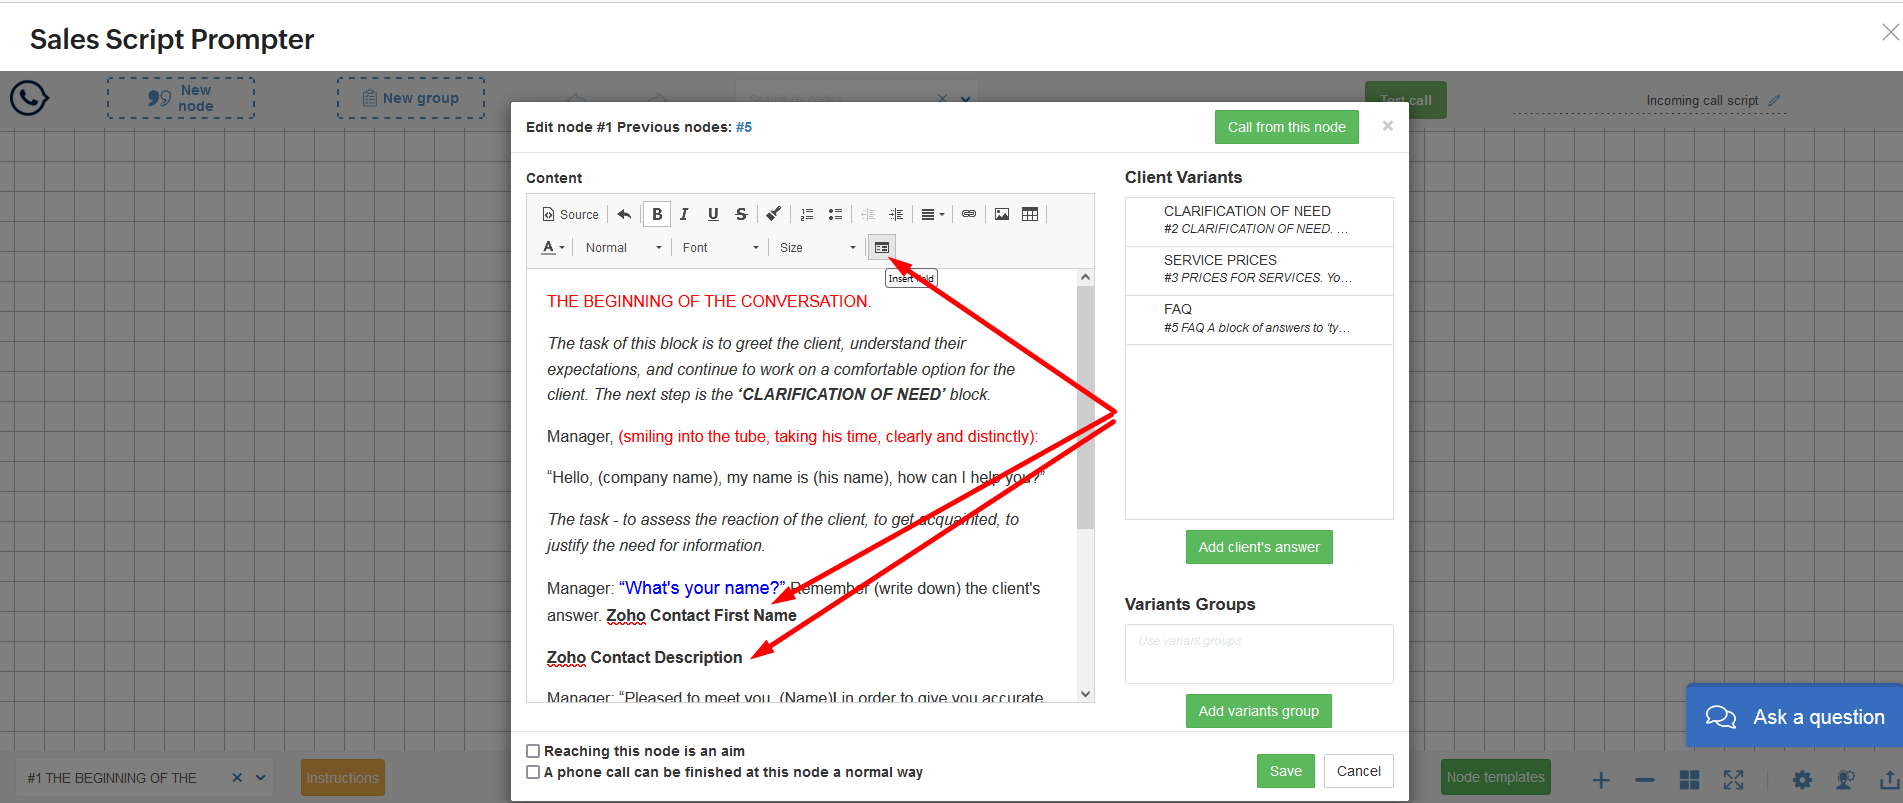
- Open for editing the node where you want to insert the field. Place the cursor on the place where you want to add the field (don't forget the spaces to separate it from the rest of the text visually), and click the Insert Fields button in the Node Editor.
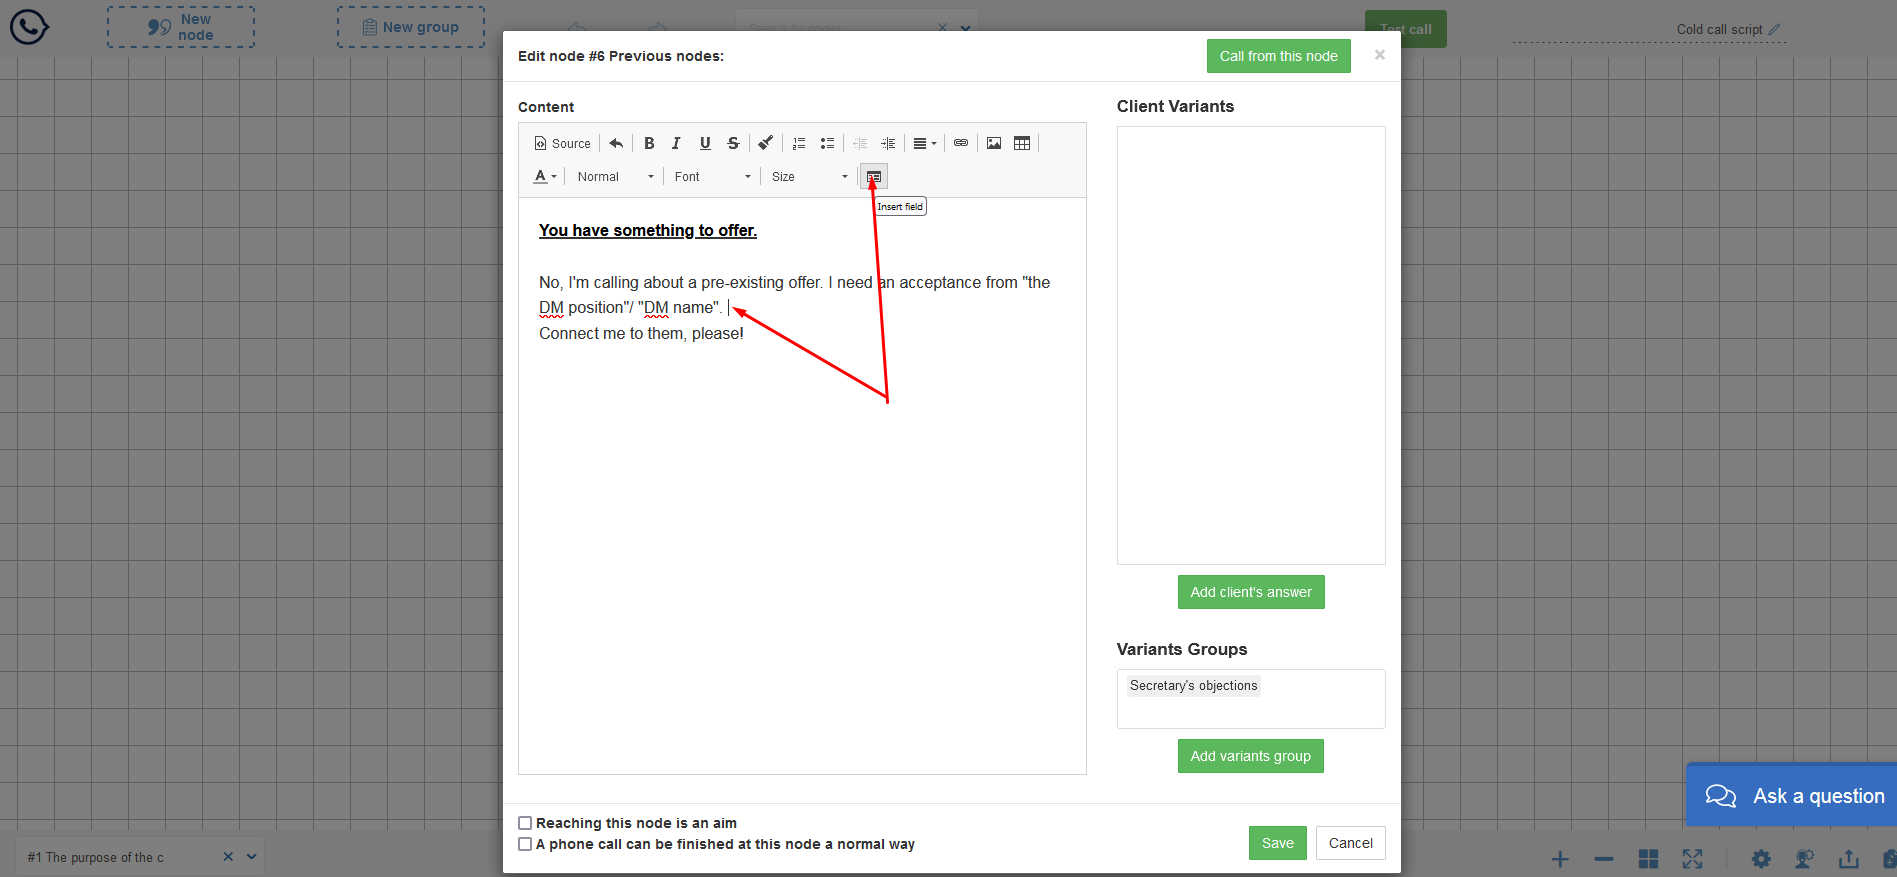
- A modal window opens with a list of custom fields. You can insert the node by clicking on the desired field.
- The field has been added to the node; it will be visible in call mode and open for the operator to populate with information obtained from the client. Don't forget to save the node's modifications.
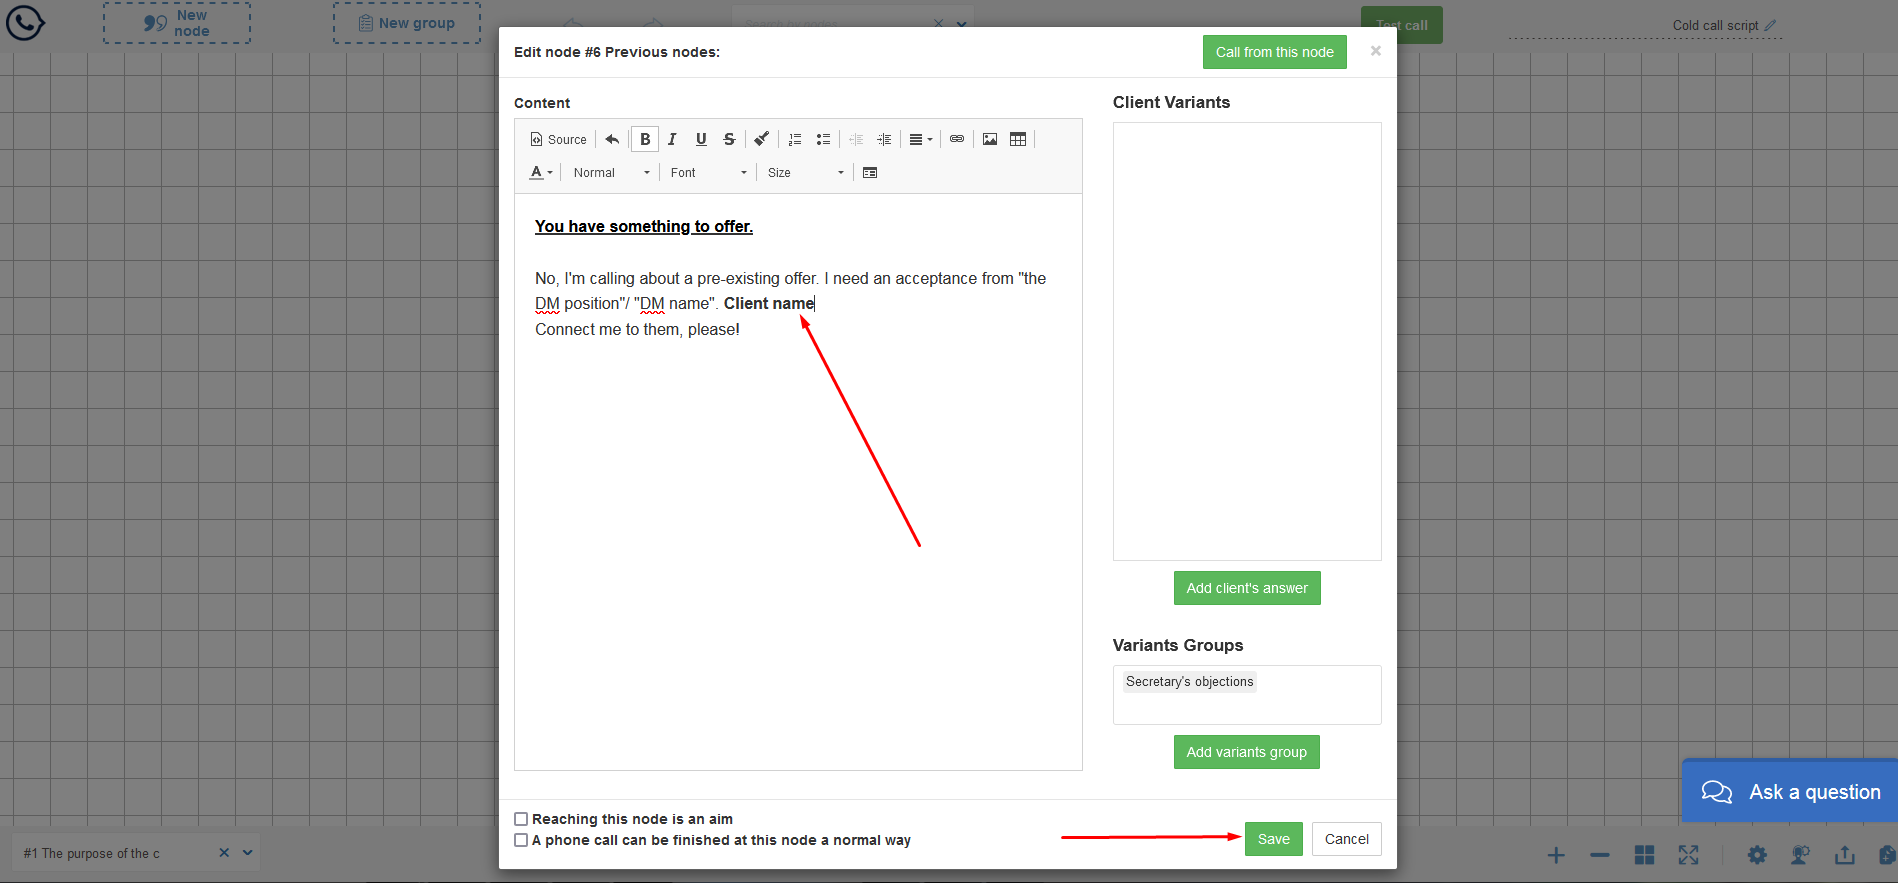
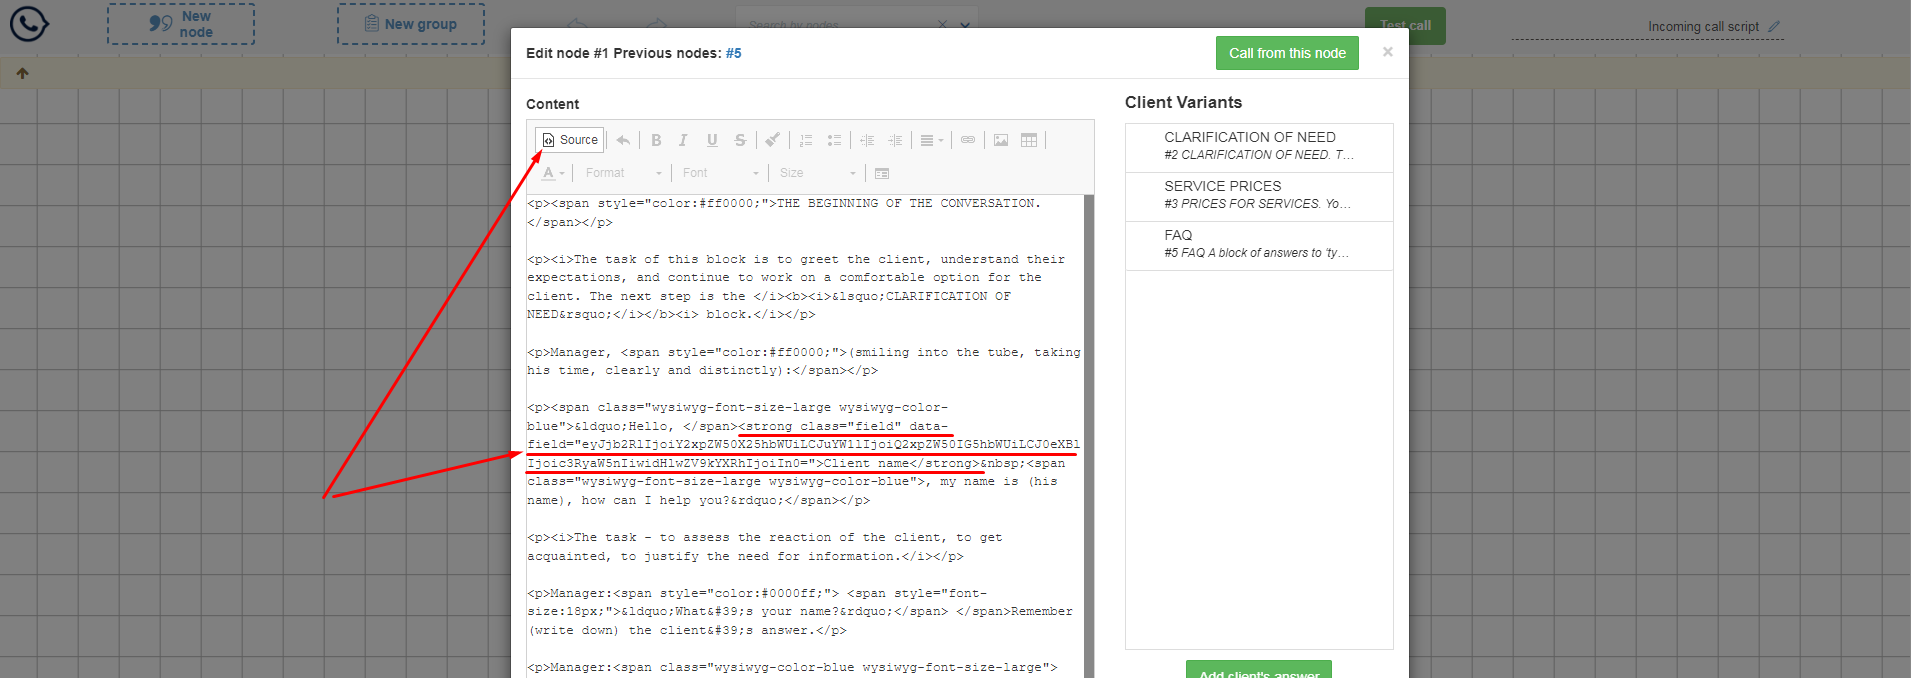
- Please note that when inserting a field into the node editor, you are inserting not just text (which you see on the screen), but code that will be converted into the desired field during a call using the script. Therefore, never insert other words, phrases, or spaces inside the fields.
 If you need to delete an inserted field, select it completely, as even leaving an extra space can disrupt the correct operation of the call script. You can make sure that everything was added/removed correctly by clicking on the code view button. If a field is added, it is framed with "<strong class="field"> .... </strong>" tags on both sides of the field name; if the field is removed correctly, this code should not be in the required part of the node.
Script and call editor settings
-
Go to the editor mode of the script you want. The main settings of the editor and call mode are in the lower right corner. Let's take a closer look at the main settings: Editor mode, call mode, and publishing settings.
-
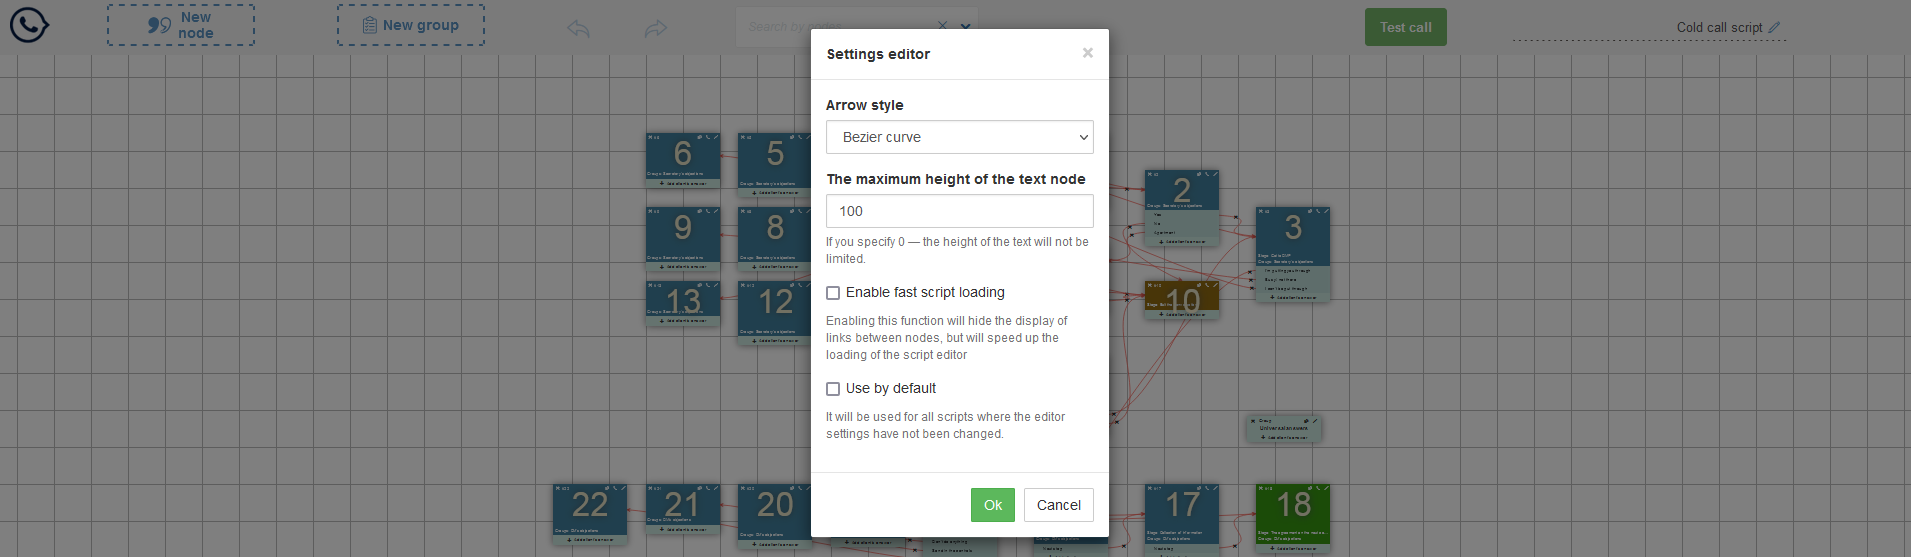
Clicking the cog icon takes you to the Editor Settings menu, where you can set various parameters that will apply to one or all scripts: arrow style, maximum node text height, enabling fast page loading, allowing you to disable drawing arrow links on large scripts in edit mode, which makes the editor load faster. If you activate the "Use by default" checkbox, these settings will apply to all scripts in which you haven't changed any of these characteristics.
-
When you click on the icon of the person with the earpiece, you are taken to the menu for editing the call mode settings.
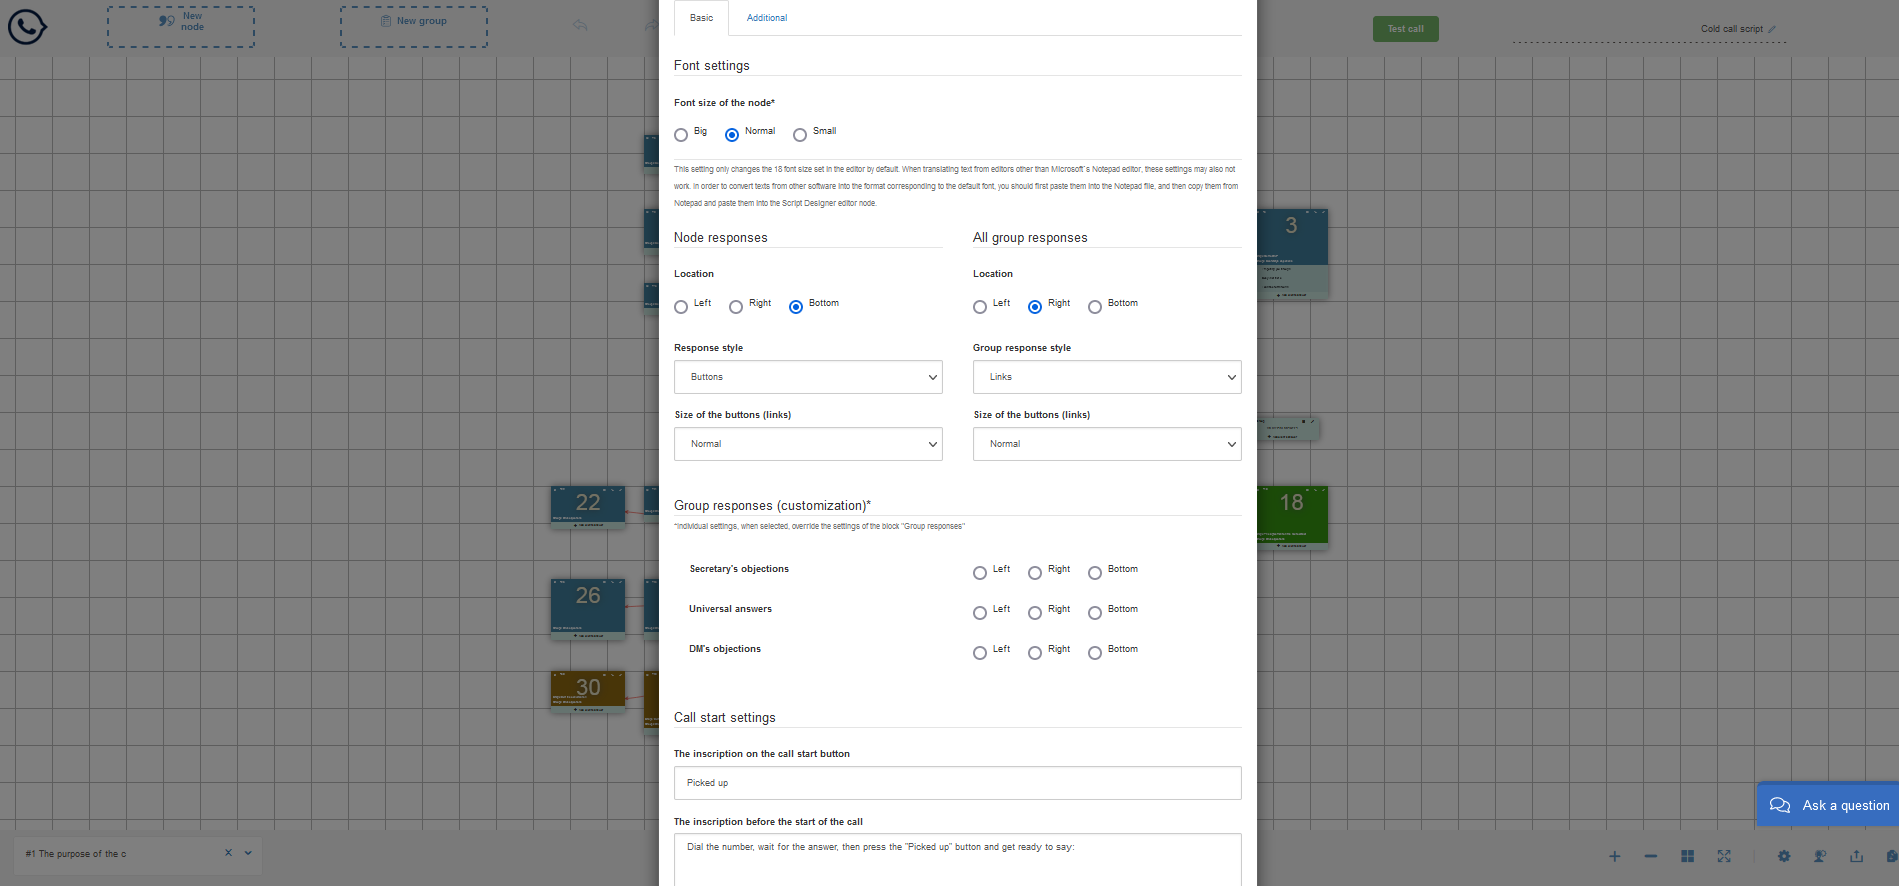 Here you can change the font size of the node displayed in the call mode, the type, style and location of the answers linked to this node and the typical answer groups, set an instructive operator inscription on the start screen before the start of the call. Different groups of calls can be fine-tuned (groups with opposite answer values can be placed on different sides of the node text in the call). In the "Advanced" tab, you can change the order of the answer groups in the call by dragging them with your mouse.

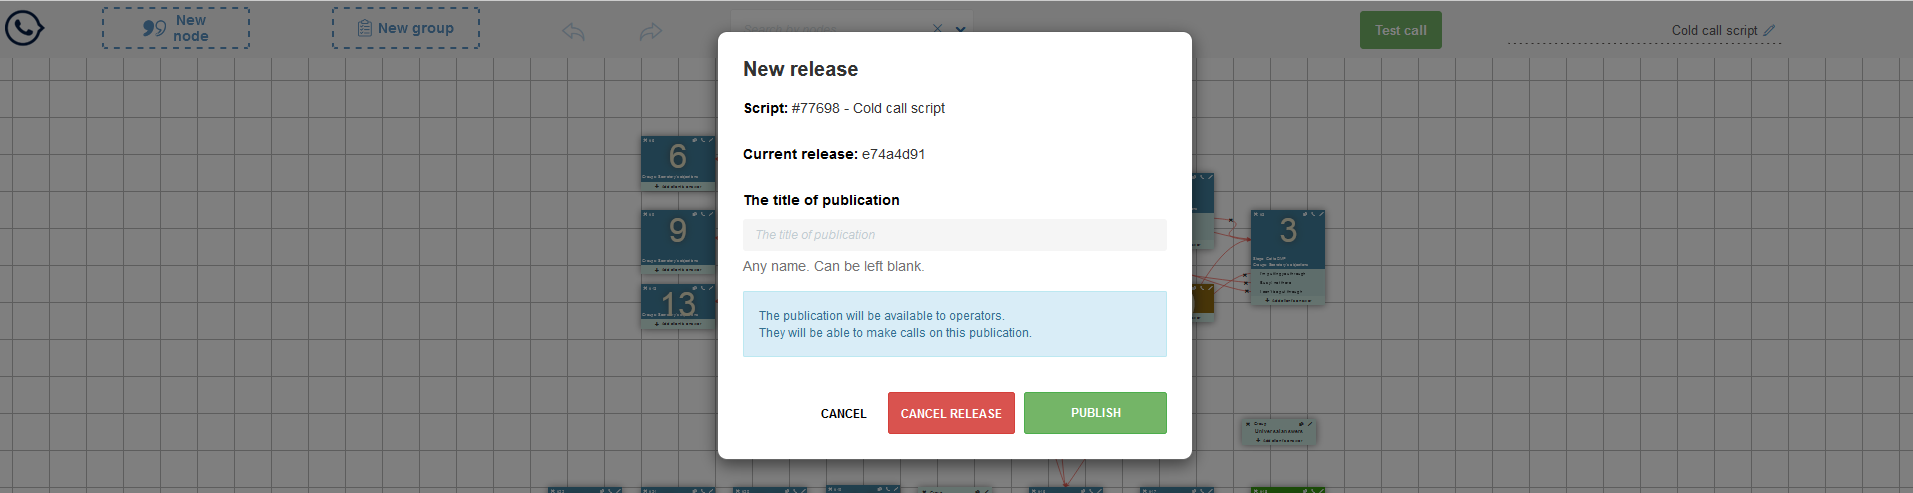
- If you have enabled the option to manually publish scripts in your personal account settings, you will have access to the "New Publication" script publication mode - the last icon in the bottom right corner of the script editor.
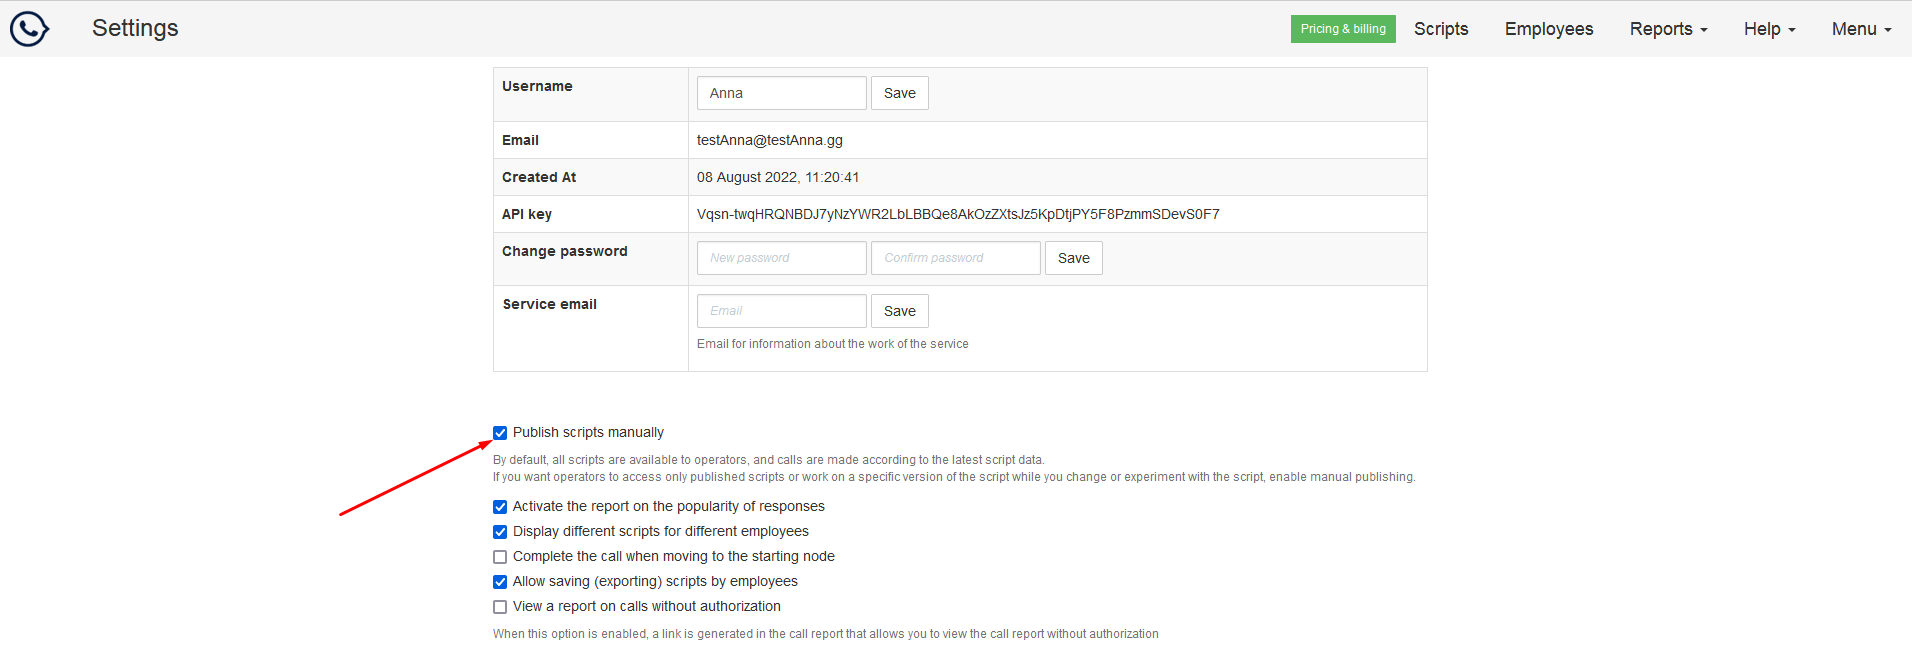 Enabling the "Publish scripts manually" option allows the supervisor or planner to edit the script and the operators to call the last worked out and saved version of the script without inconsistencies and lost connections between different nodes and responses. After the supervisor publishes the script, a new, modified version of the script becomes available to the operators.
- Working with Links in CKEditor 4
To create a link, highlight the desired text and click the "Link" icon (chain link symbol) on the toolbar.
1. External Links (Websites)
On the "Link Info" tab:- Protocol: Select
https://(standard) orhttp://. - URL: Enter the website address (e.g.,
google.com).
- Same Tab: Use
<not set>,_self,_parent, or_top. - New Tab: Select
_blank.
2. E-mail Links
Allows the operator to quickly send an email.- Link Type: Select E-mail.
- Fields: Enter the recipient's address (Yout Email), the subject line, and the message body.
- How it works: When clicked, the system attempts to open your default mail client (Outlook, Mail, etc.). If no agent is configured, the browser will ask you to choose an app manually.
3. Phone Numbers (Tel)
Ideal for mobile users and IP-telephony (softphones).- Link Type: Select Phone.
- Format: Enter the number as
+15551234567.Note: Write the number without spaces, brackets, or dashes, starting with
+. - How it works:
- On Smartphones: Directly opens the dialer.
- On PC: If a calling app is installed (WhatsApp Desktop, SIP client), the browser will prompt to start the call. If nothing is configured, it may attempt to open a blank tab.
Pro Tips
- Verification: Always test your links in "Call Mode" or "Preview" after saving.
- Missing Text: If you didn't highlight text before clicking the icon, type it into the "Display Text" field at the top of the settings window.
- Protocol: Select
- Working with Tables
To insert a table, click the "Table" icon (grid symbol) on the toolbar.1. Creation and Basic Settings
In the "Table Properties" window, you can set:- Rows and Columns: Enter the required amount.
- Width: Set in pixels (e.g.,
500) or percent (e.g.,100%) for a responsive layout. - Headers: Choose to highlight the first row or column (for data labels).
- Caption: A title that appears directly above the table.
2. Design and Spacing
- Border size: Thickness of the lines. Set to
0to make the grid invisible. - Cell spacing: Space between individual cells.
- Cell padding: Space between the cell border and the text inside.
3. Editing an Existing Table
Right-click anywhere inside the table to access the context menu:- Row: Insert row before/after or delete row.
- Column: Insert column before/after or delete column.
- Cell: Merge selected cells or split them.
- Table Properties: Return to the size and border settings window.
Creating and Importing Custom Fields
How to create fields
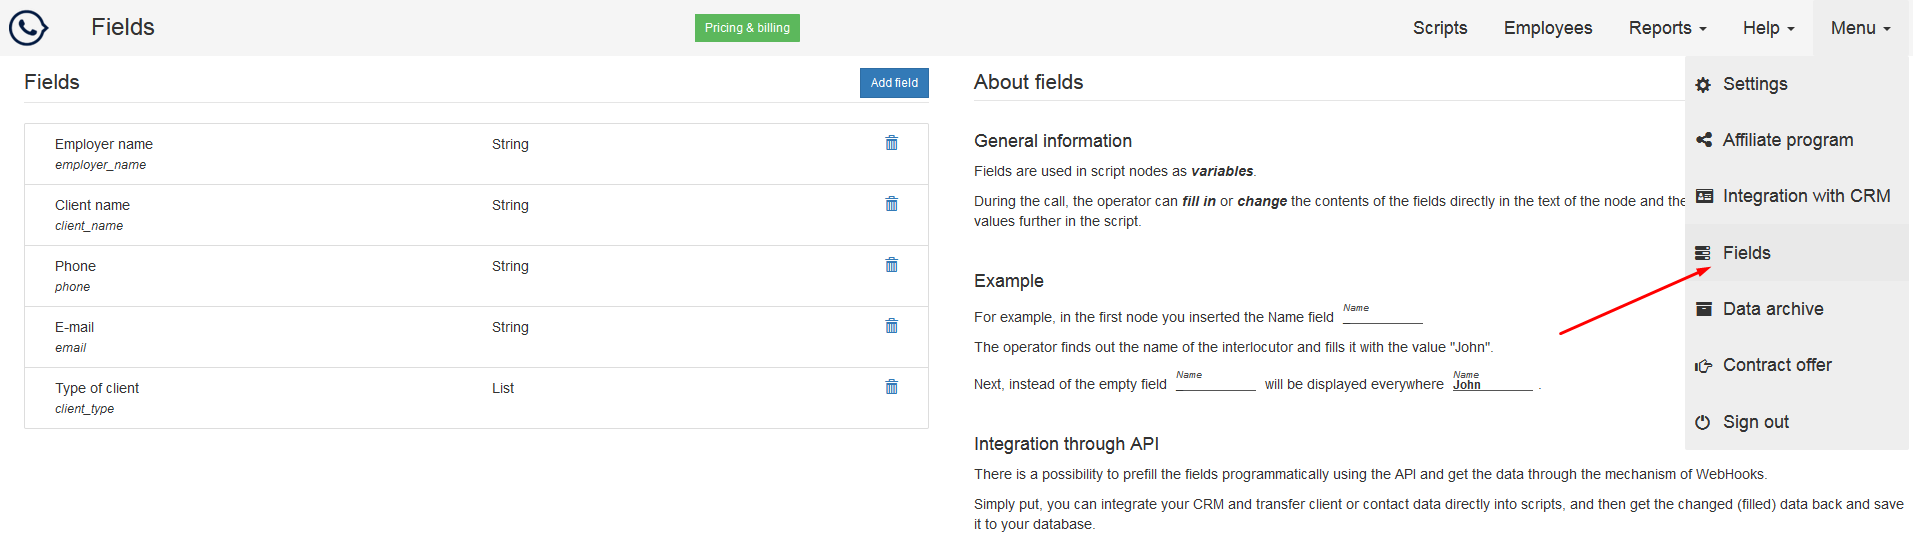
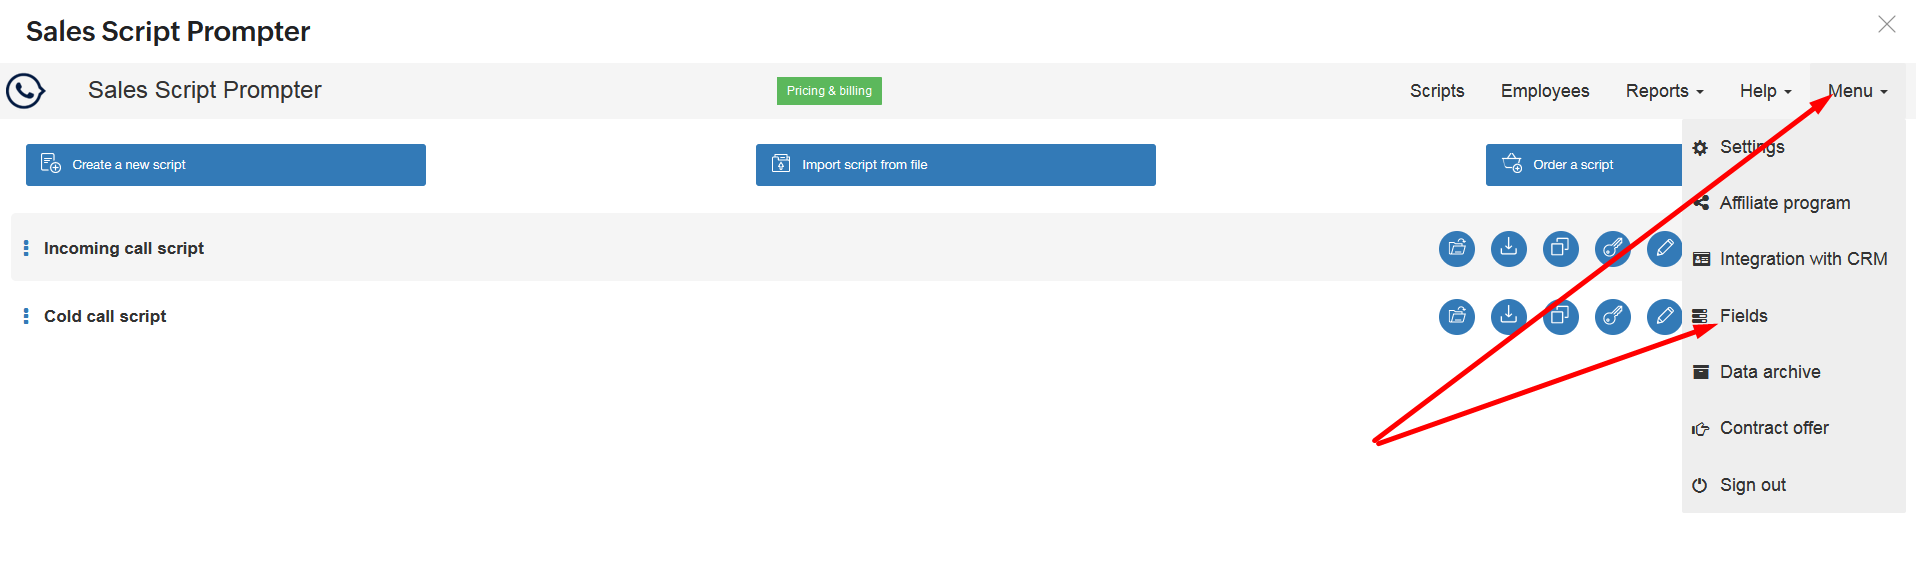
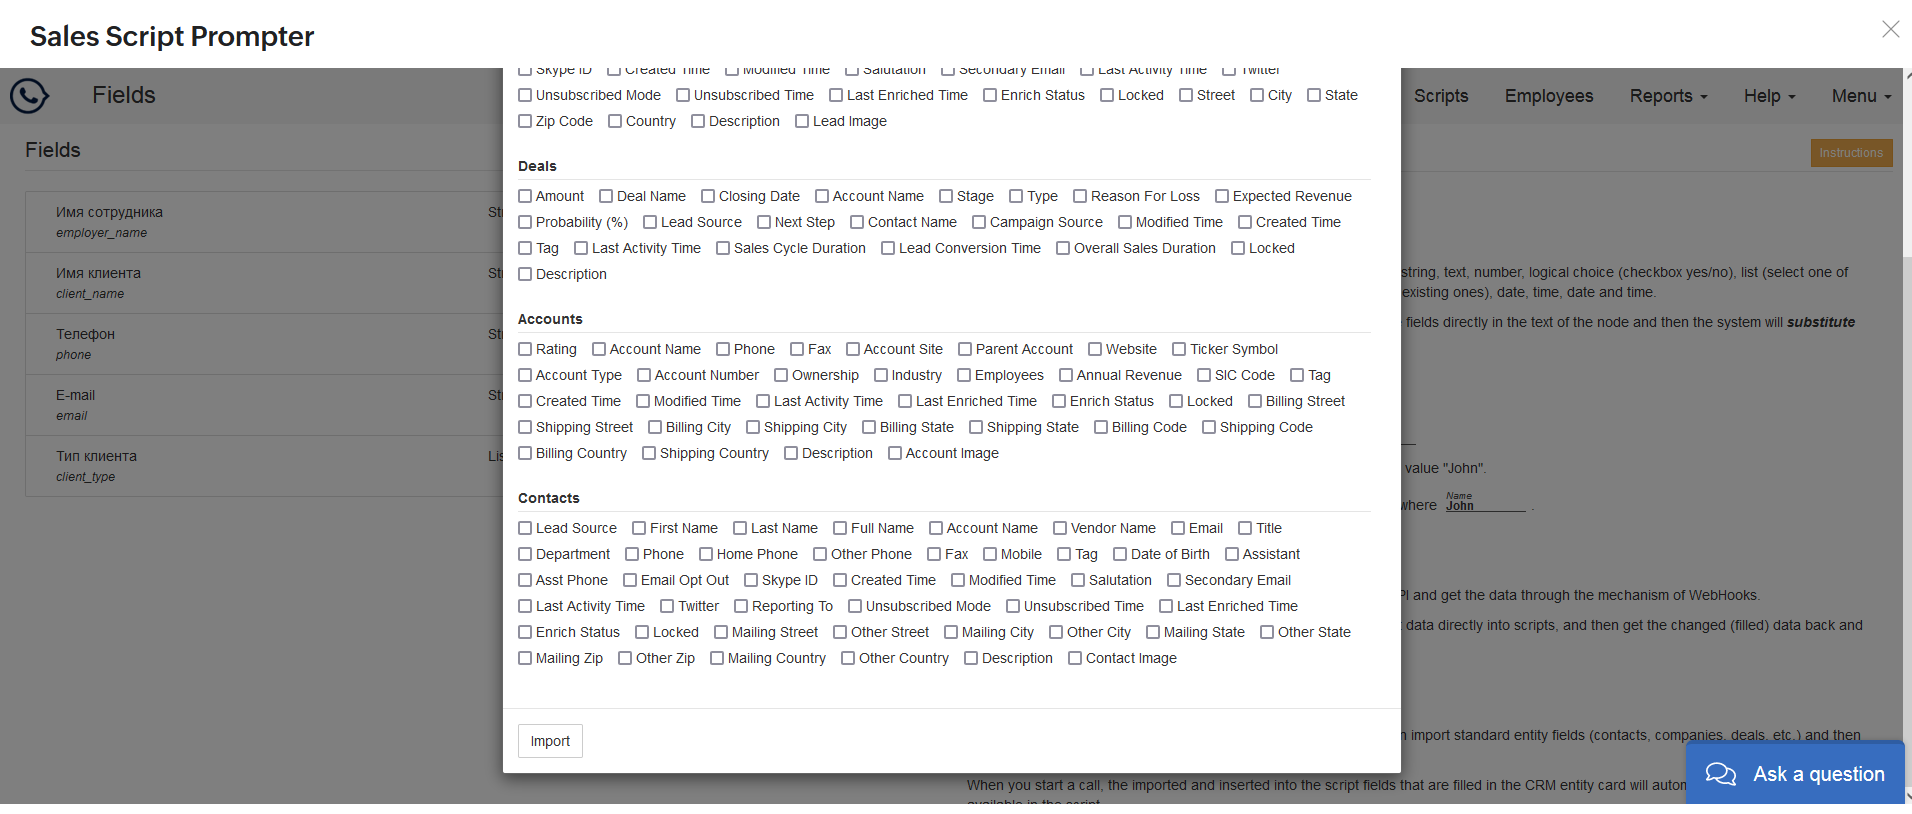
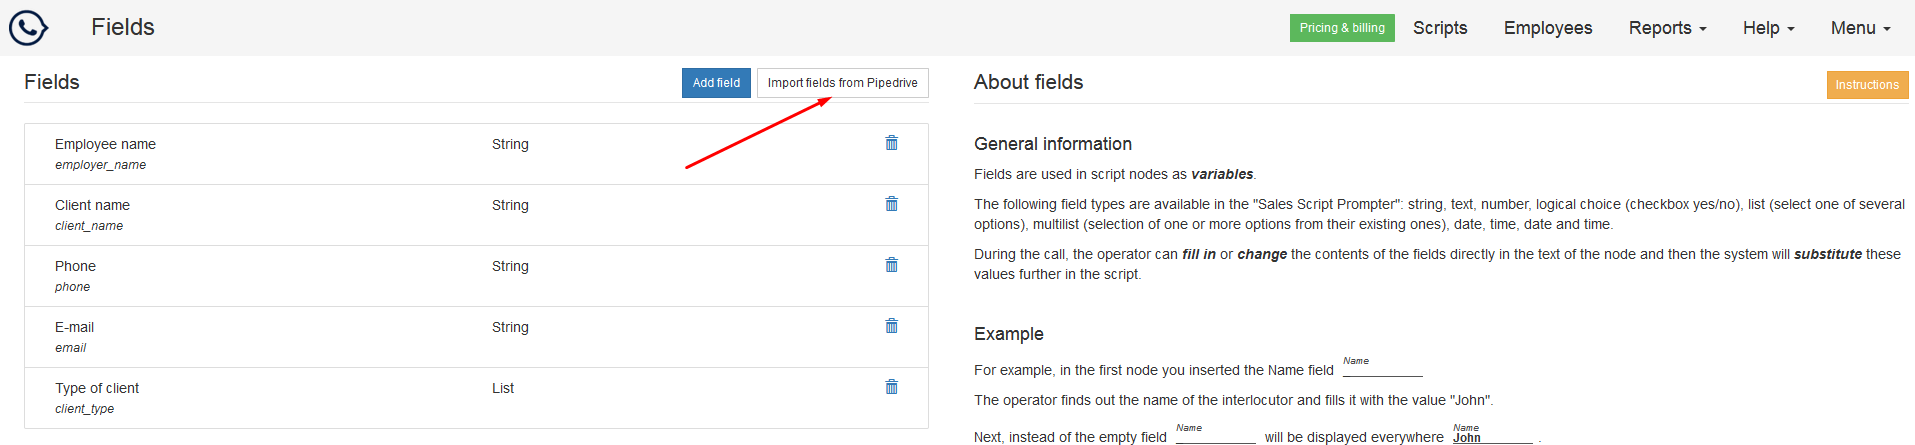
- Custom fields are designed to work efficiently with the script and save data about the client with whom the operator was talking. When you create an account, 5 fields will be automatically created for you, which you can insert in the necessary nodes of your script. To add one or more fields, you need to go to your account and go to Menu -> Fields.
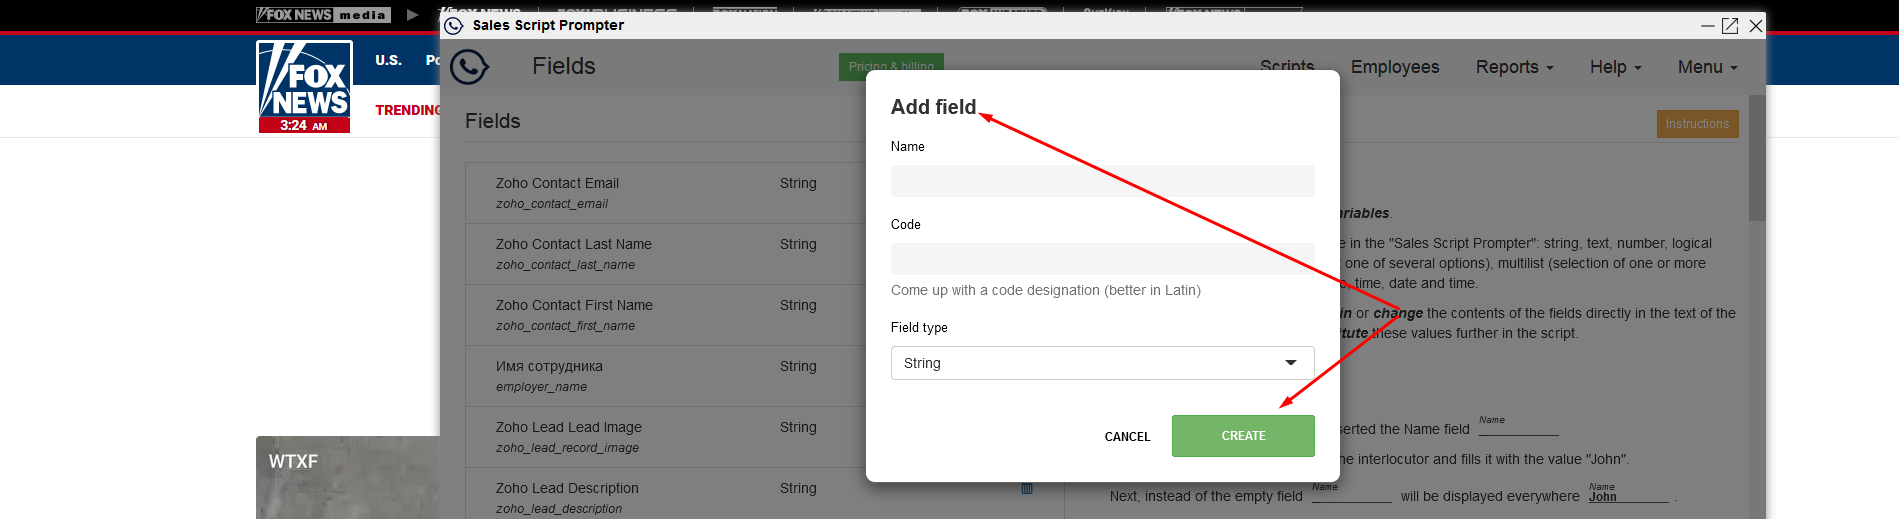
- Click the "Create" button to create a new field.
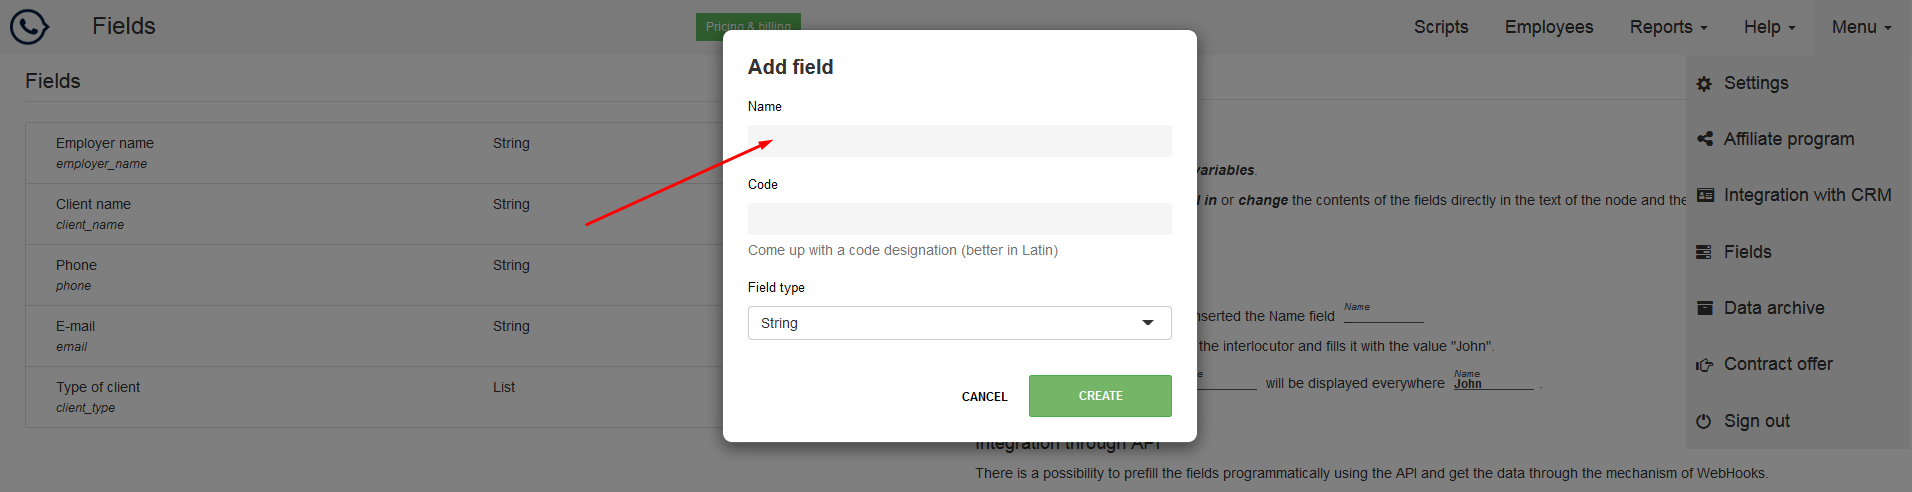
- A modal window will open in which you will need to fill in:
- "Field name" - a short meaningful name of the field, which is displayed in the script node.
- "Code" - Latin letters translation of the field name - a unique identifier of the field in your account.
- "Type of field" - the type in which the added field should be displayed: string, number, checkbox (yes/no, for example), list (selection one of the options), multilist (selection one or more options from possible), date, time, date and time, textarea.
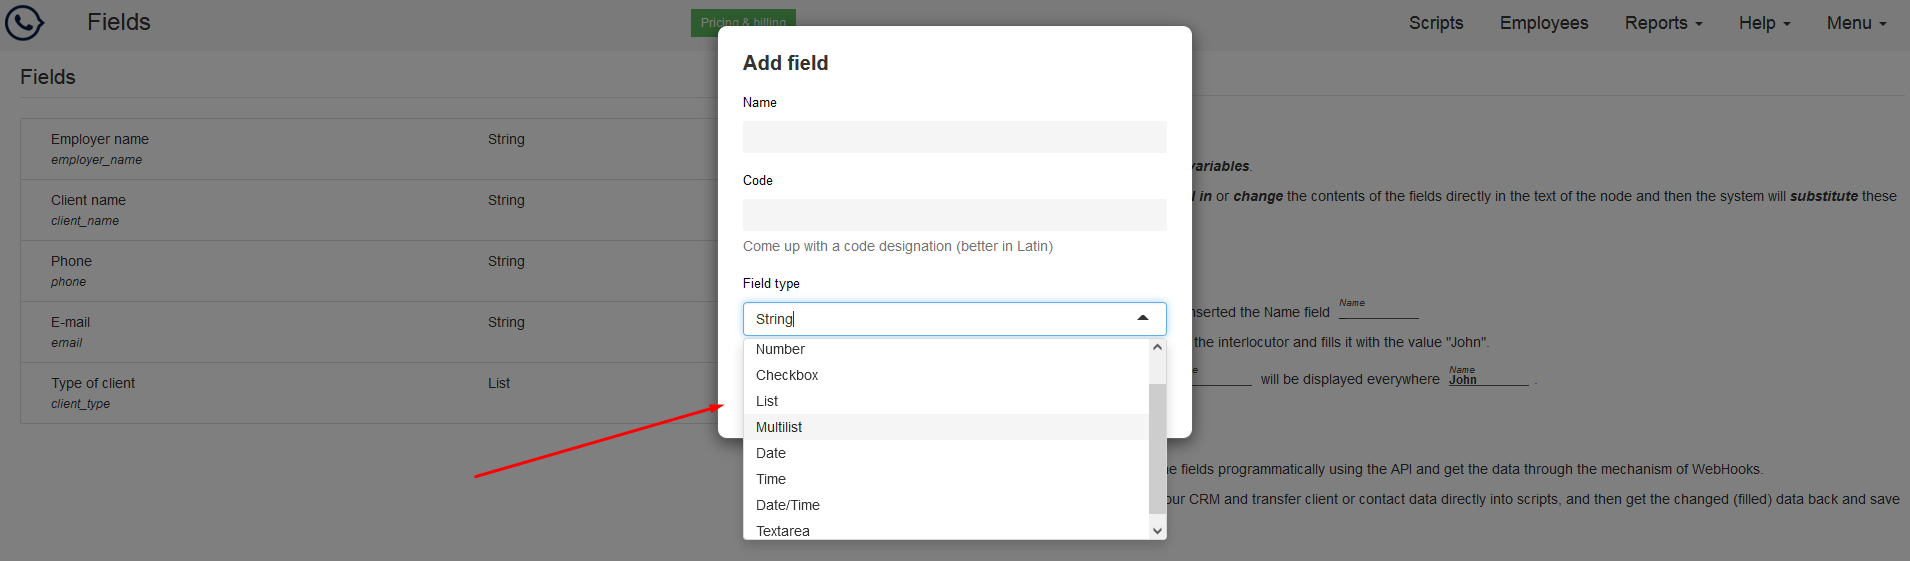
- If you selected the "List" or "Multilist" field type, you will need to fill in the options that the operator will work with during the call. The easiest option is to put them separated by commas.
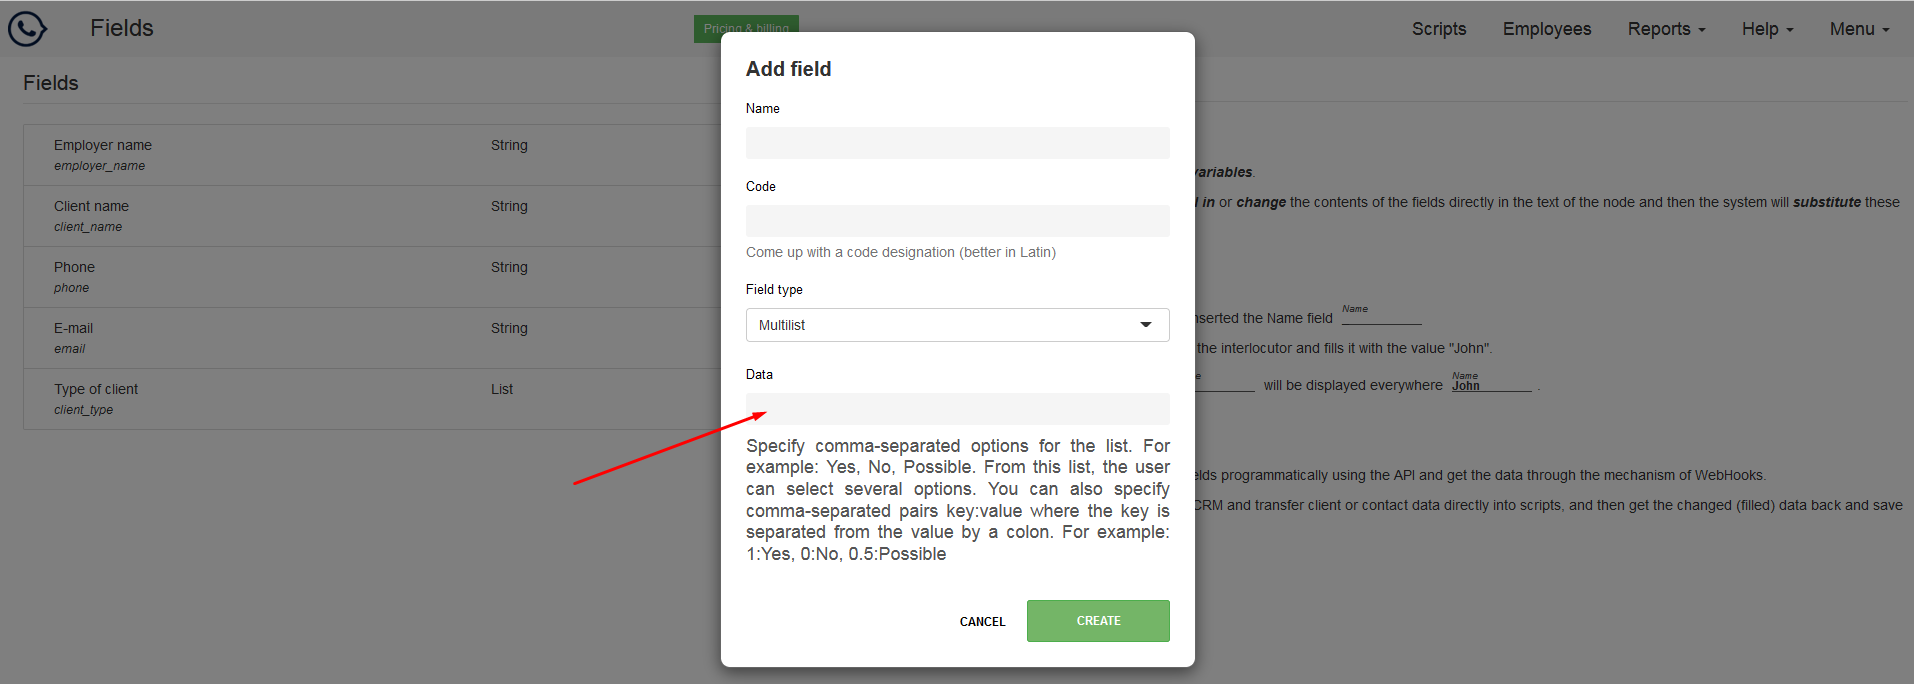
- When you have finished entering data about the new field, click the "Create" button. The new field will be created and appear at the top of the list of fields.
How to import fields from CRM
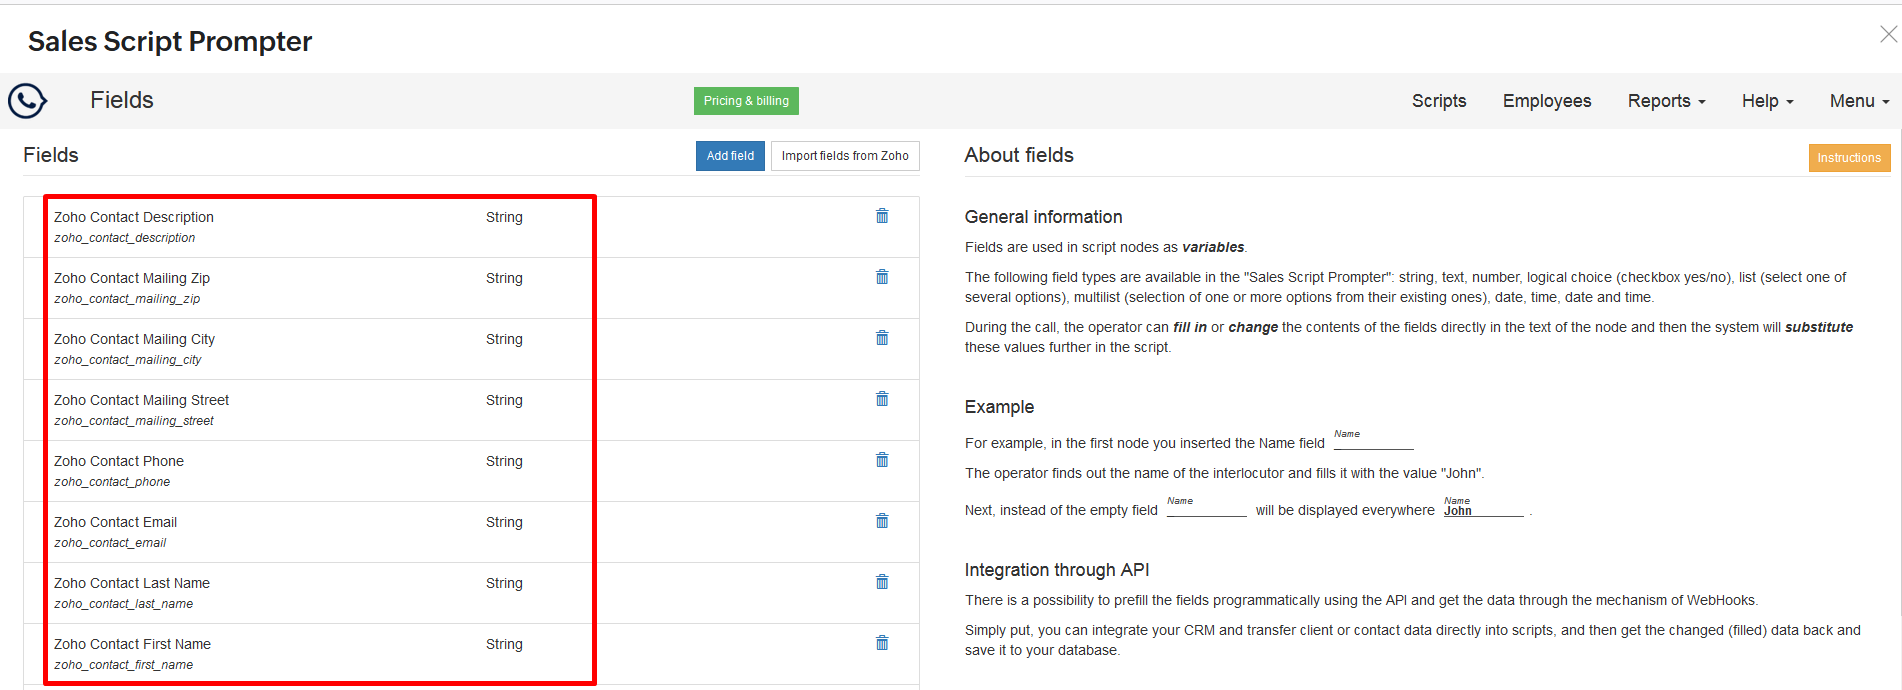
- Custom fields are designed to work efficiently with the script and save data about the customer with whom the operator spoke. To import fields from CRM, you need to install the "Script Designer" application in your CRM and go to Menu -> Custom fields.

- Clicking the "Import fields from..." button will open a modal window with a list of your fields in this CRM.
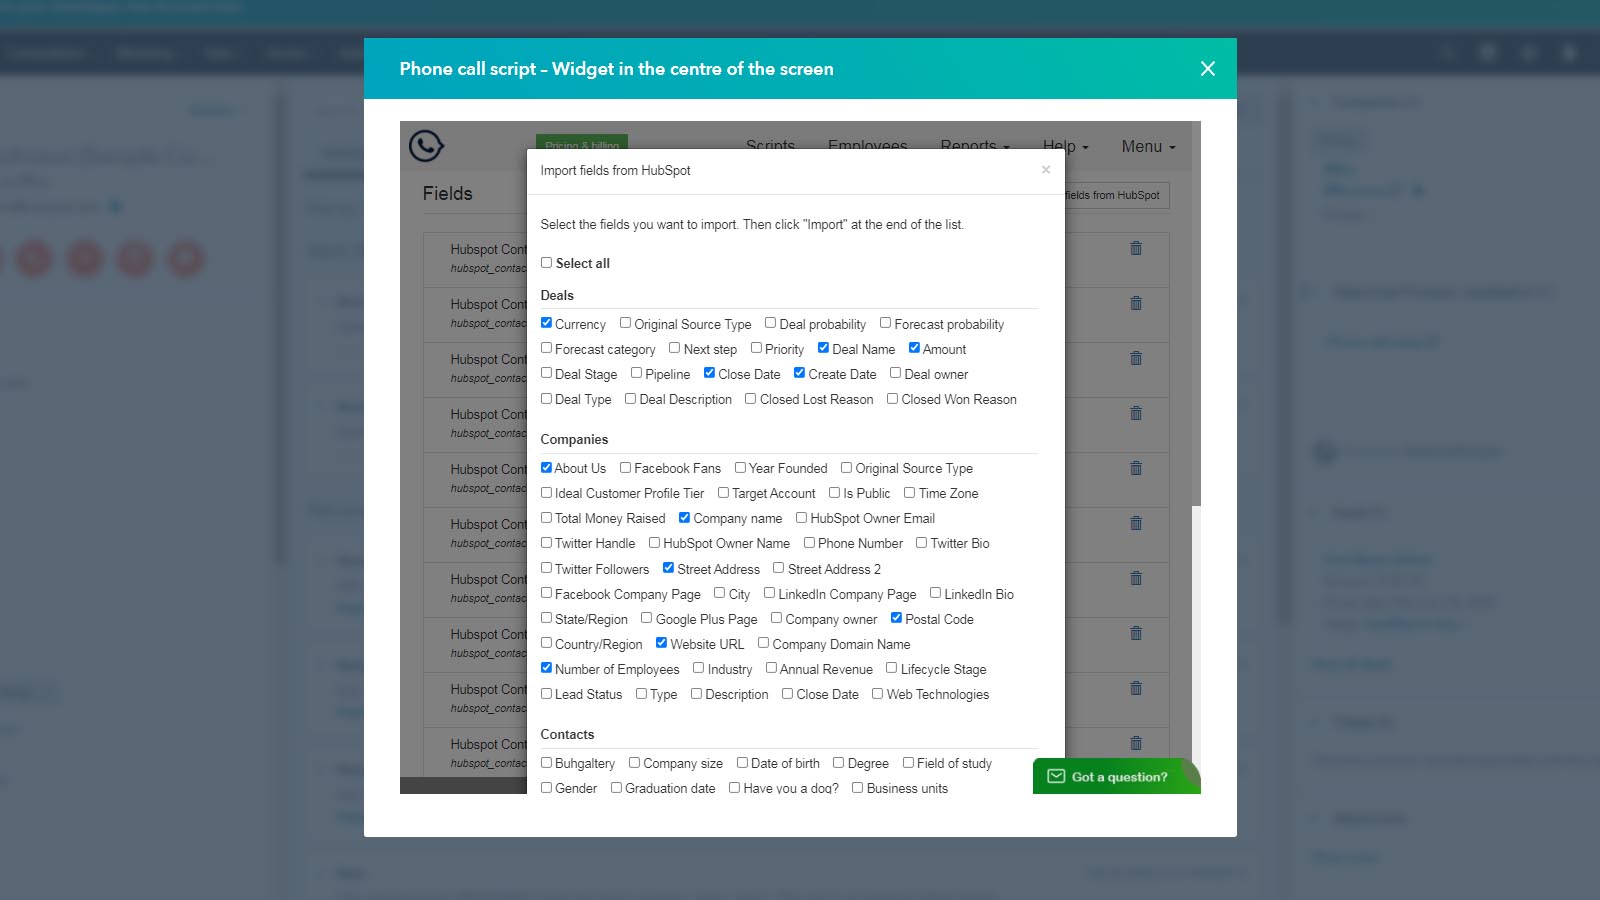
- After selecting the fields you want to import, click the "Import" button, and these fields will appear in the list of your fields and will become available for insertion into the script nodes.

Creating standard phrases and adding them to the script
How to create and use standard phrases in scripts
- The functionality of standard phrases is designed to simplify the work
of scriptwriters and account managers by providing the ability to reuse
phrases in different scripts. By creating standard phrases, a manager
eliminates the need to enter the same text multiple times in various
scripts. To add a standard phrase, you need to log in to your account
and go to Menu -> Standard Phrases.

- To create a new phrase, click the "Add Phrase" button.

- A modal window will appear where you need to enter the phrase text.

- After entering the data, click the "Create" button. The new phrase will
be created and appear at the top of the phrase list. A similar modal
window for adding phrases will be available directly from the node
editor.

- At any time, you can edit or delete any standard phrase. Nodes in which
phrases have already been inserted, will remain unchanged since they are
inserted independently of the original phrase.
- To add a phrase to the text in the node editor, click on the icon for
working with standard phrase functionality. A modal window will open
with a list of all standard phrases. Select the desired phrase from the
list and click on its text. When inserting phrases in the node editor,
the standard phrase will be added to the location of the cursor.

Thus, this tool significantly simplifies the process of creating and editing scripts, providing convenience and efficiency in work.
Work in the CRM
Widget for Mozilla Firefox
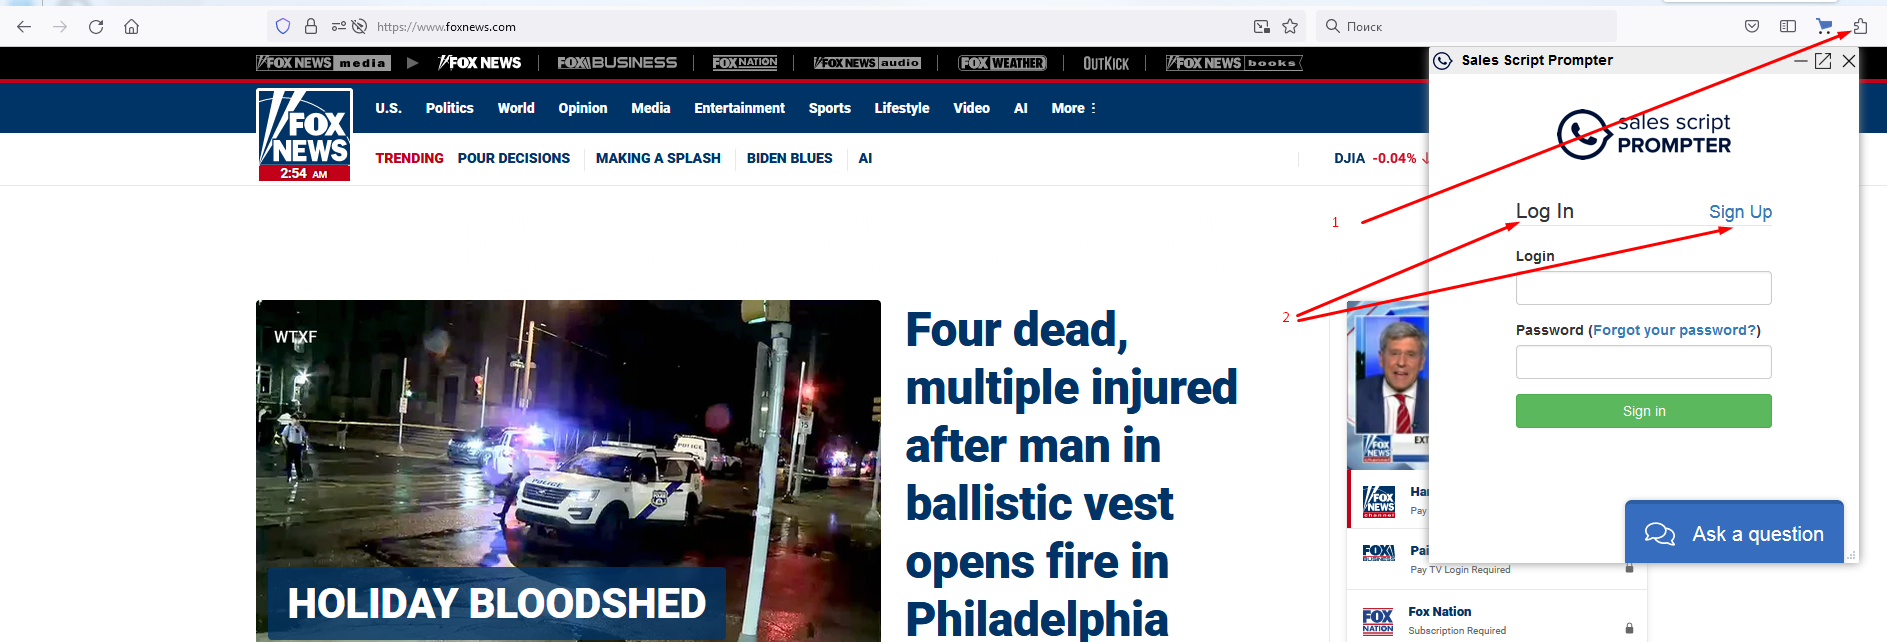
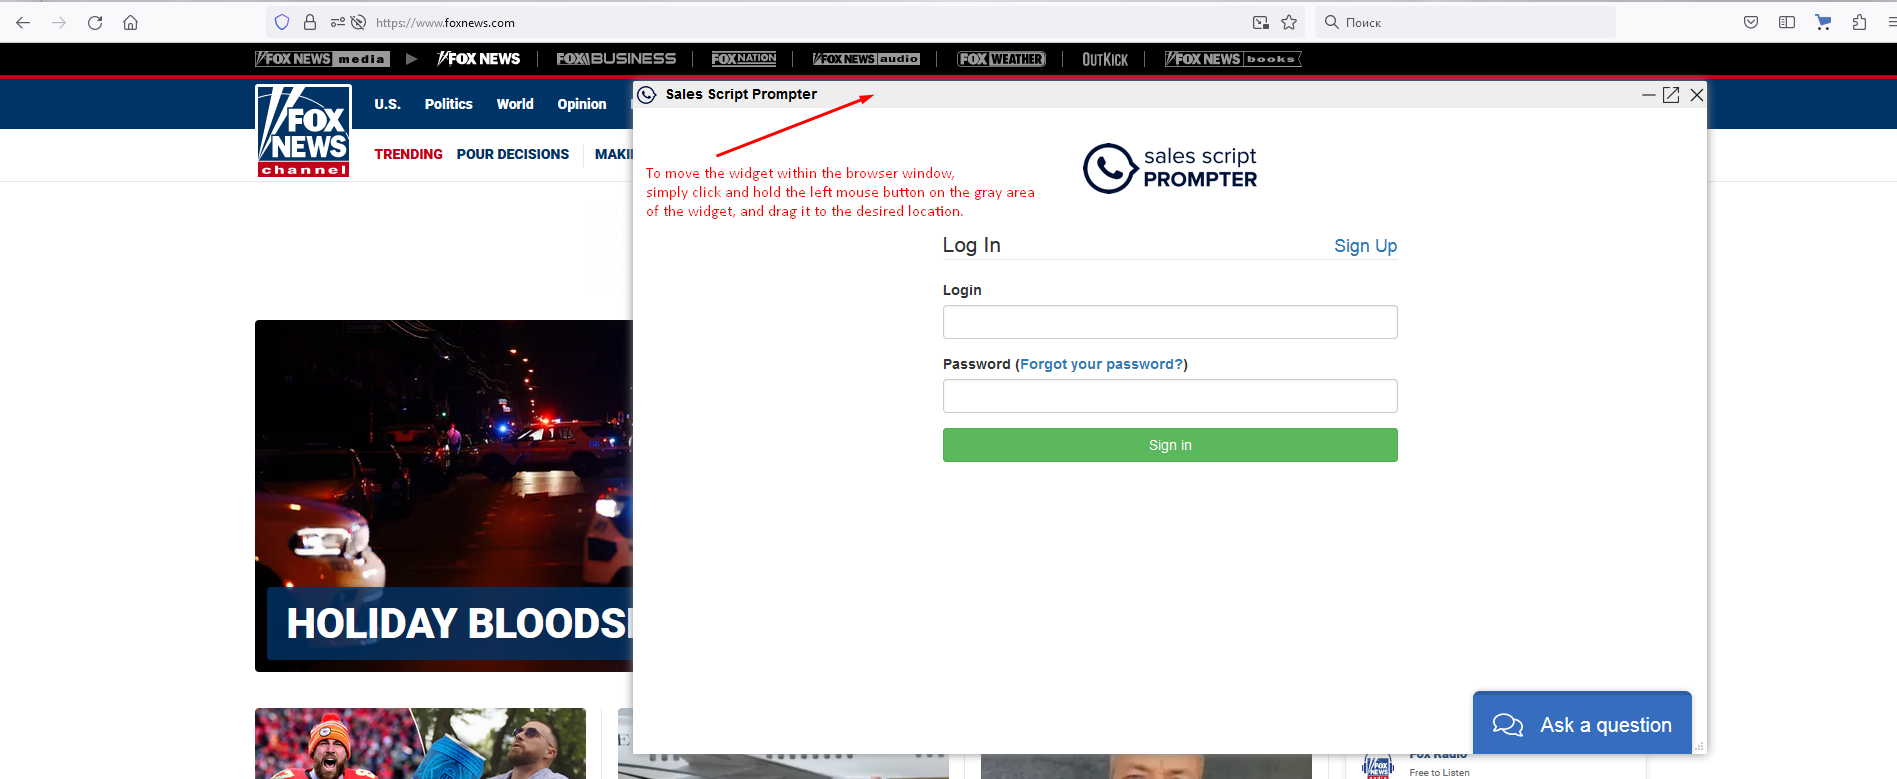
You can work with "Sales Script Prompter" through the Mozilla Firefox browser extension.
Link to install the extension - here.
- To start using the widget, click on the "Extensions" icon in the Mozilla Firefox browser, and it will appear in a window. Then, log in or register in Sales Script Prompter.
- You can adjust the position of the widget.
- You can resize the widget.

- This is what the application's home page looks like.
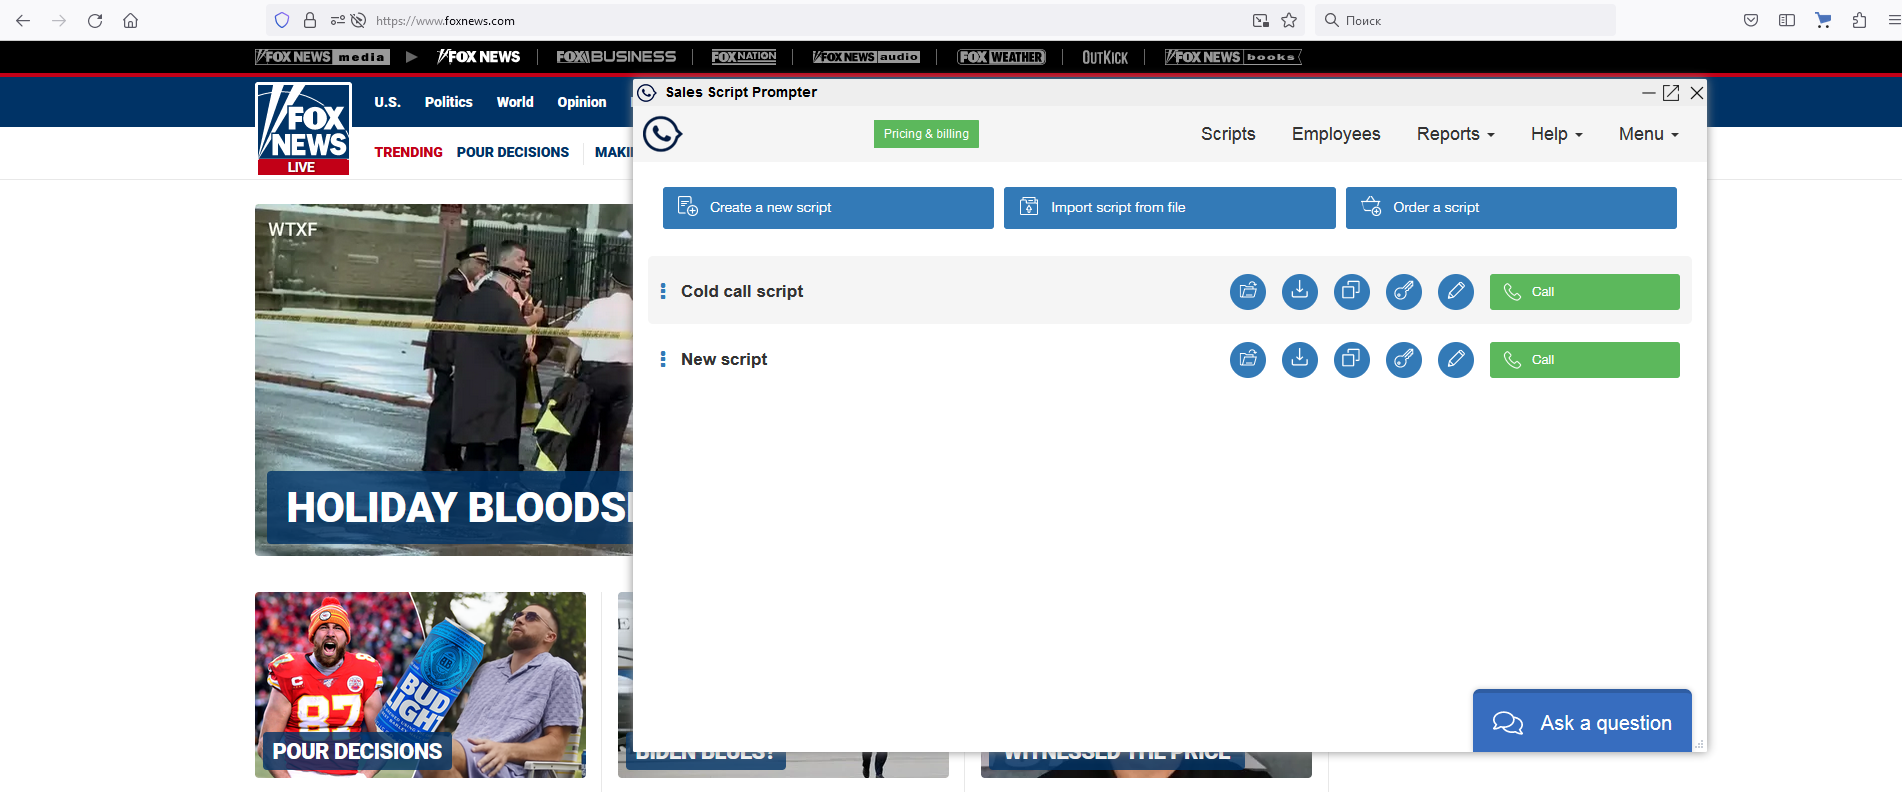
- You can create or edit scripts.
- You can create fields and then insert them into the script.
- You can leave comments during a call.
- You can view conversation statistics.
You can find more information in this instruction.
Zoho CRM
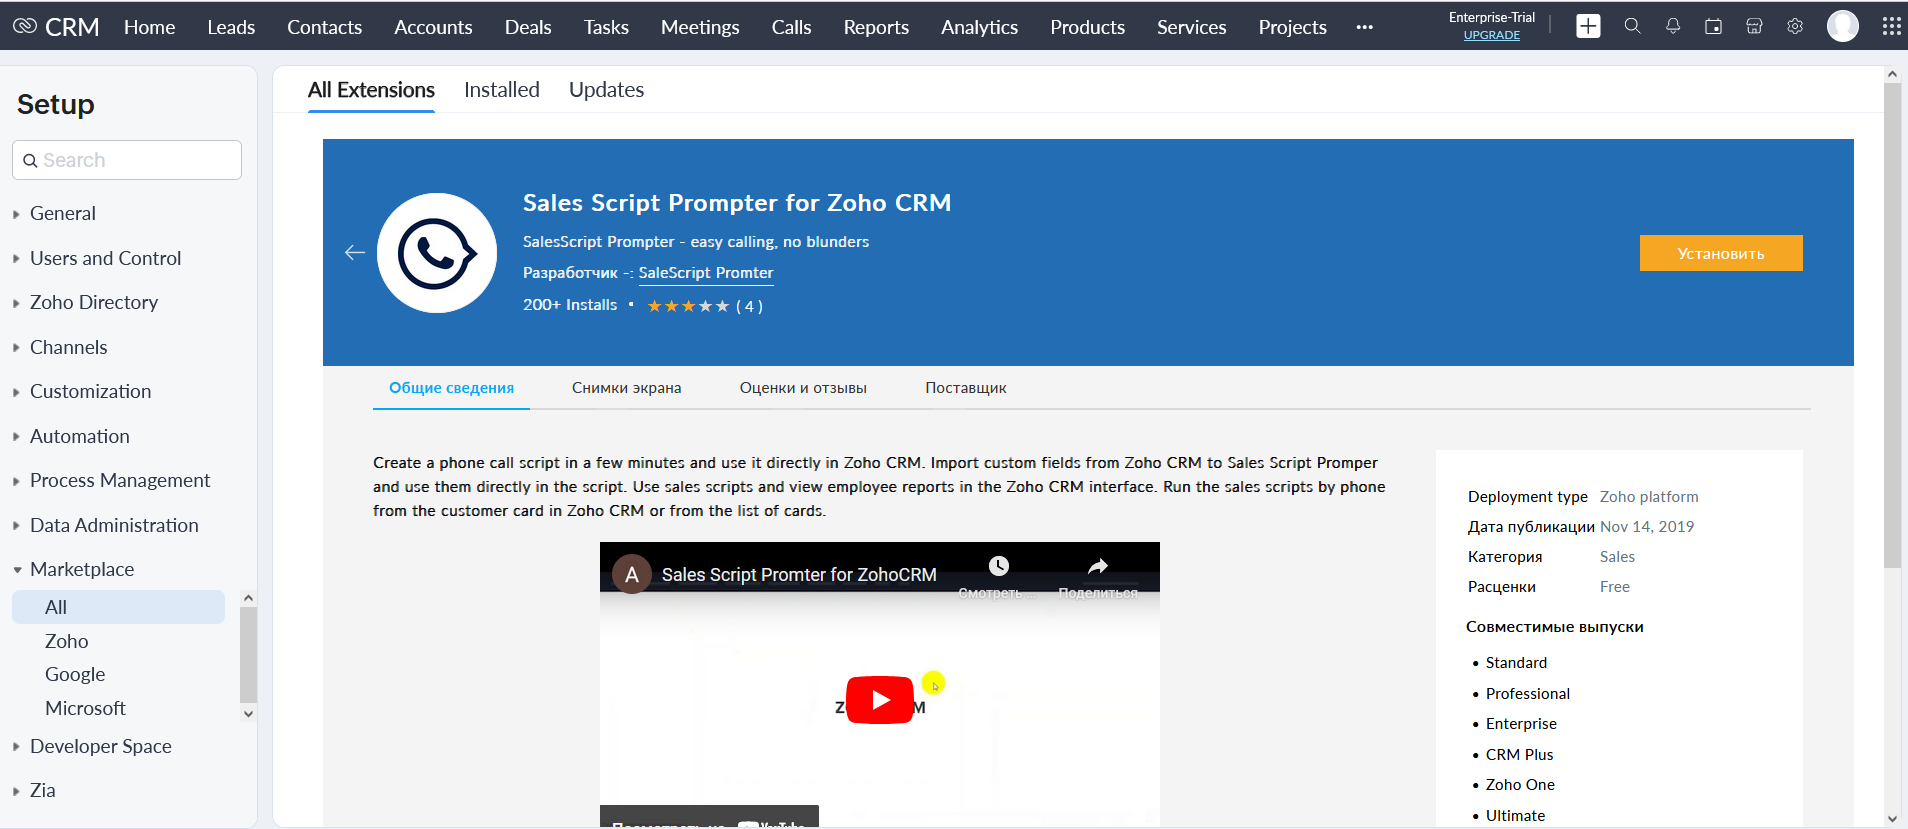
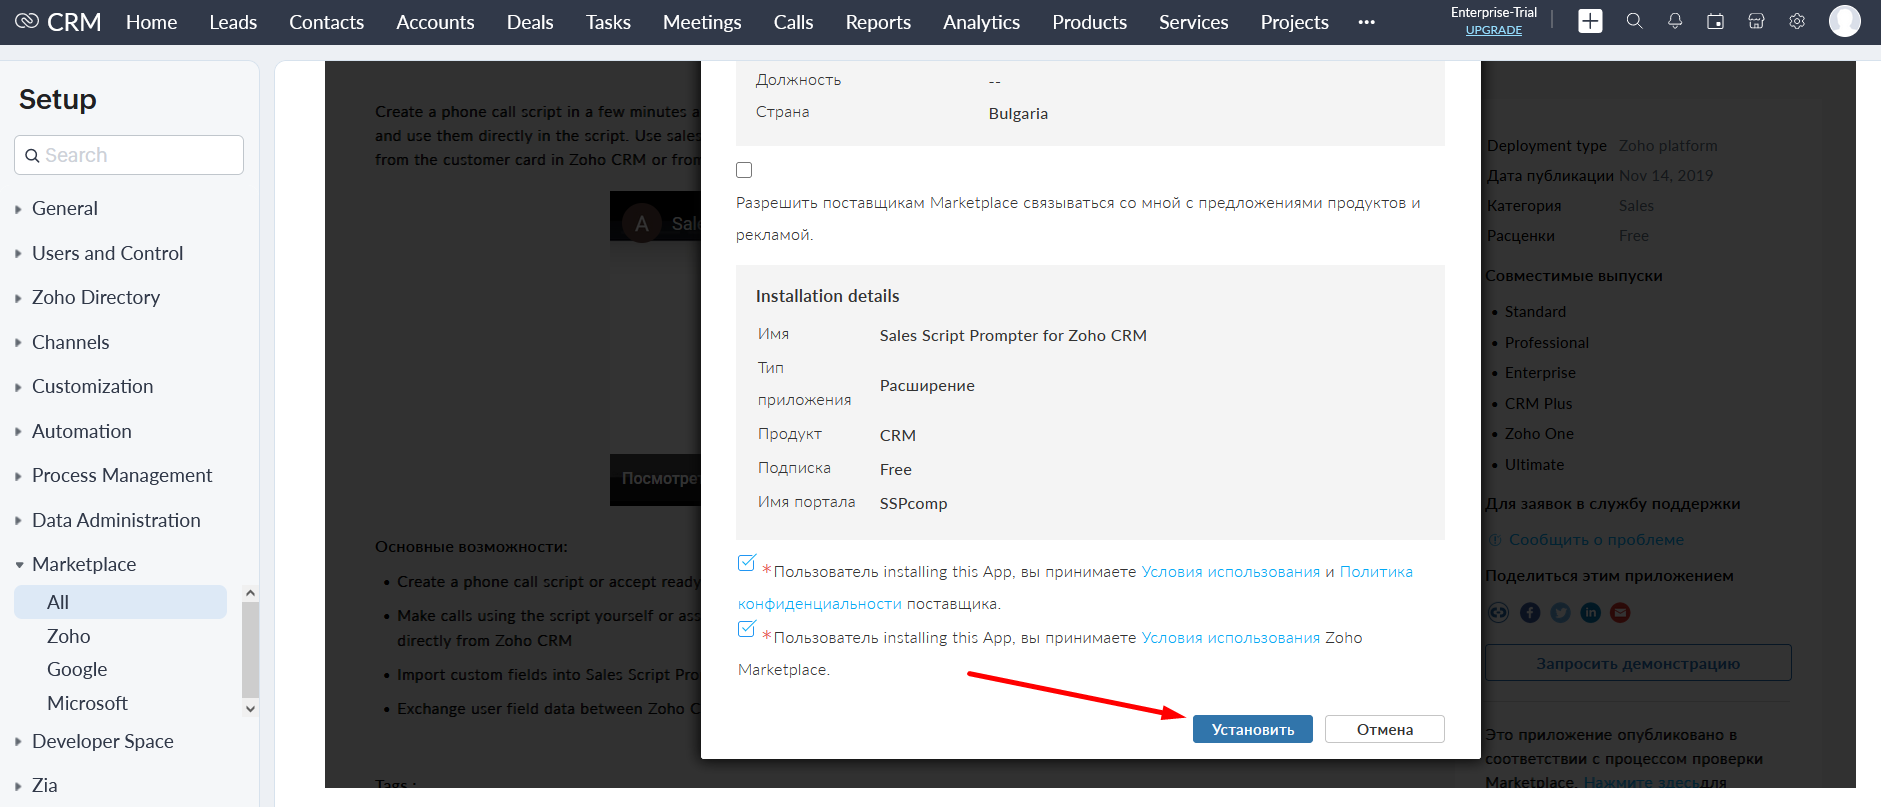
In order to work effectively with the various entities in Zoho CRM, the "Sales Script Prompter" widget was developed. To install it, just follow a few simple steps.
- Go
to your Zoho CRM account, to the Marketplace section and search for the
"Sales Script Prompter" application. Click on the "Install" button.
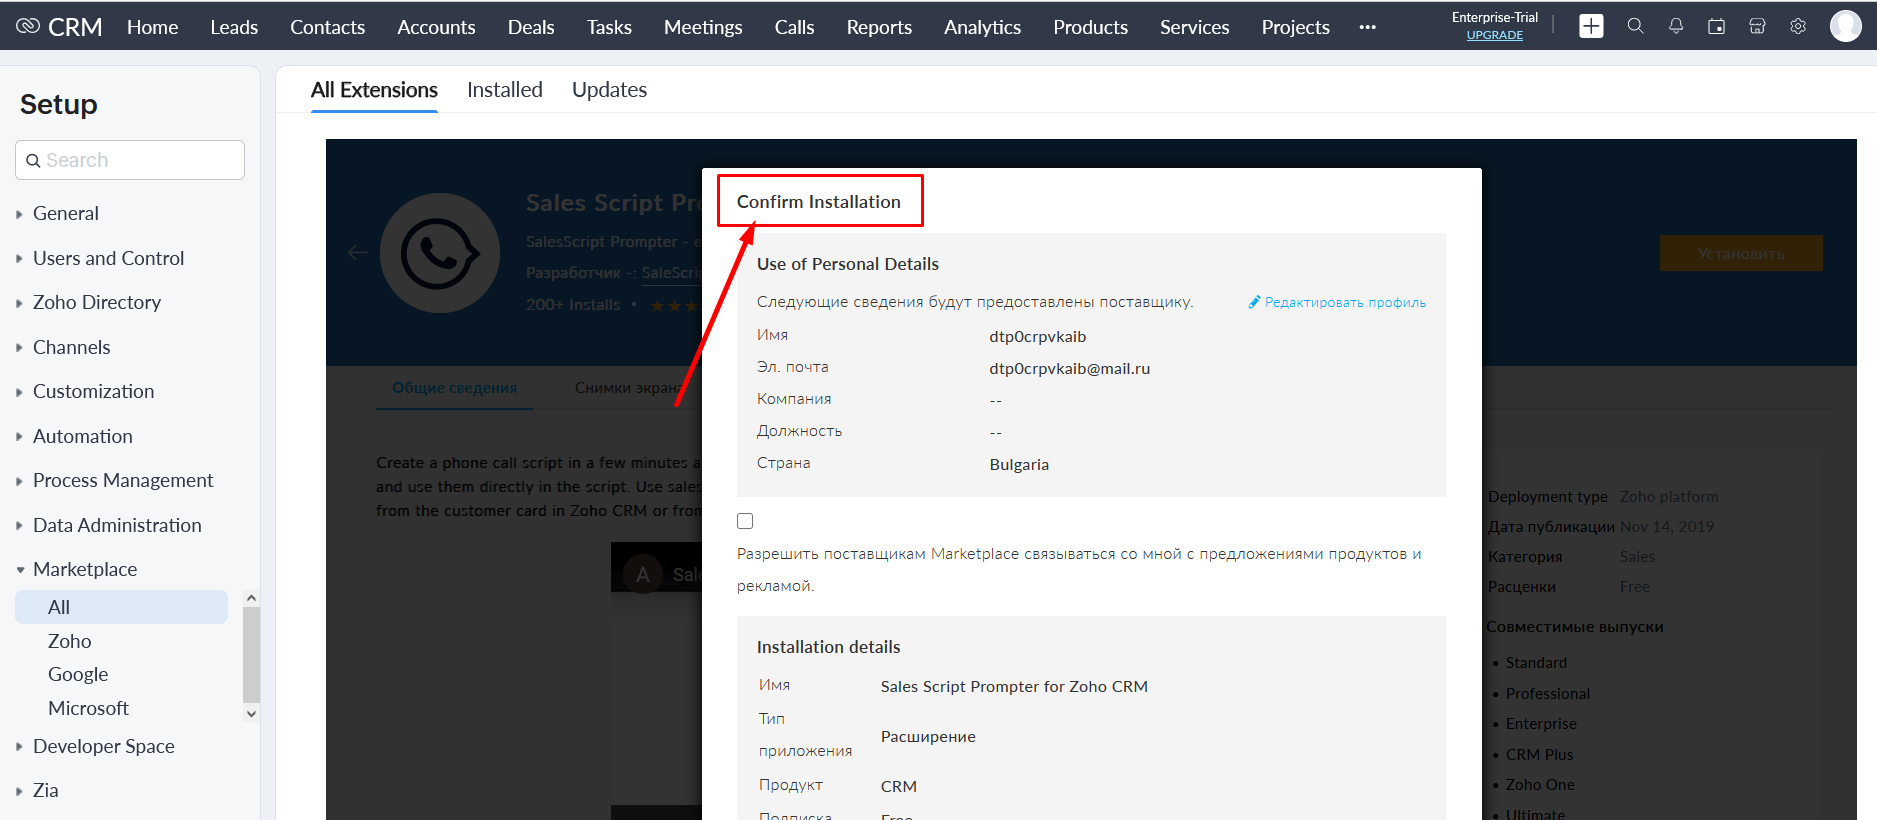
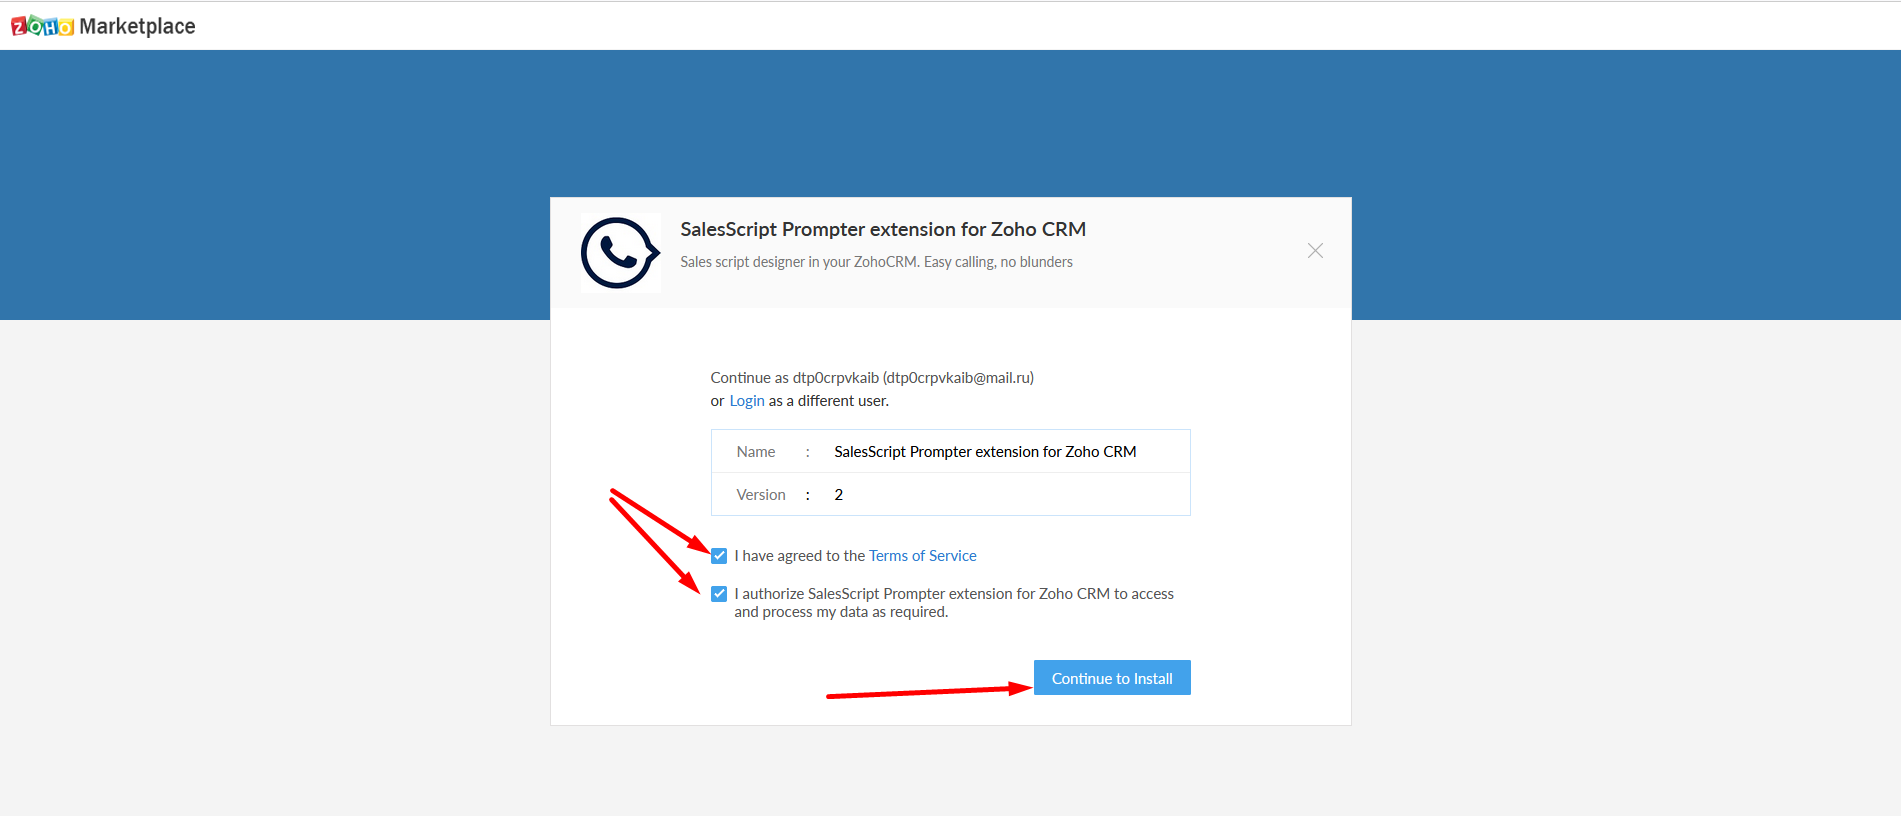
- In
the window that appears with the application description, select the checkbox
to accept the installation of the application.
Then
- confirm your consent to the transfer of data on your zoho account, as well
as read the license agreement and confidentiality policy "Sales Script
Prompter". Then
click the "Install" button.
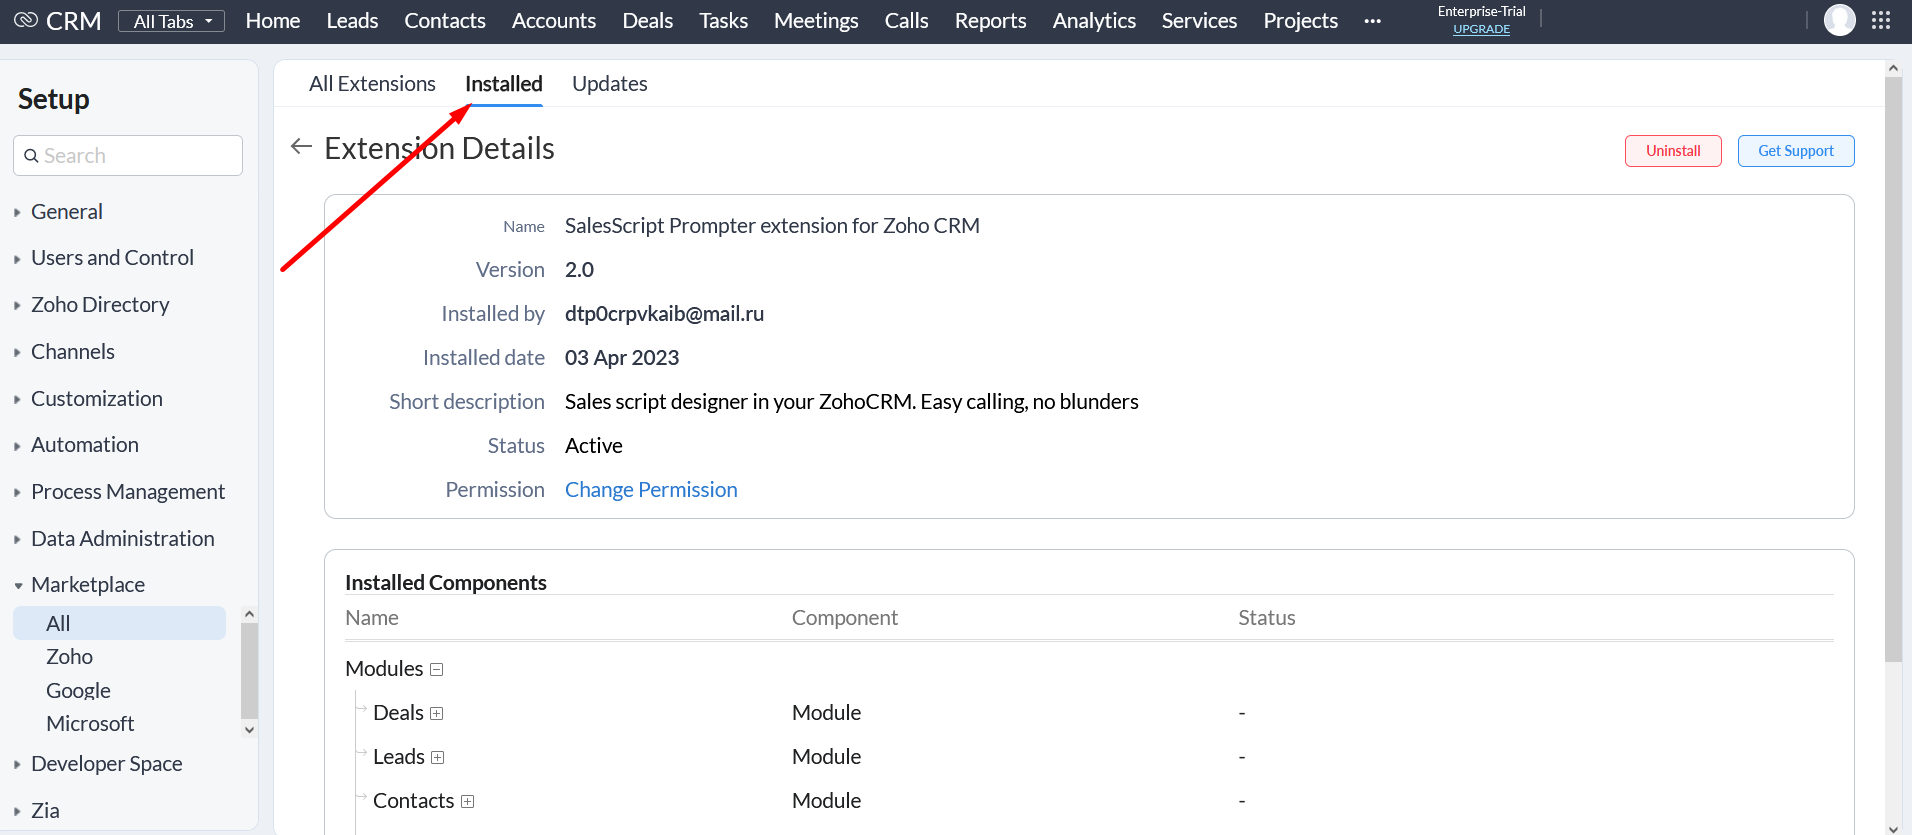
-
Congratulations!
The integration of your Zoho CRM account with the "Sales Script
Prompter" service is complete.
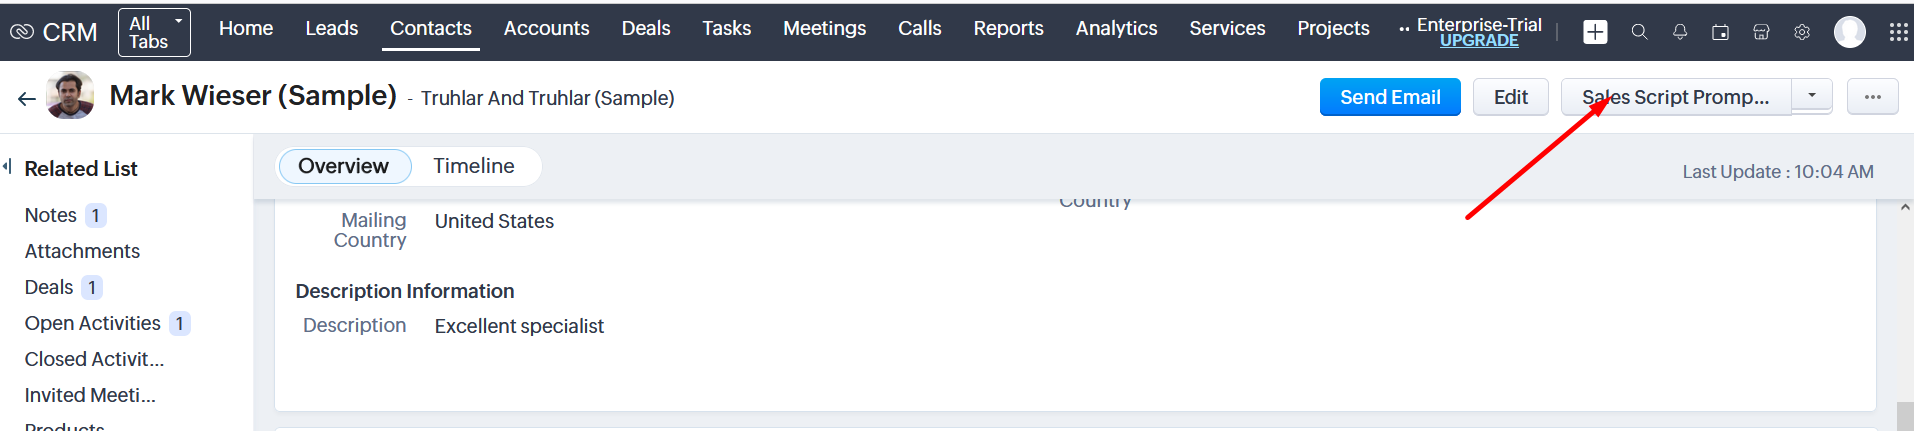
- To start working with the application, you need to log into any entity
in the CRM - contact, company, deal, or lead. You will see an
application button. Click on it.
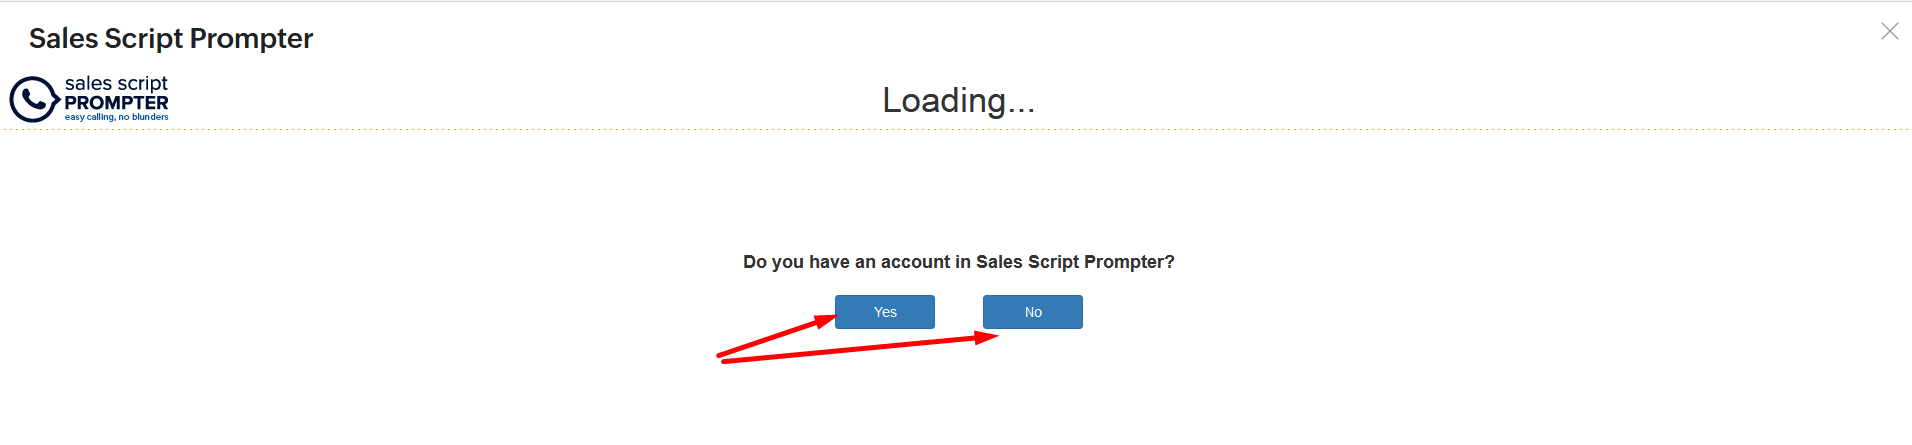
- Upon first login, the system will ask you for information - whether you
have a registration in the "Sales Script Prompter" service or not. If
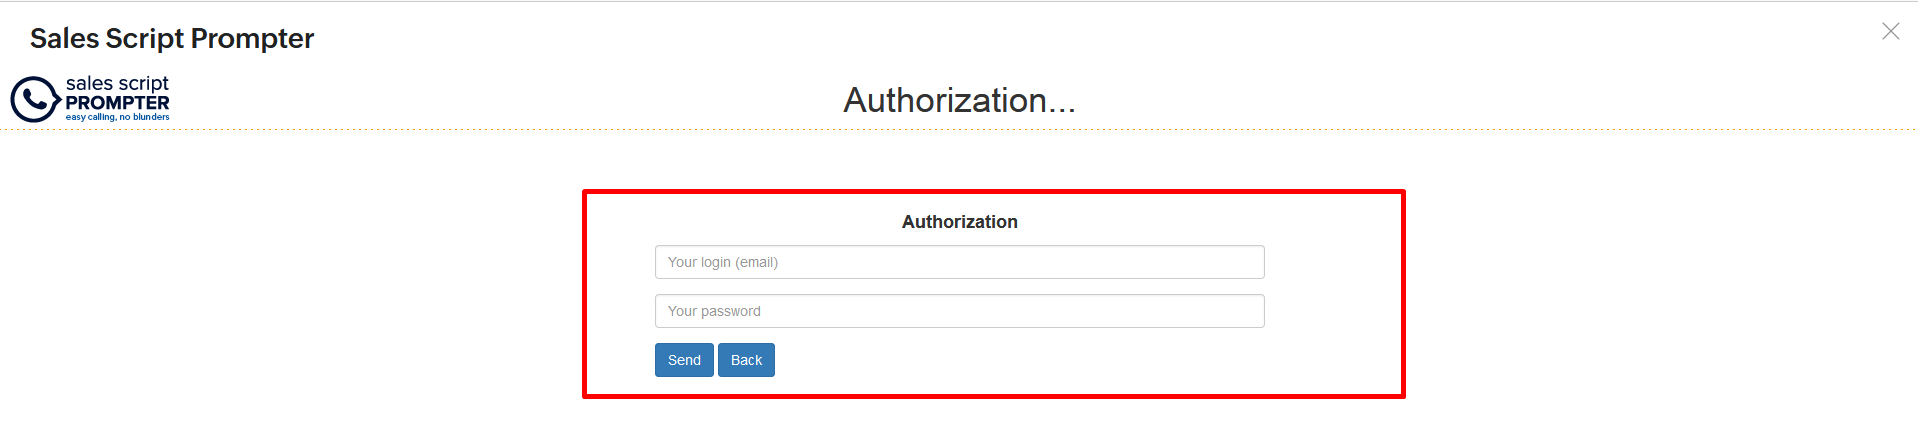
you are registered, you will be prompted to log in. If not, you will be
offered to register using the data provided in your Zoho account.
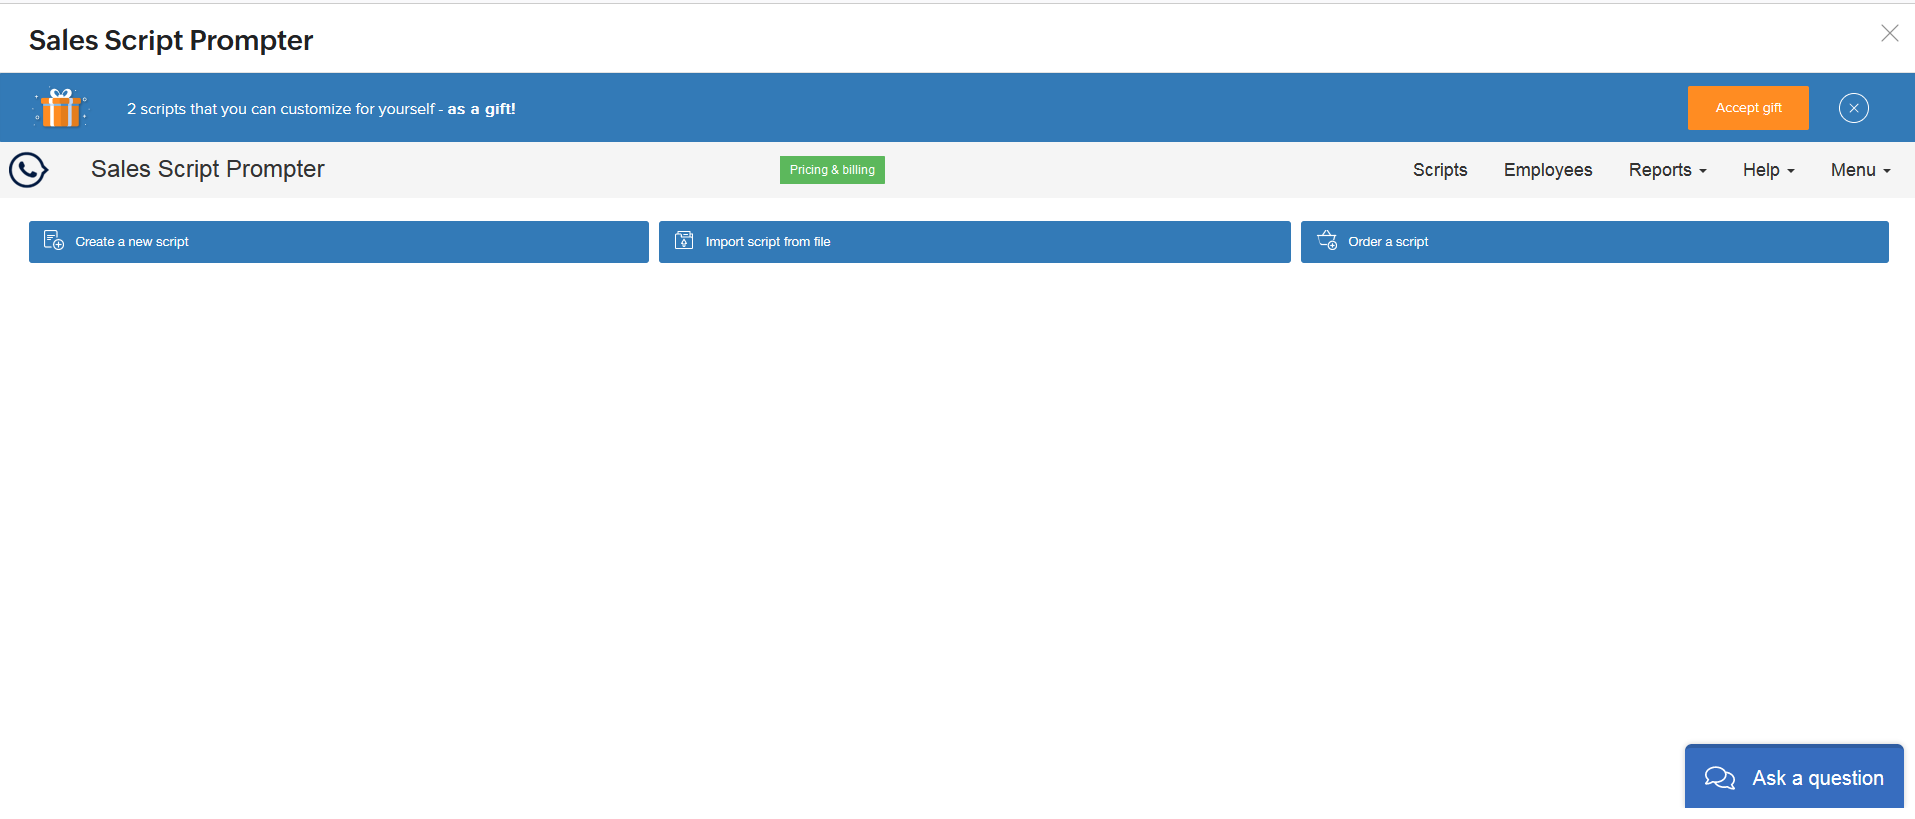
- After entering the data, you will be redirected to the application. Accept the scripts as a gift to get started with the application.
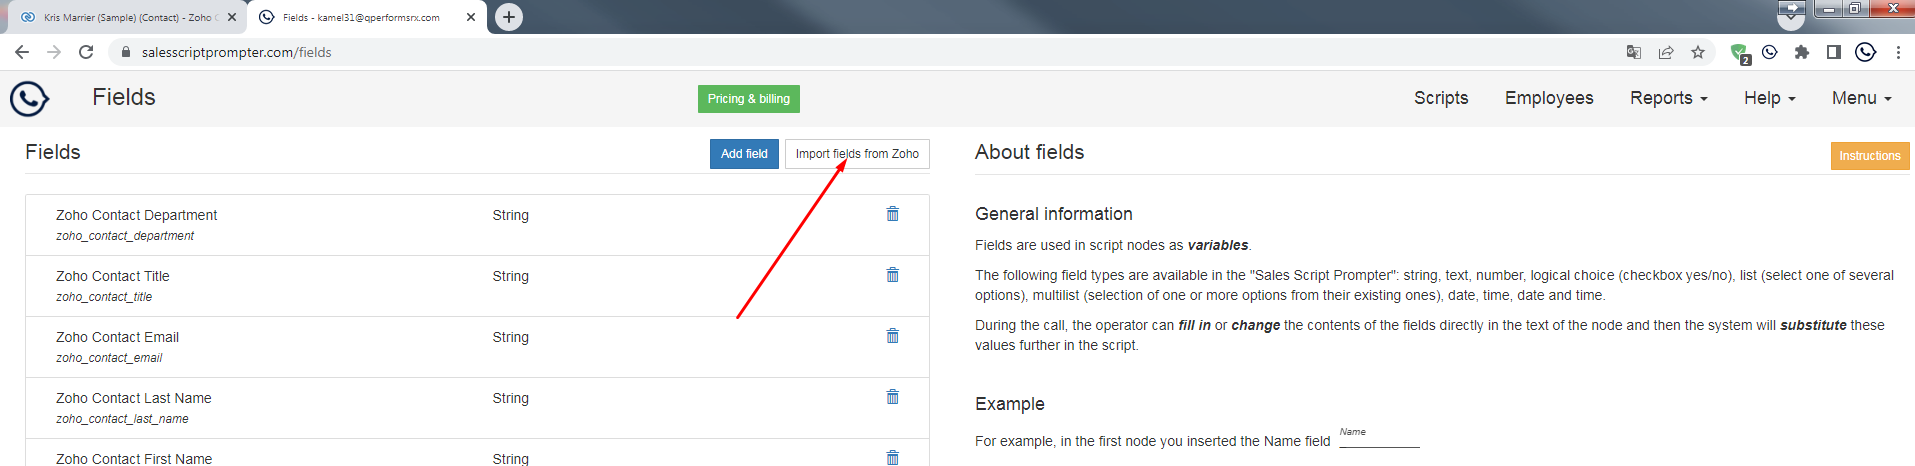
- In it, you can create and edit scripts, use them during customer calls,
import and insert fields from Zoho into the script by filling them with
customer data or changing them on the fly during the conversation. To
import fields, go to the Menu -> Fields and click on the "Import
fields from Zoho" button.

- You will be presented with fields from different entities to import.
Check the necessary ones and click the "Import" button. The fields will
be added to your account.
- Now you can add them to the script using the editor. For details, refer to the "How to insert fields into a script" section.
- After adding the fields to the script, you will see them during calls
from the desired entity and will be able to manage the data in these
fields - change, add, or delete values. After completing a call
according to the script, refresh the page to see the changes applied to
the fields during the call.
- You can add a final comment after the call, as well as create a task for a specific date - all data will be displayed in the CRM card from which the script was called.

- You can also work with the application in the Web tab within Zoho CRM. Here you can import fields, insert them into scripts, and assign access rights to scripts for employees and groups of employees.
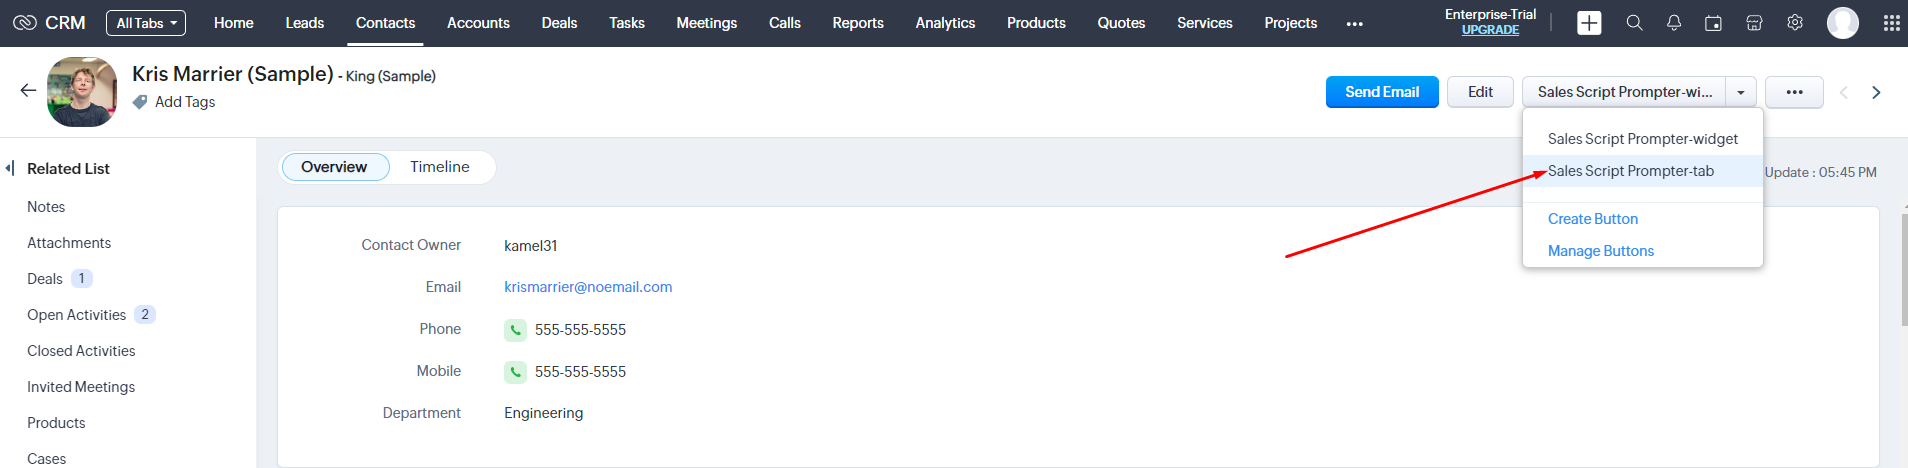
- To work in the Web Tab, register or log in to the Sales Script Prompter service using the widget in the contact, lead, or deal card.

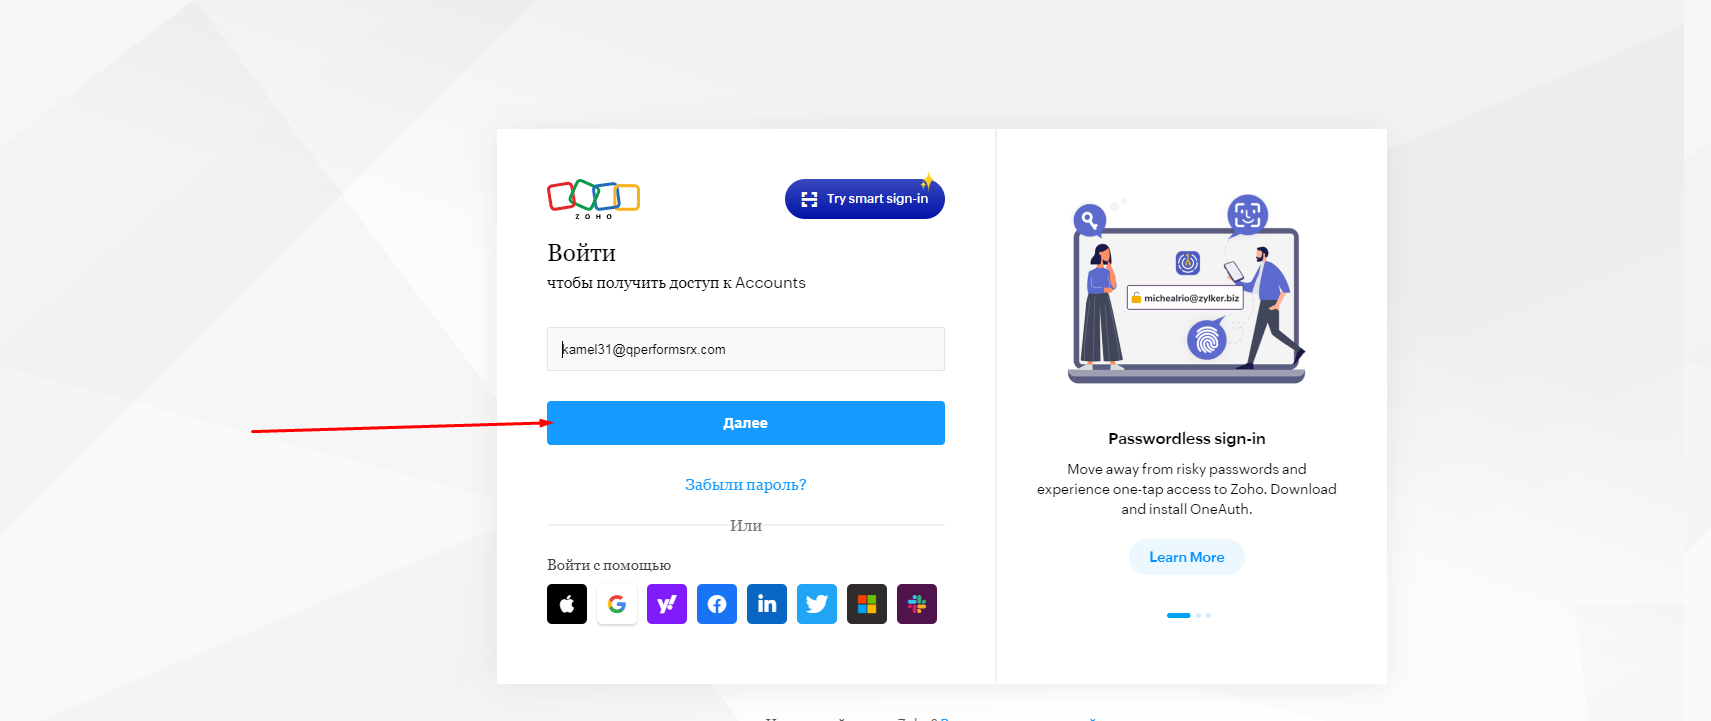
- After that, click the "SalesScriptPrompter-tab" button again, and you will be prompted to integrate your Zoho CRM account with our application. Click the "Create integration" button.

- Zoho will ask you to log in and then confirm the consent for our application to access your CRM data.
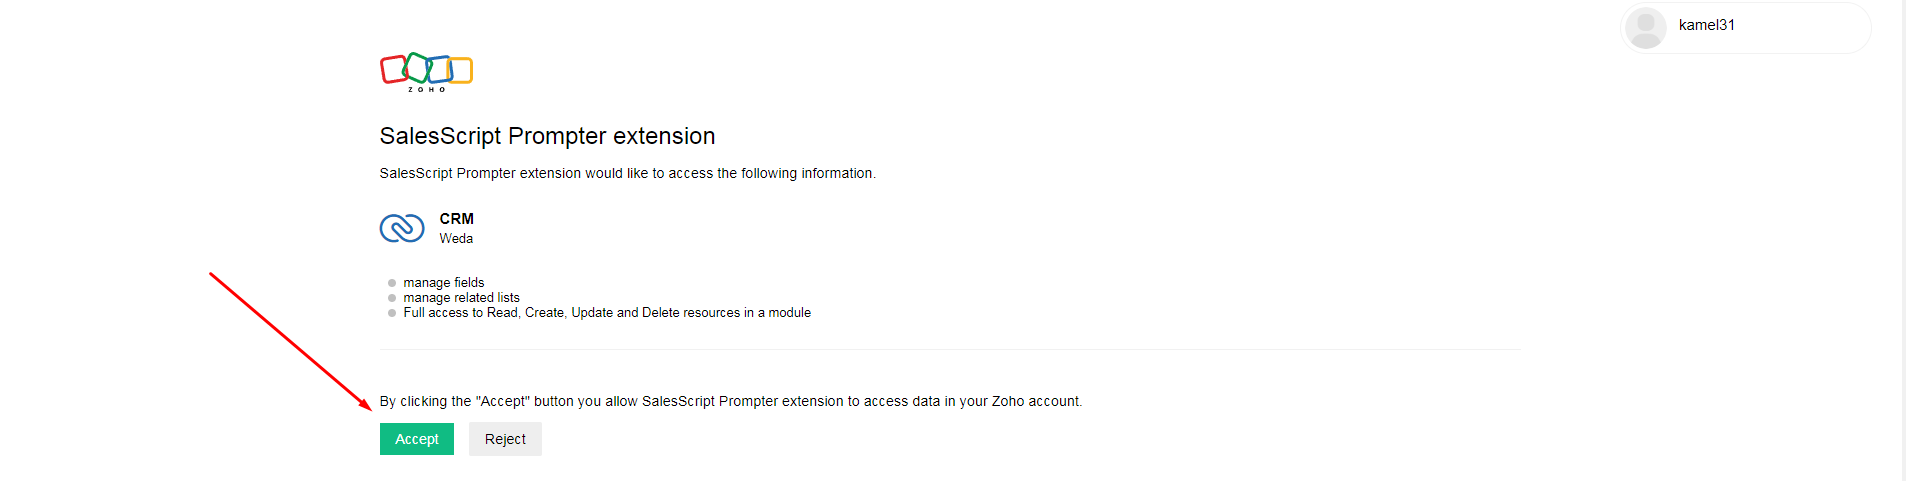
- Once the process is complete, the system will notify you that the integration is set up. You will need to close the current tab, refresh the browser page where Zoho CRM is open, and then use the "SalesScriptPrompter-tab" button again.

- Once the server integration is configured, you will be able to work with scripts in the Web tab and import fields for insertion into scripts.
Kommo CRM
In order to work effectively with clients, companies and deals in the Kommo CRM, the "Sales Script Prompter" widget was developed. To install it, just follow a few simple steps.
-
Go
to your Kommo CRM account, in the Integration section and search for the
"Sales Script Prompter" application. Click on the "Install"
button, and then in the window that opens with the description of the
application, check the box for consent to the transfer of personal data and
start installing the application.

- In
the window that appears, fill in your phone number, it is necessary to address
any questions on the use of scripts, the service and its capabilities. For ease
of use of the widget, we recommend that you also click on the checkboxes to
create an account and authorization in the "Sales Script Prompter" service.
Even if you are already registered in "Sales Script Prompter", check
these checkboxes and the system will recognize you and authorize automatically, in
the future the option "auto-entry" will simplify the use of the
widget for your employees.
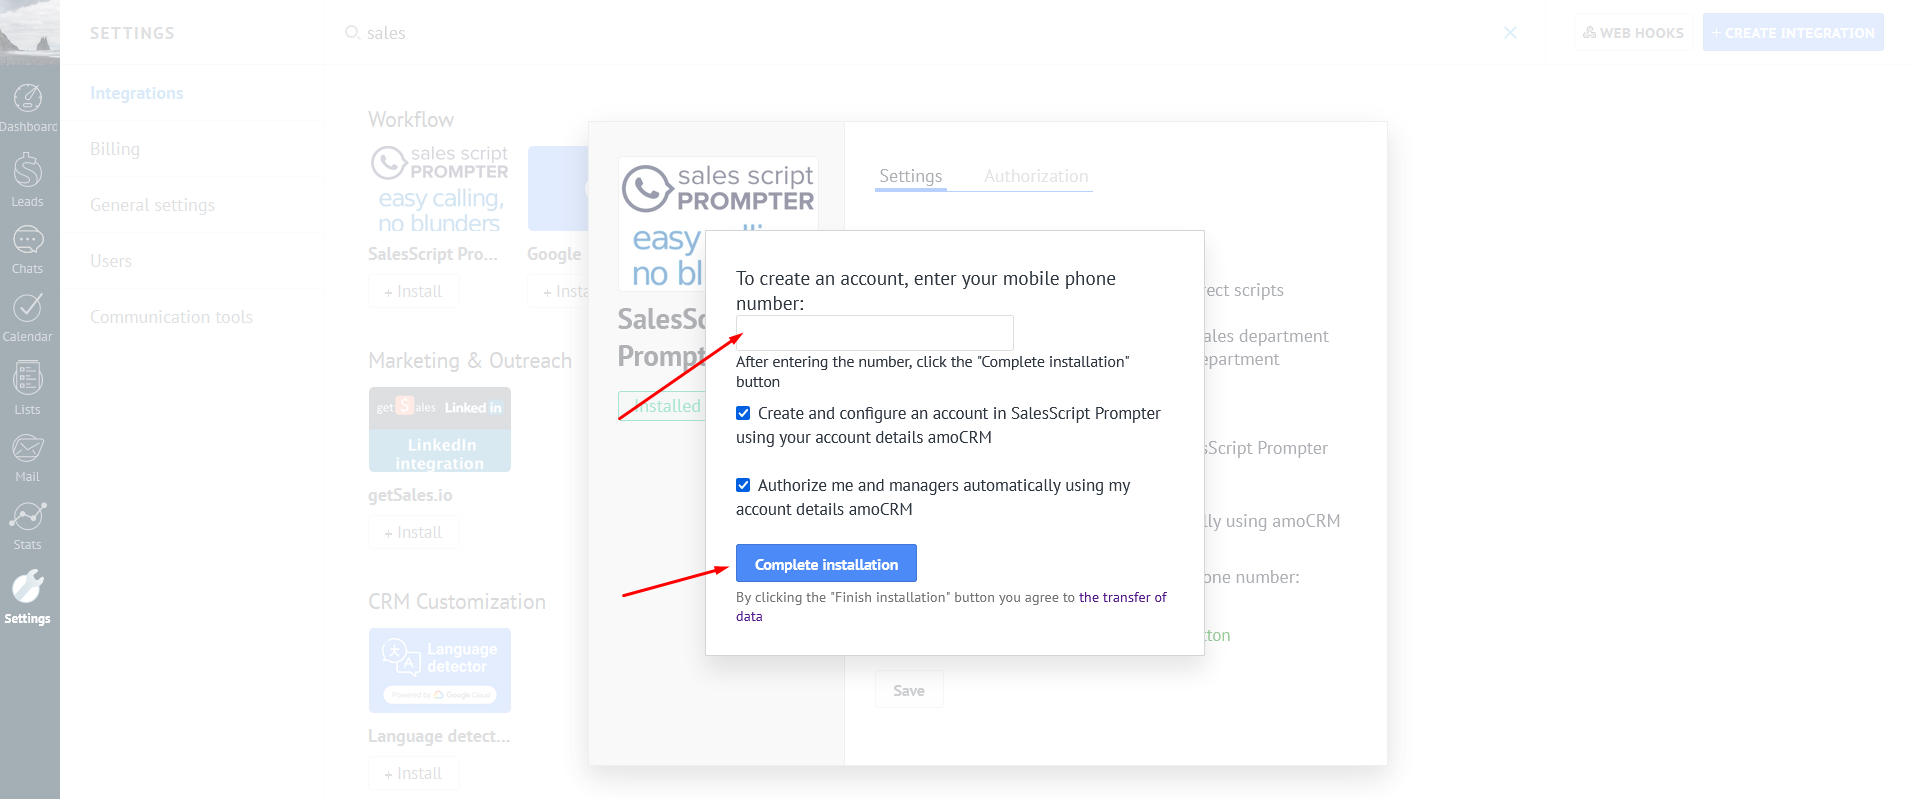
- After that, click "Finish" and "Save" to finish installing the widget. Afterwards, reload your Kommo account page to allow the application's scripts to load.
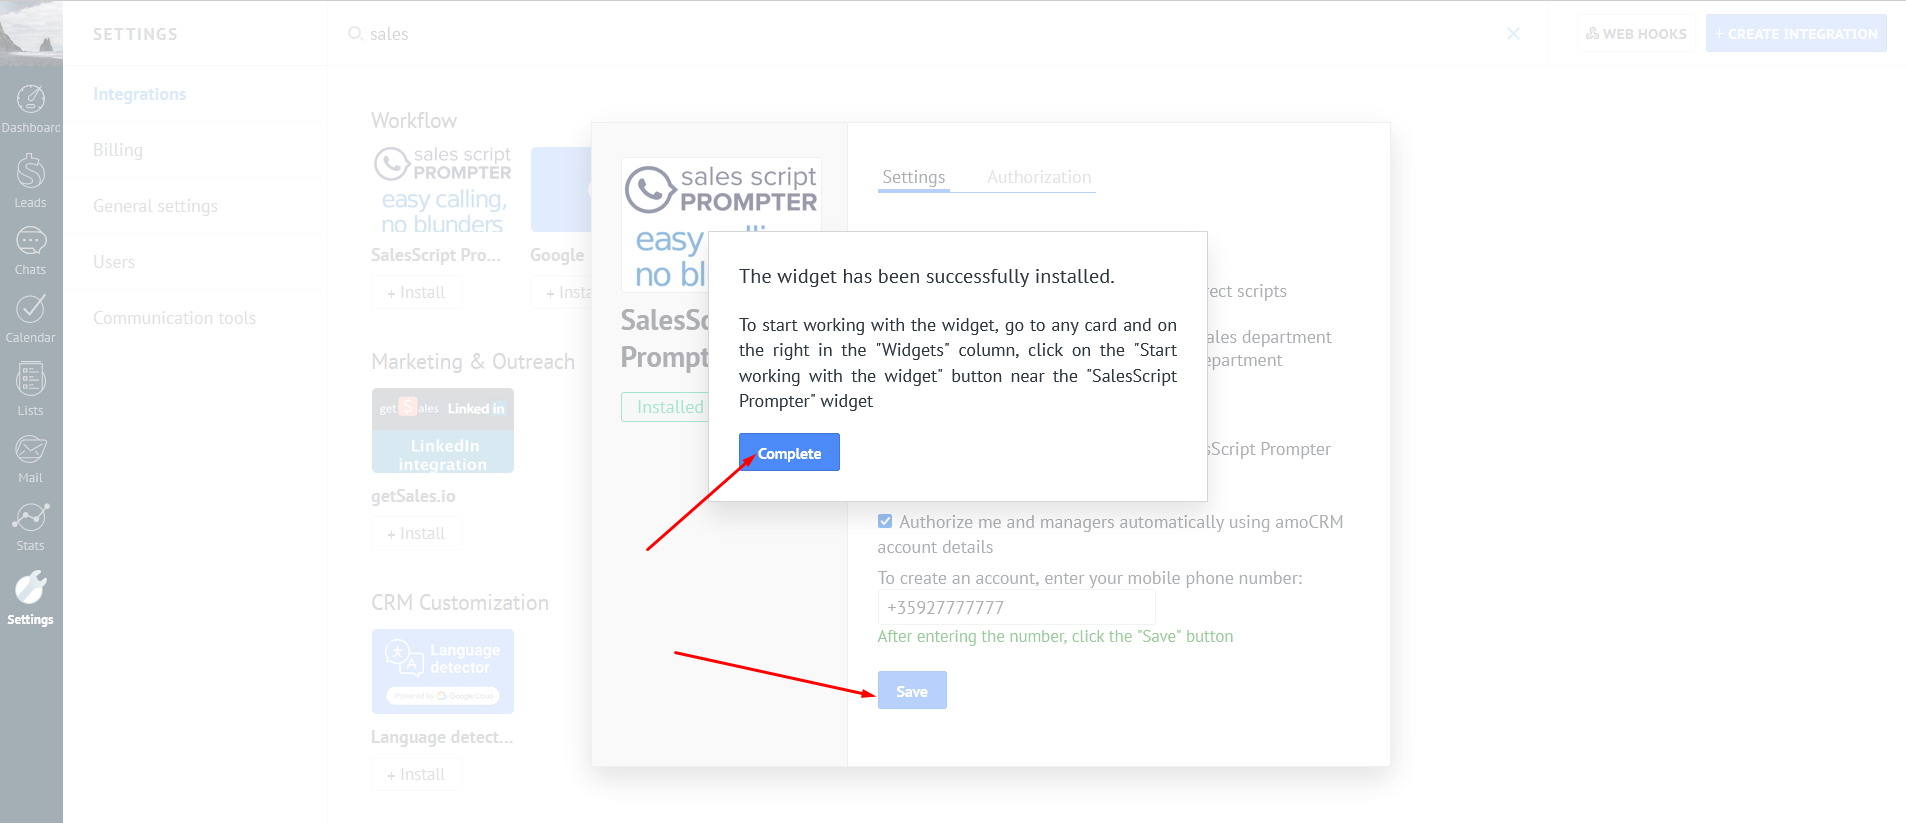
- Congratulations! The integration of your account in the Kommo CRM with the "Sales Script Prompter" service is complete. Now you can import the required entity fields from Kommo into our service, insert them into your script and make effective calls to your customer base.
- In case you already
have an account in "Sales Script Prompter", you have created scripts
in it, invited employees for work and the email specified during registration doesn’t coincide with the one specified in the Kommo profile, you can link your
Kommo profile with another "Sales Script Prompter" account.
To do this, you need to log in to the
"Sales Script Prompter" profile that is currently integrated with Kommo and go to
Menu -> Integrations -> Kommo CRM.
- An email will be sent to the email address you want to link your Kommo account to confirm the operation. By clicking on the "Confirm linking" button, you will express your consent to this operation, after which a new link will be created between the Kommo accounts and "Sales Script Prompter".


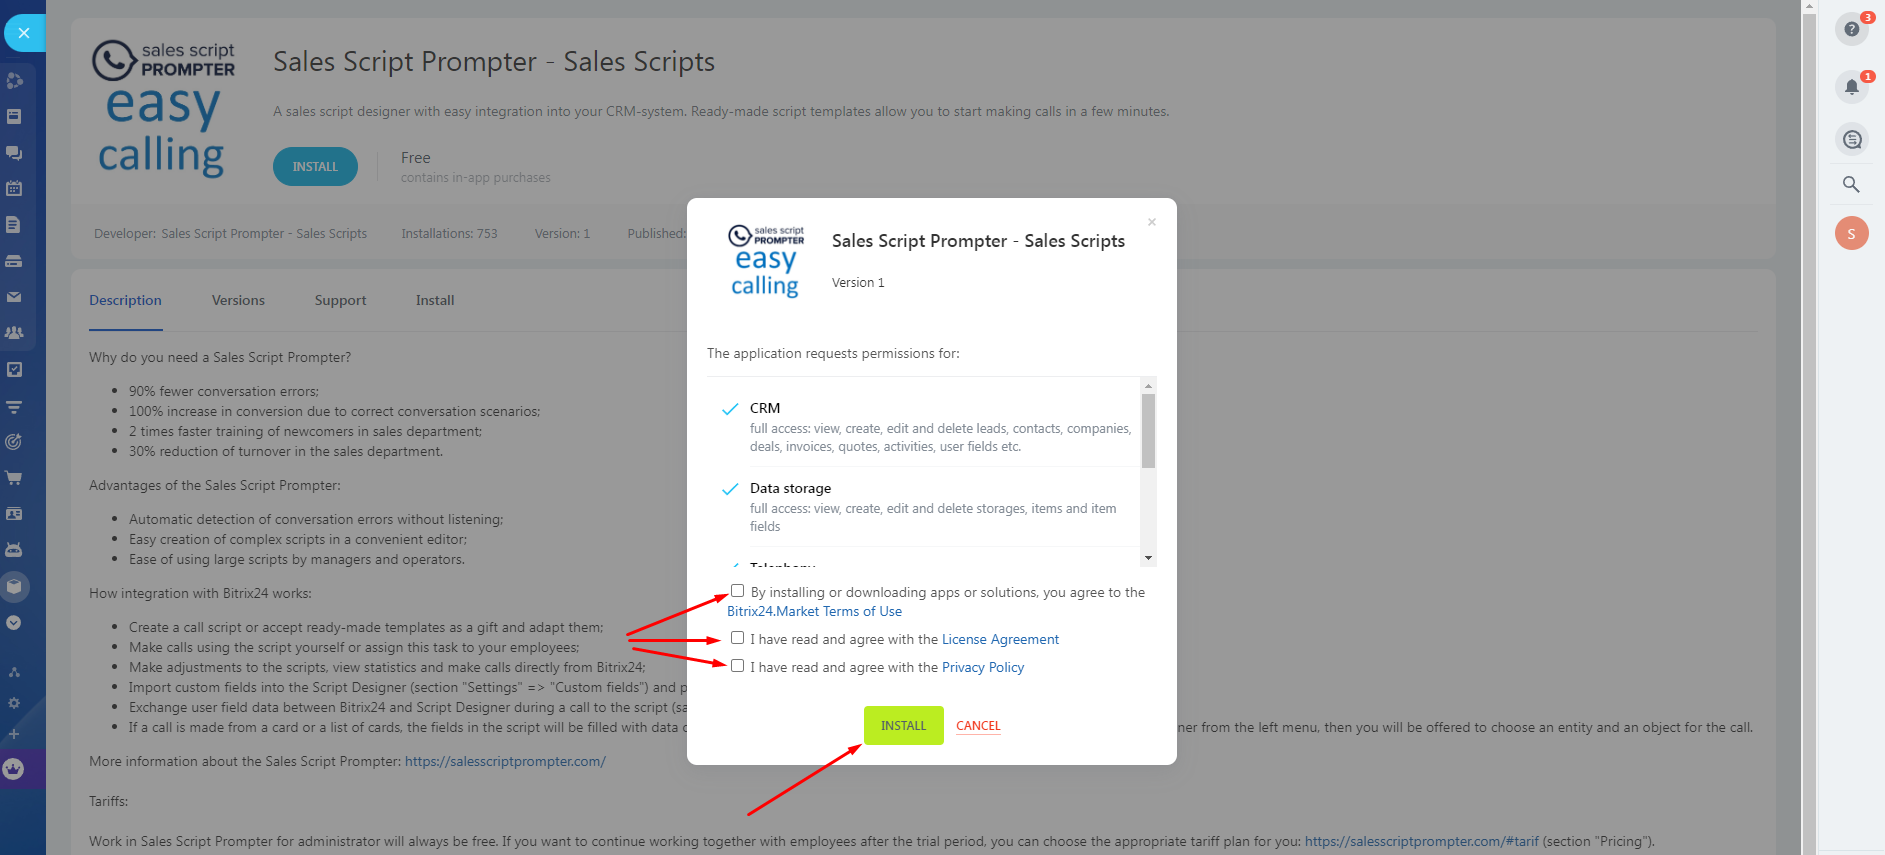
Bitrix24 CRM
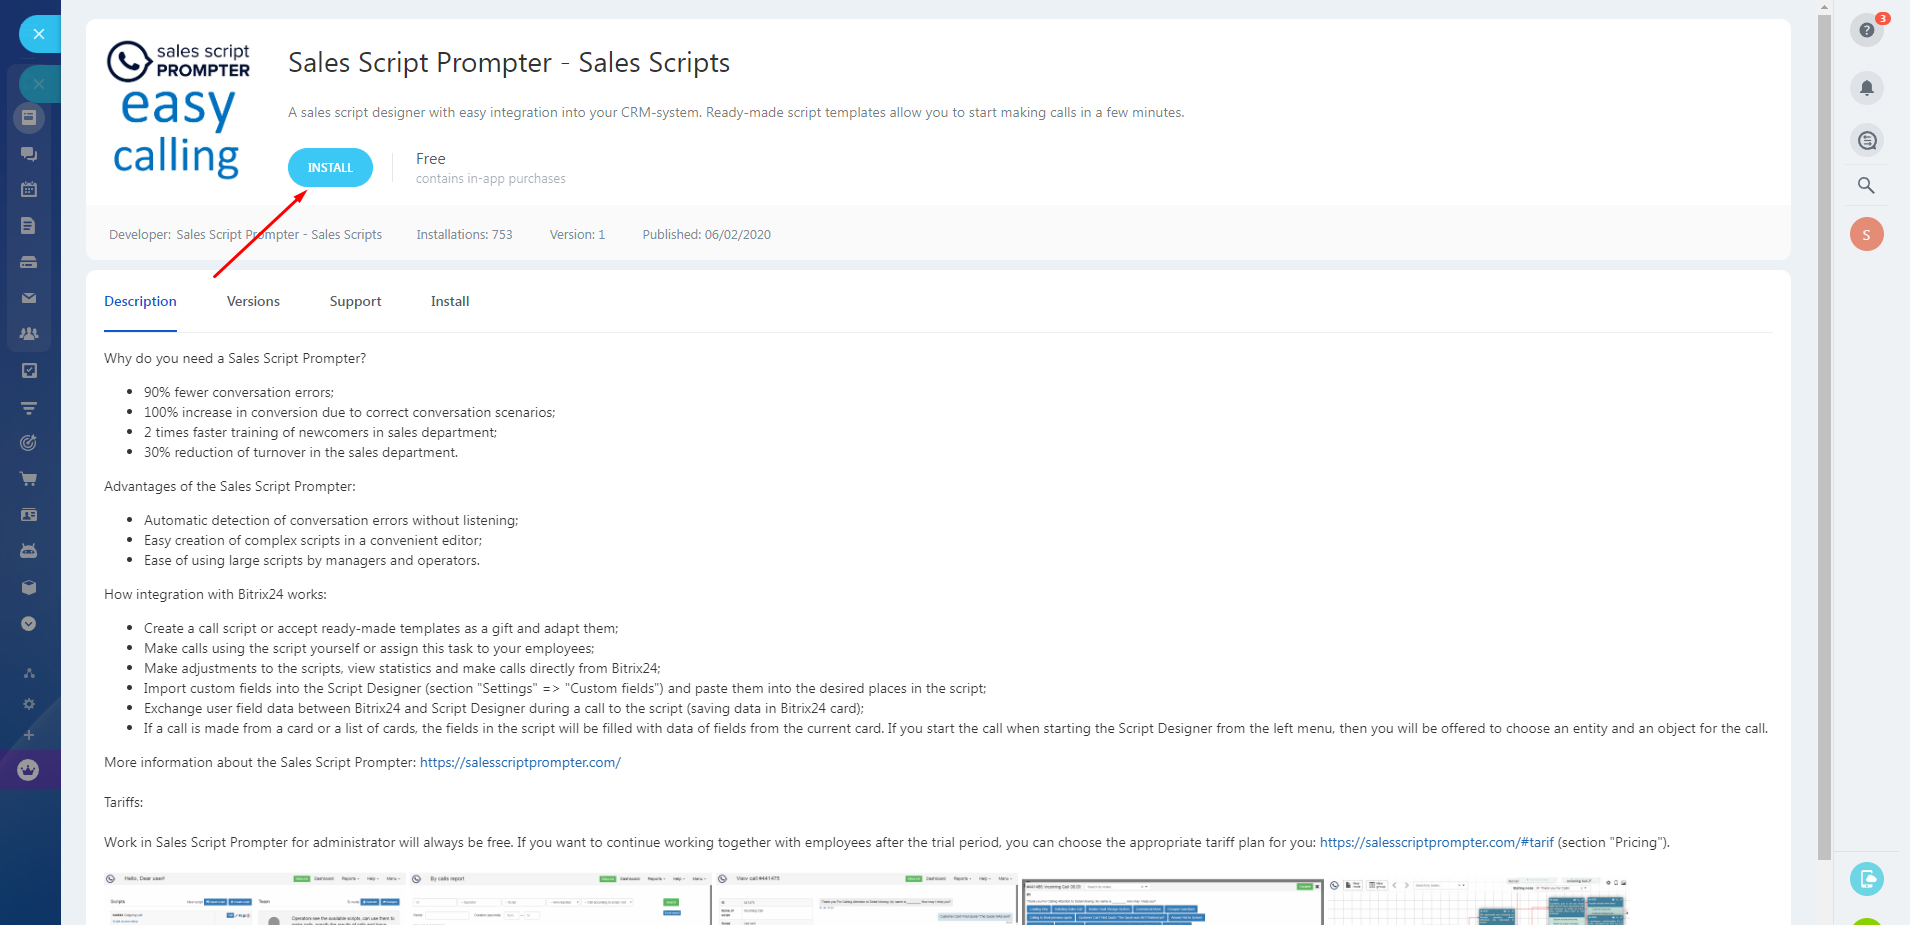
In order to work effectively with the various entities in Bitrix CRM, the "Sales Script Prompter" widget was developed. To install it, just follow a few simple steps.
- Go
to your Bitrix CRM account, to the Market24 section and search for the
"Sales Script Prompter" application. Click on the "Install" button.
At the first registration, the Bitrix account from which the application is installed becomes the administrator account for the Sales Script Prompter, and in the future, in order to work correctly with employees, reports, scripts and fields in them, the administrator must be authorized under this account.
In a situation where 2 users in Bitrix have account administrator rights (for example, a programmer and a director), but the programmer installs the application, the director becomes an employee in the Sales Script Prompter and will no longer be able to invite employees to the project and manage them.
In this case, the only correct way out is to delete the created accounts in Sales Script Prompter, an application in Bitrix24, and reinstall everything again, with the correct arrangement of rights and user roles. - In
the window that appears with the application description, select the checkbox
to accept the installation of the application.
Then
- confirm your consent to the transfer of data on your Bitrix account, as well
as read the license agreement and confidentiality policy "Sales Script
Prompter". Then
click the "Install" button.
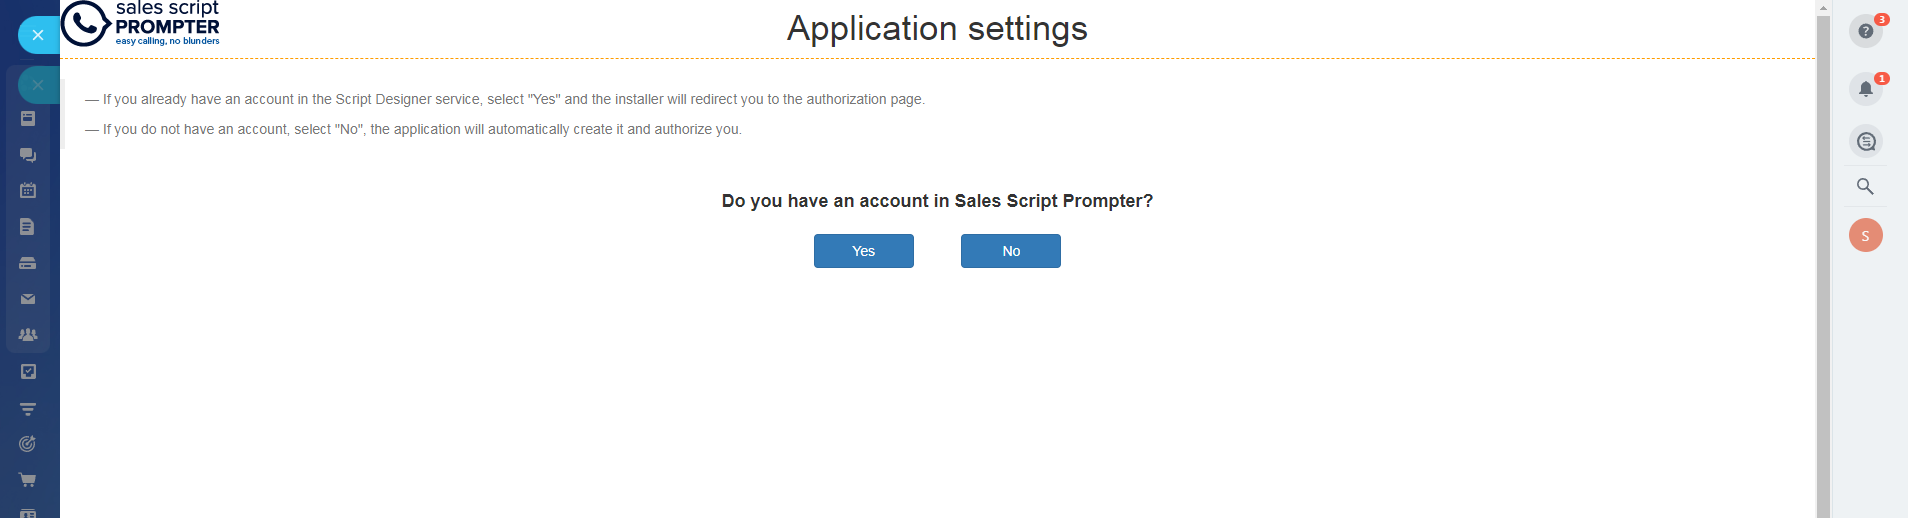
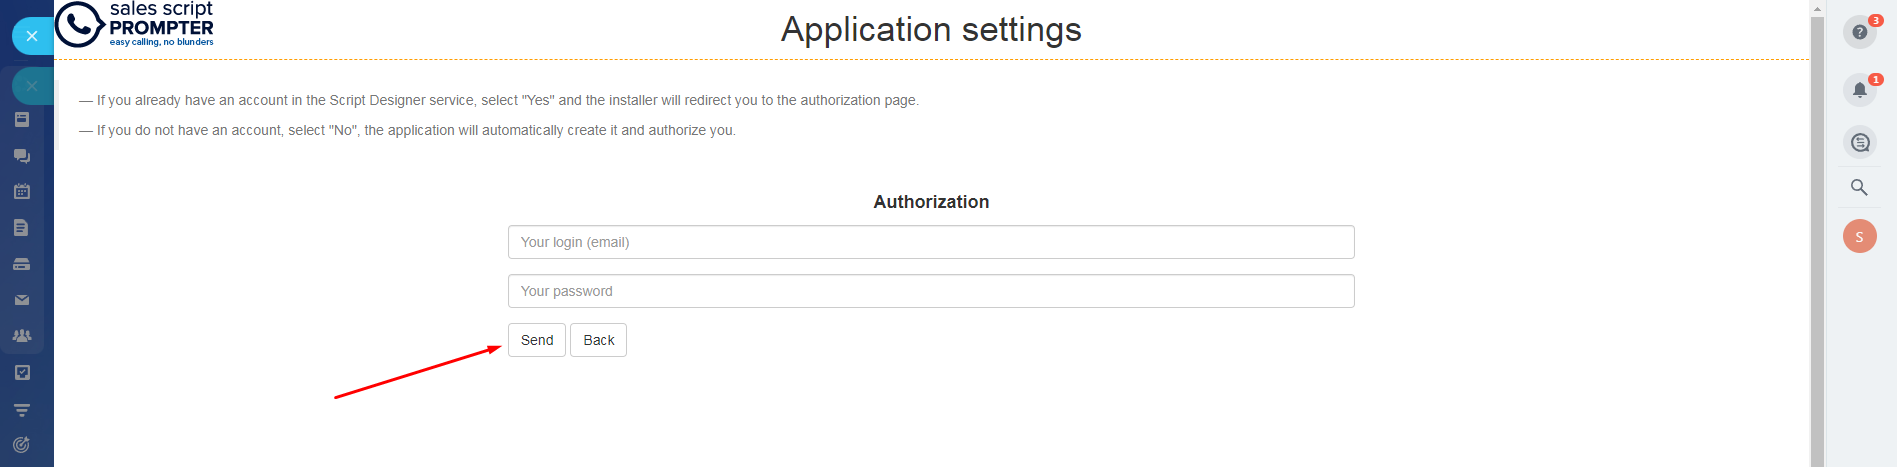
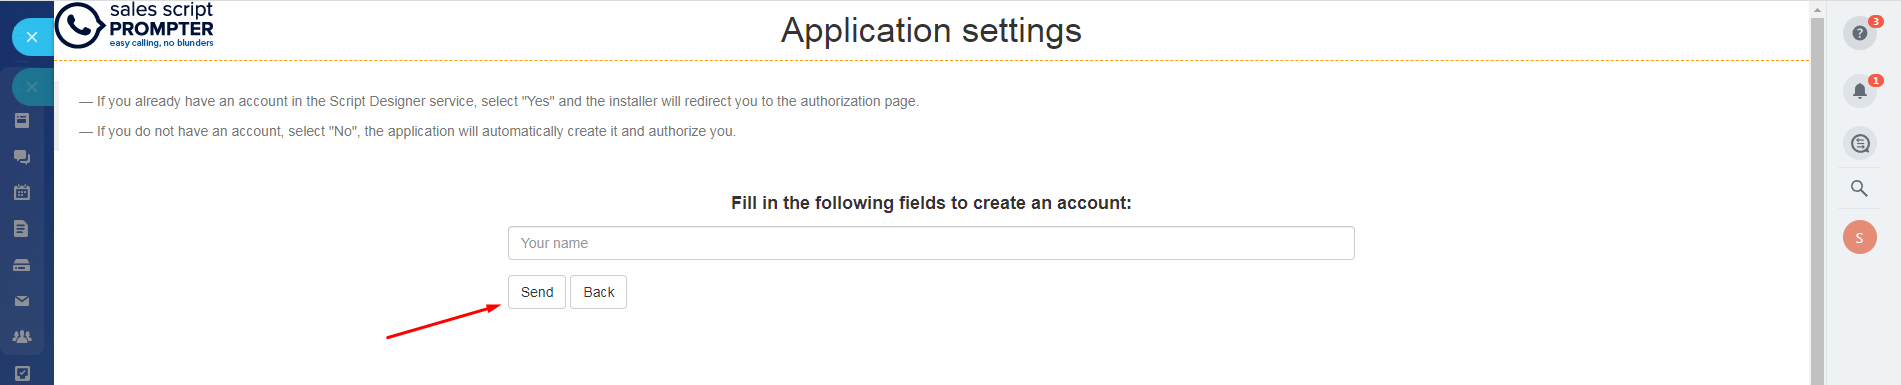
- The
installation wizard will start, and then you will be offered to choose one of
the options - to log in, if you already have a registration in the "Sales
Script Prompter" service, or to create a new account (by clicking
"No").
- Fill
out the required form and click on the "Send" button.
-
 Congratulations! Your Bitrix CRM account has been fully integrated with the "Sales Script Prompter" service. Now you can import the necessary entity
fields from Bitrix to our service, insert them into the script and make
effective calls to your client base.
Congratulations! Your Bitrix CRM account has been fully integrated with the "Sales Script Prompter" service. Now you can import the necessary entity
fields from Bitrix to our service, insert them into the script and make
effective calls to your client base.

- If you did everything according to the instructions, but the integration does not work, pay attention to your domain in Bitrix24. In the event that it is unique (does not match the pattern https://any_characters.bitrix24.(com/de/br/eu/es)), please let us know about it in the chat on the site and send the full domain address from the address in the message browser lines. We will need to add it to the list of trusted sites (this is due to security requirements from Internet threats).
Pipedrive CRM
In order to efficiently work with contacts, companies and deals in Pipedrive CRM, the "Sales Script Prompter" widget was developed. To install it, just follow a few simple steps.
- Go
to your Pipedrive CRM account and follow
the link to install the "Sales
Script Prompter" application
.

- Click
on the "Allow and Install" button, which will launch the installation
wizard.
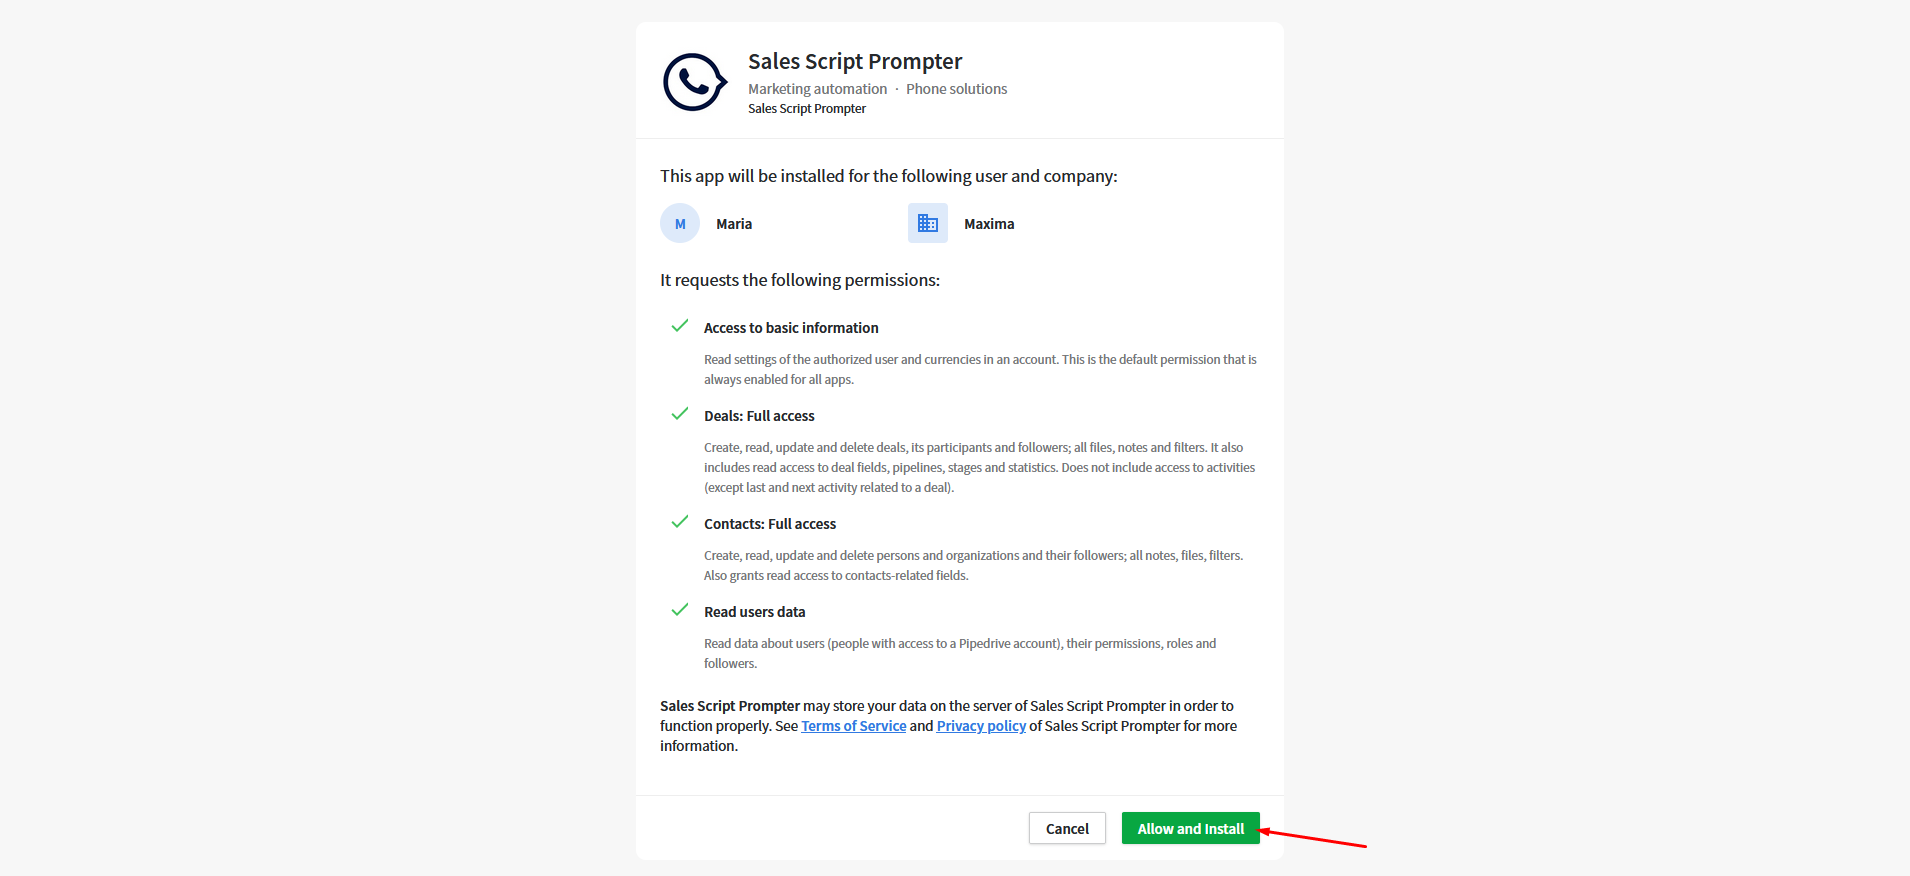
- Choose
one of the options offered by the system - authorization or account creation,
and then the "Sales Script Prompter" service will do everything
automatically.

- Congratulations!
The application is installed and ready to work. Go to the card of the entity
you need, and click on the "Sales Script Prompter" application
button.
-
Now
you can create scripts, make calls on them, import entity fields from Pipedrive
and work with them during a script call.
Working in call mode
How to make a script call
-
To make a script call, go to your account and click the "Call" button.

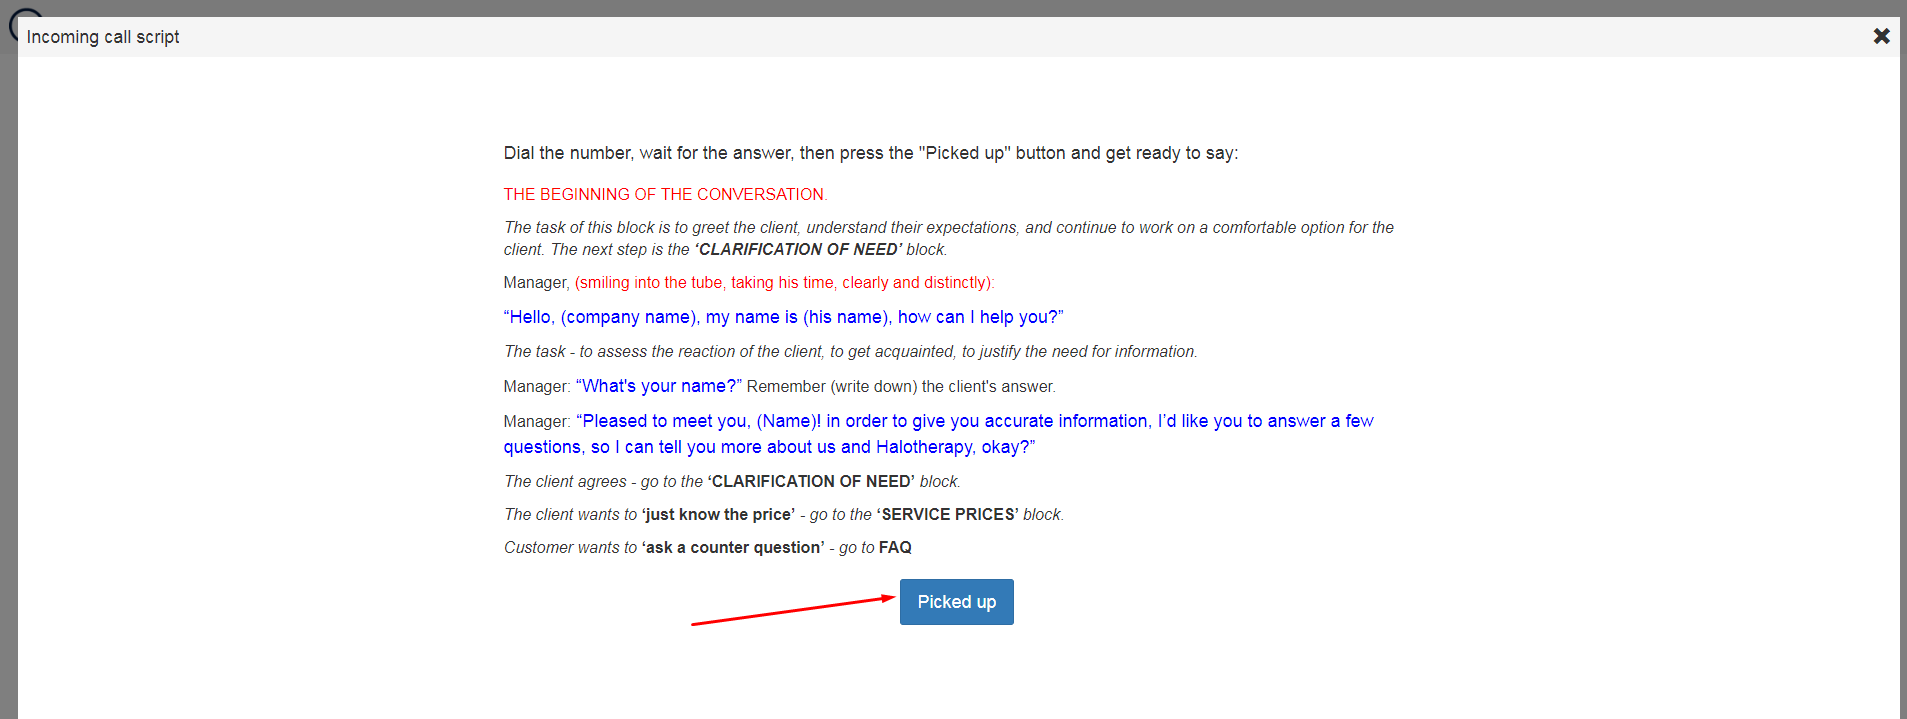
- When starting a conversation with a client, study the start inscription and click on the "Picked up" button.

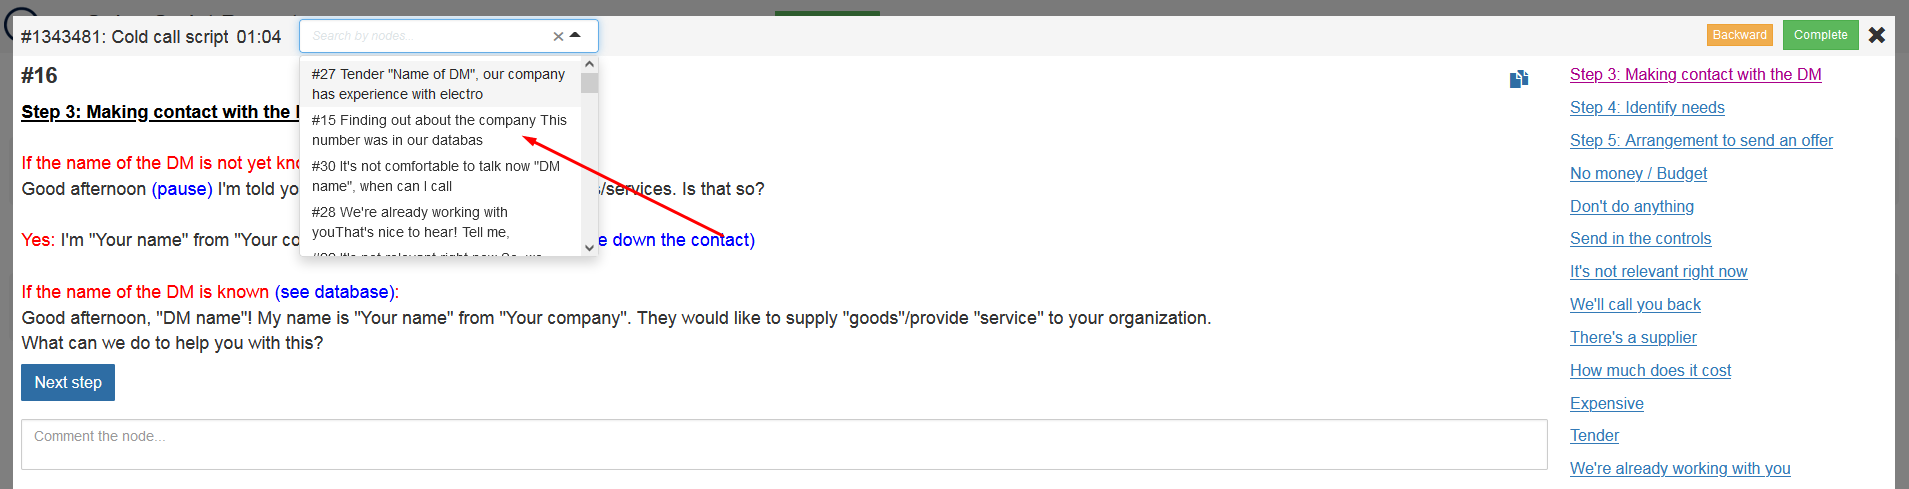
- You will be shown the initial node of the script, then depending on the conversation with the client, you can click on the answer options or group answers, moving to other nodes that correspond to the logic of the conversation, and continue the dialogue with the client. You can enter comments for each node to note important points that you need to further work with the client.
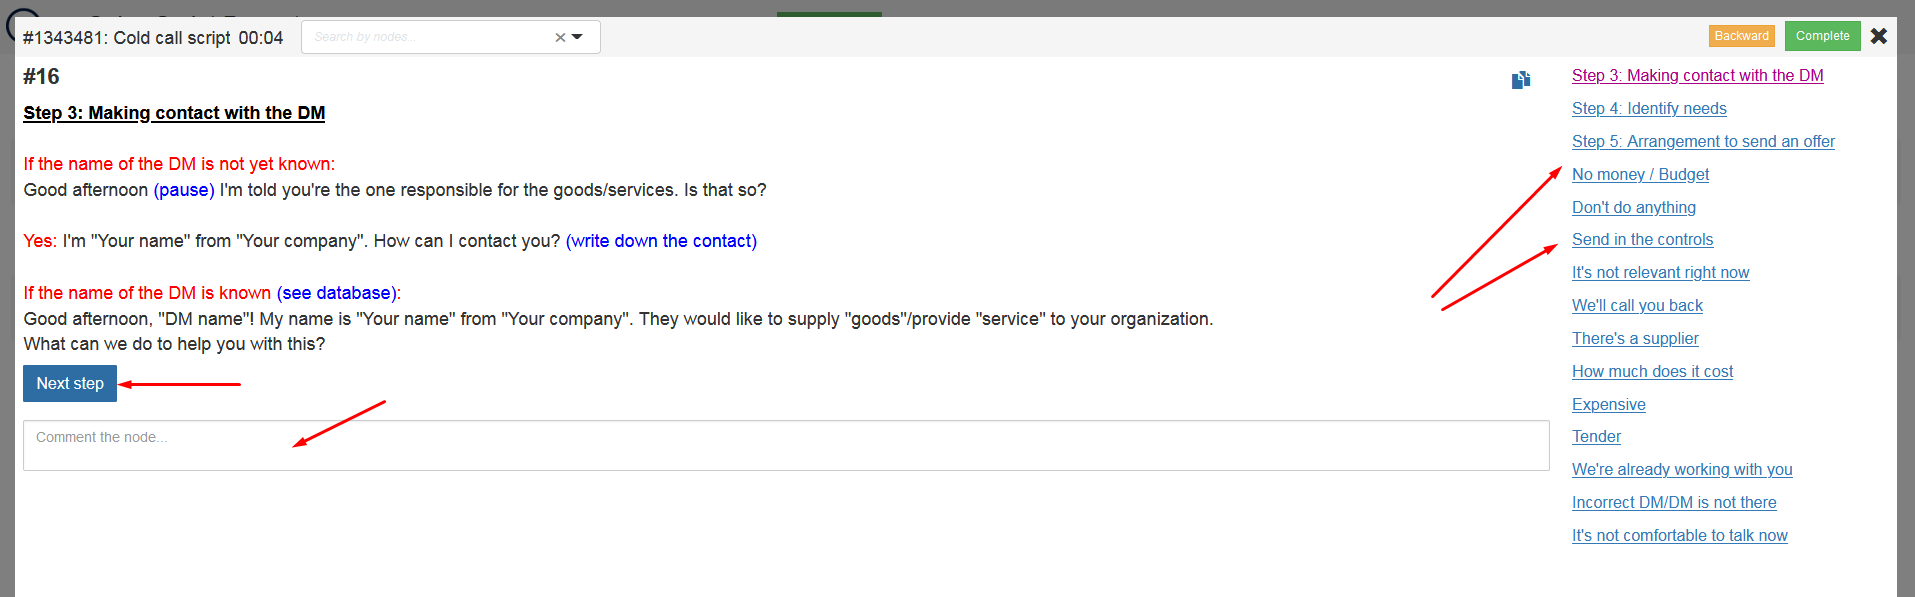
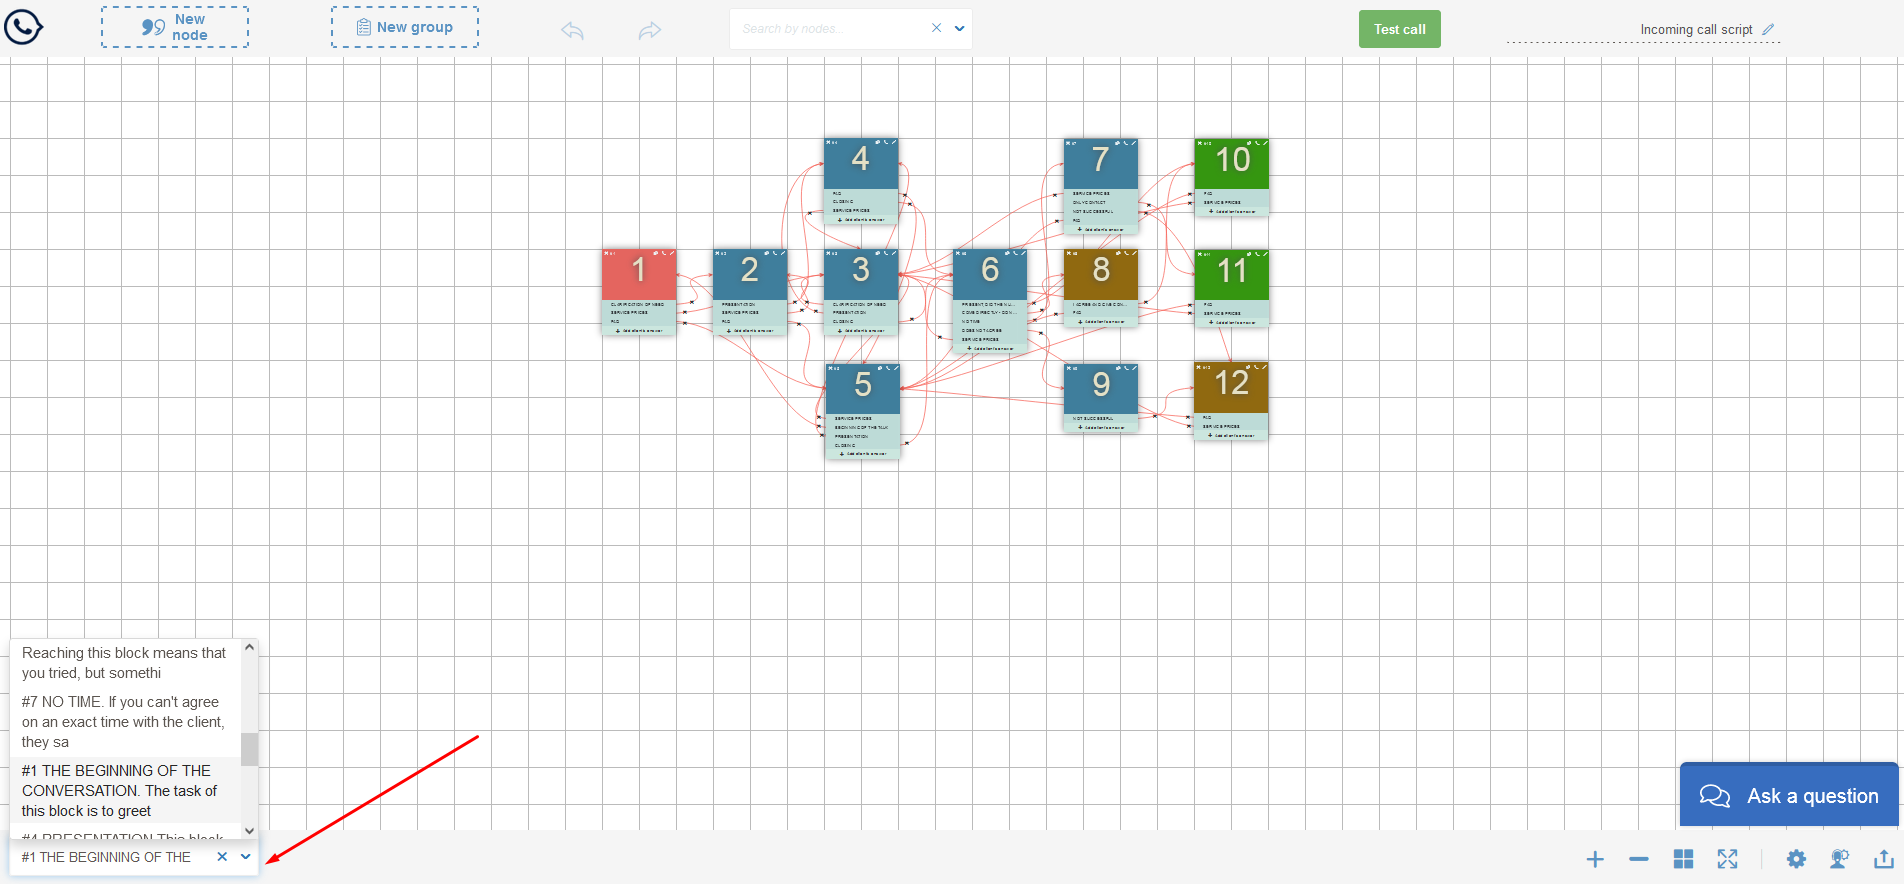
- In a situation where none of the options/groups of answers fit, but you know there is a node that meets the requirements to continue the dialogue, you can go to it from the search.
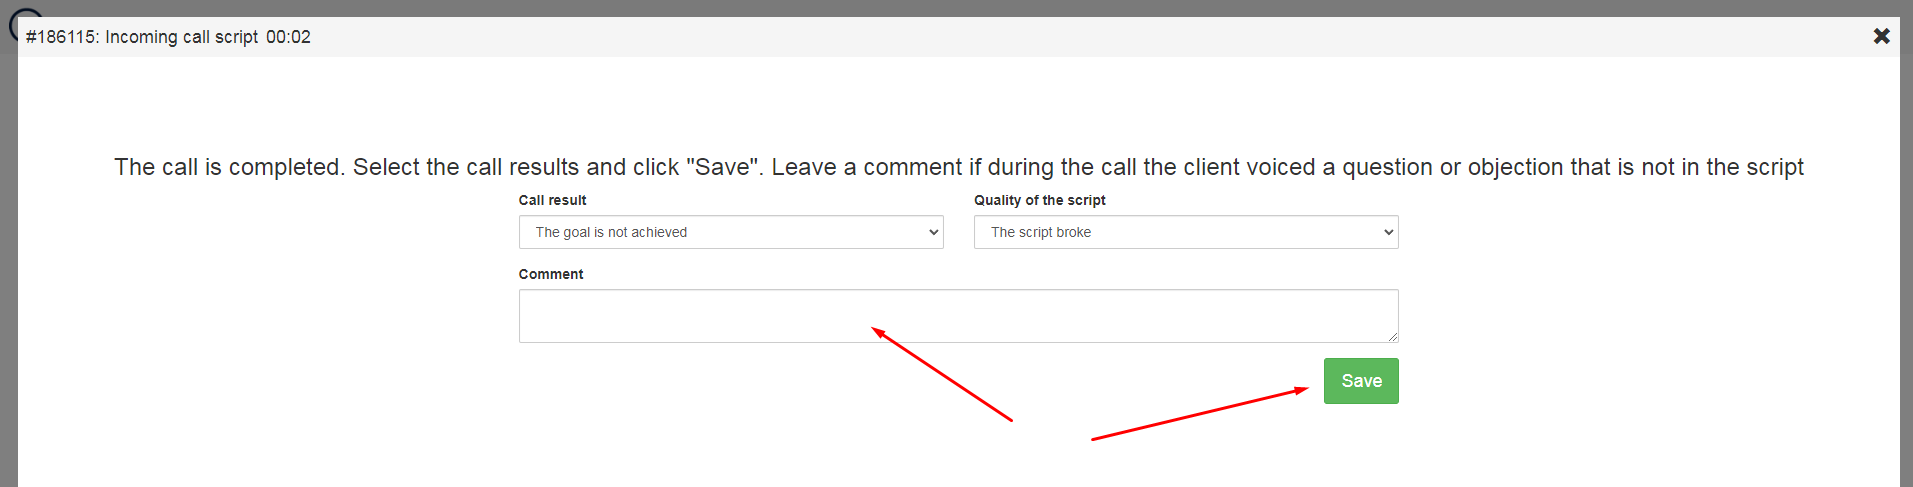
- When the conversation has come to a logical end, you must press the "Complete" button.
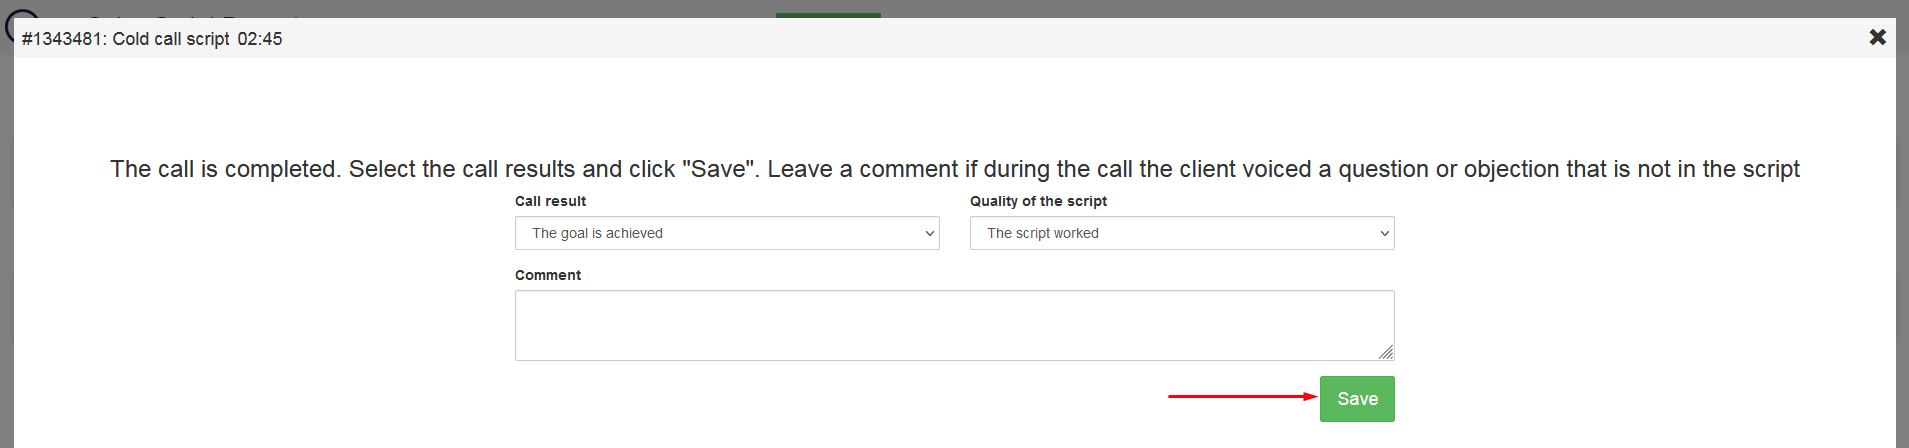
- You will be taken to the final screen of the call, where the results of the call are displayed with the option to make a final comment on the call. Click the "Save" button to save your final comment.
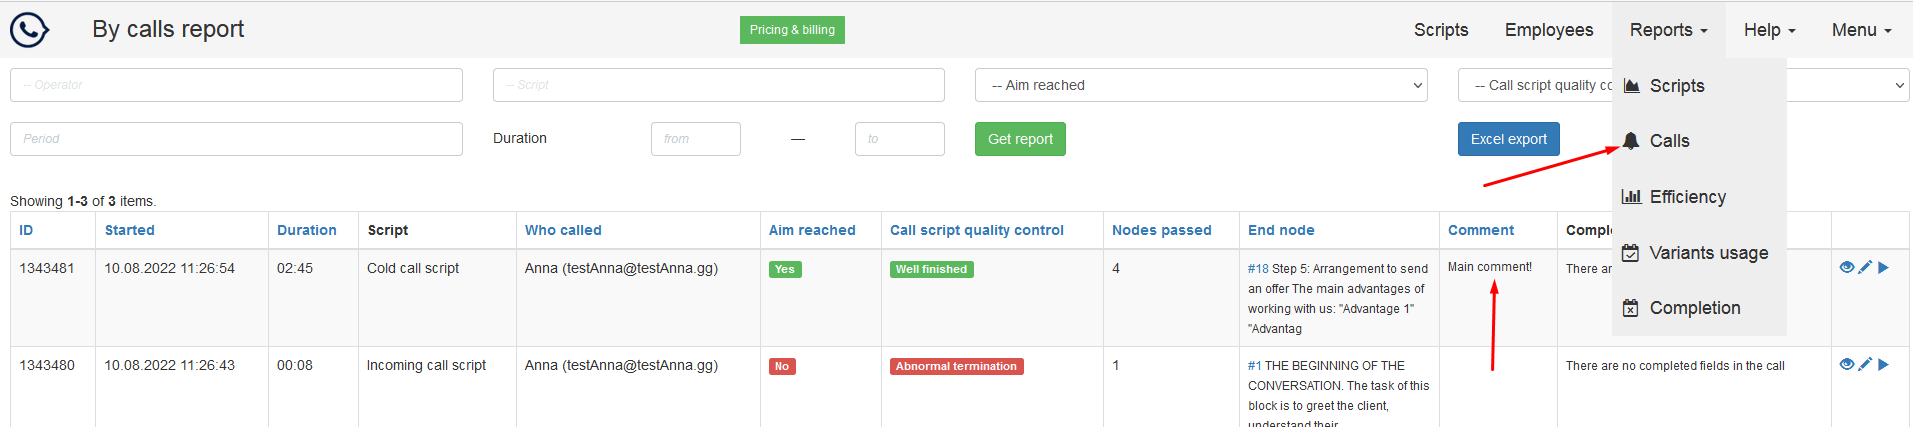
- You can view the results of calls by going to the menu item Reports -> Calls. All reports will be discussed in more detail in the "Working with Reports" section.
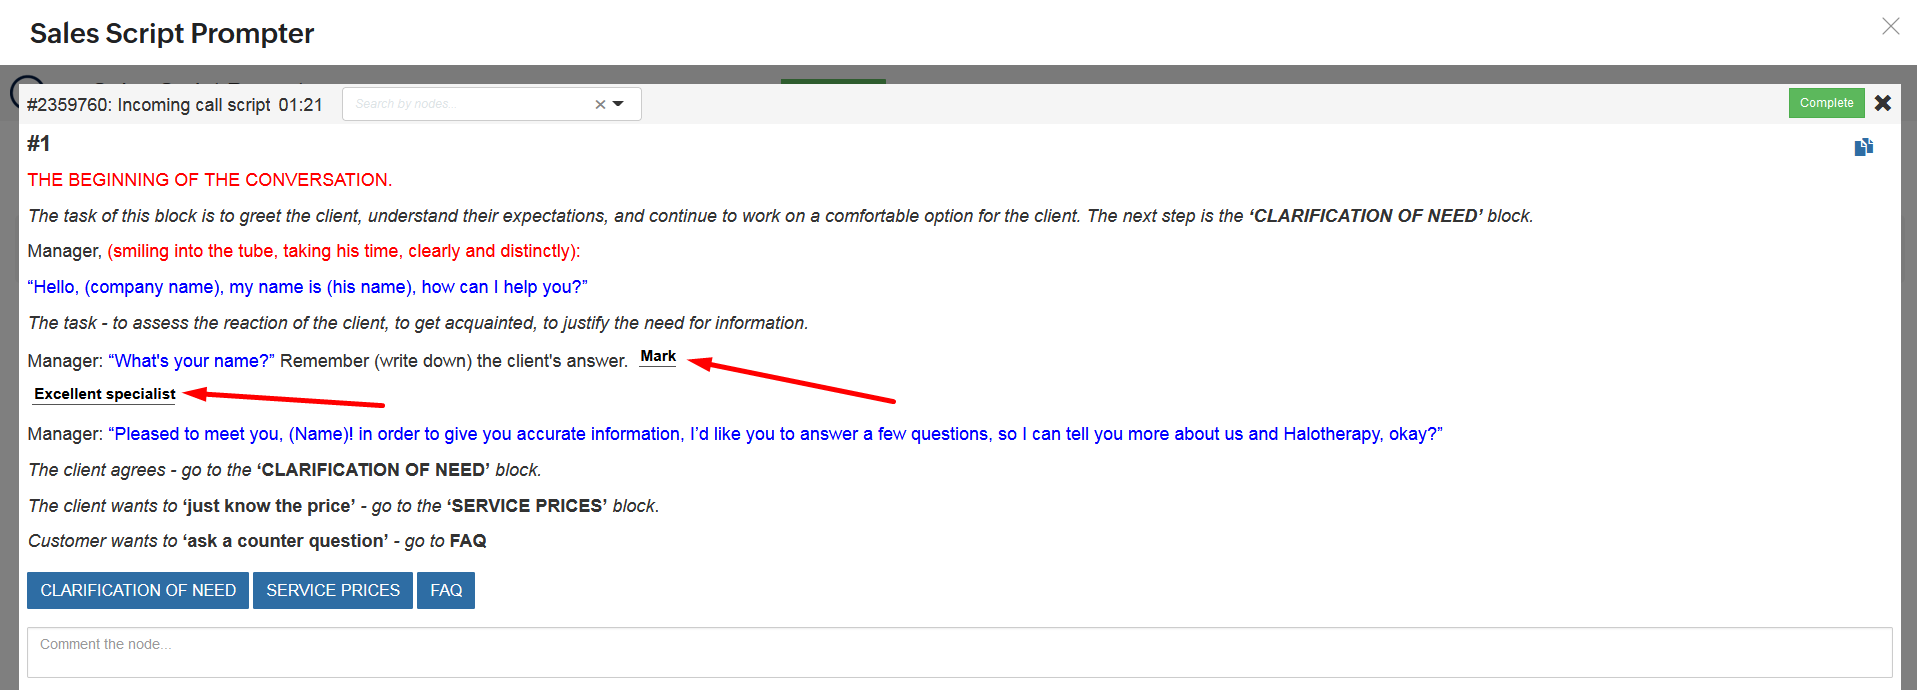
How to fill in the fields in a call
During the call, there are several scenarios for working with user fields.
Scenario 1: Working from CRM
- Start of the call:
- At the beginning of the call from CRM, the script fields are automatically filled with data from the client's CRM card.
- During the call:
- The manager can edit the values of the fields during the call.
- End of the call:
- After the call ends, all field changes are saved.
- The fields in the client's CRM card will be updated with the new values.
- The call report will include all the fields used in the script, along with their values.
Scenario 2: Working directly from the service without CRM
- First start of the call:
- When the call is first started, all fields in the script will be empty.
- During the call:
- The manager fills in the fields as needed.
- End of the call:
- After the call ends, the filled fields are saved in the call report.
- Resuming the call:
- During the next call, the script resumes with the values saved from the previous call.
- The manager can adjust the field values during the new call.
- Starting a call with empty fields:
- To start a call with empty fields, close the start screen.
- Then select the desired script for the call from the list of scripts.
Detailed Mechanism for Working with Fields During a Call
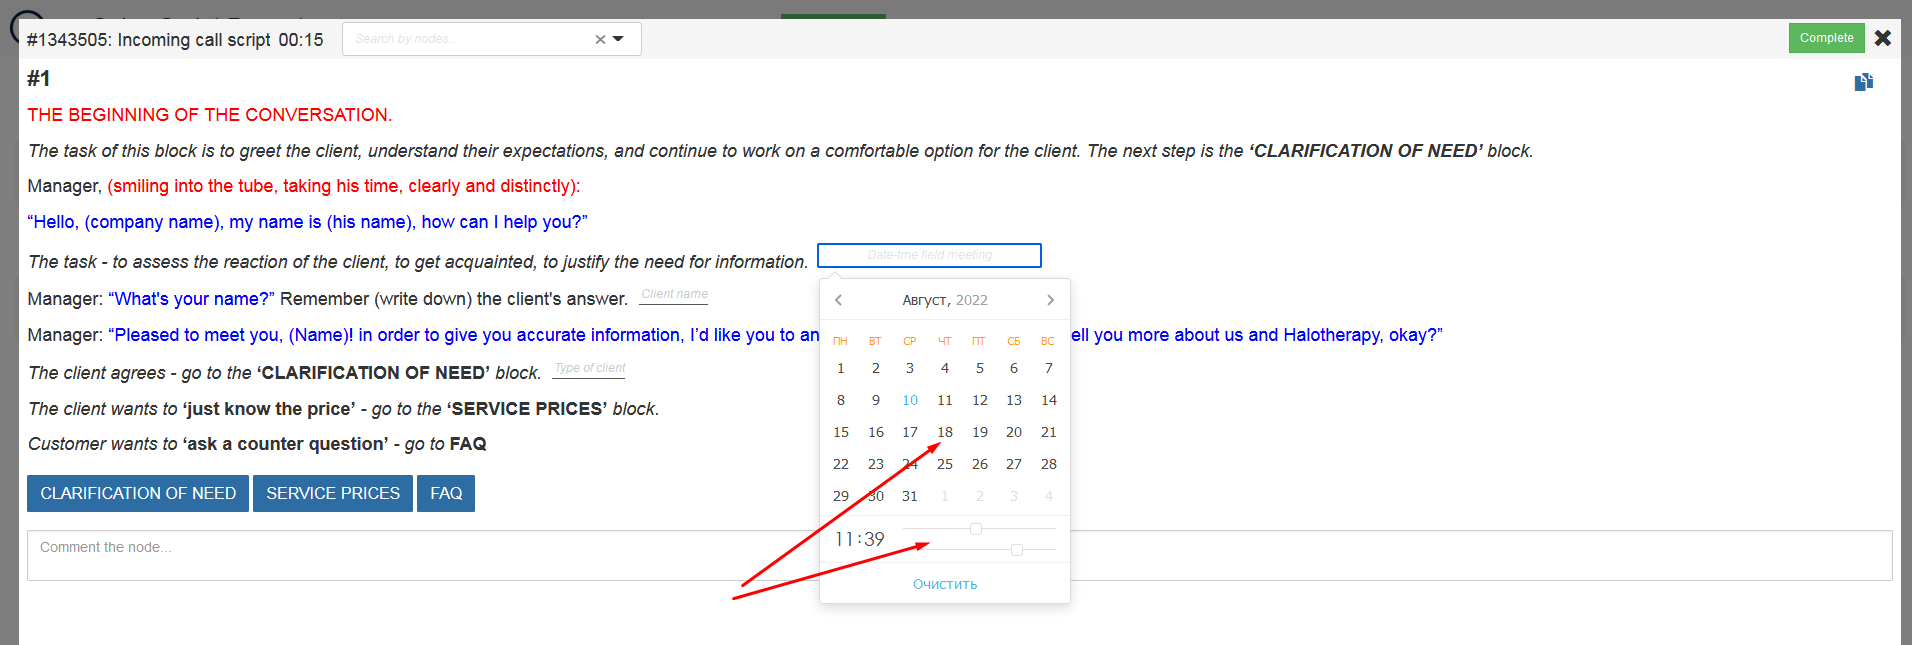
- To fill in the fields in a call, go to the desired node that has fields and fill them in. If the field is text or numeric, enter the text from the keyboard, if the field is a checkbox, list, or multiple list, or a date, time, or date/time type, specify or select the values you want.
- If you work in CRM, in some CRM (e.g. Bitrix) the values of the fields of an entity (contact, deal, company, etc.) from which you call are automatically changed instantly in the CRM entity card. In other CRM (AMO) entity fields in the CRM card will be changed only at the end of the call and by clicking on the "Save" button.
- If the field in the call is present in several nodes, filling it once, you will see the value of this field in all nodes. If you need to correct the value of this field during the call, you can do it. You can view the list of completed fields by the results of the call in the menu Reports -> Calls.

Working with reports
Scripts report
This report is a summary and is a table with a list of all scripts and an analysis of past conversations on these script You can generate a report more flexibly by selecting a script, an employee, a period of work with the script, as well as goal achievement parameters and script quality control. Fine-tuning allows you to better evaluate the work of employees.

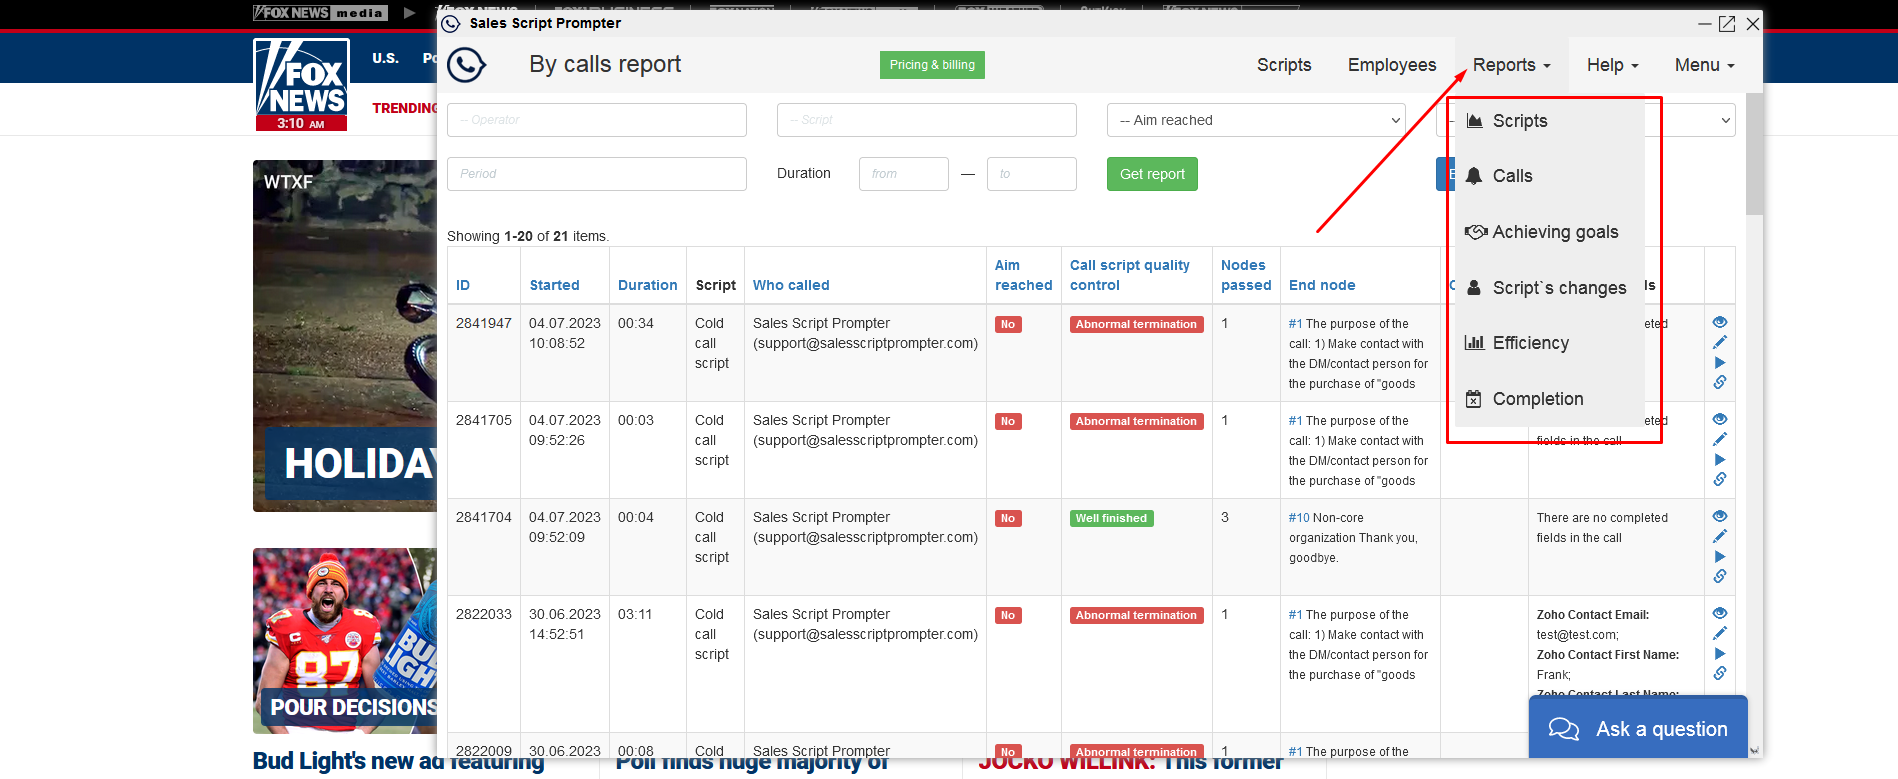
If you click on the figures inside the table, you will go to the call report.
Call report
Report on calls is very important in terms of monitoring the effectiveness of employee conversations. It is a complete list of all calls on the script you and your employees, recording the results of calls, comments and fields filled during the communication with the client if they are in the script.

You can generate a report using filters (fine-tuning): employees, call period, and other indicators to generate a report.
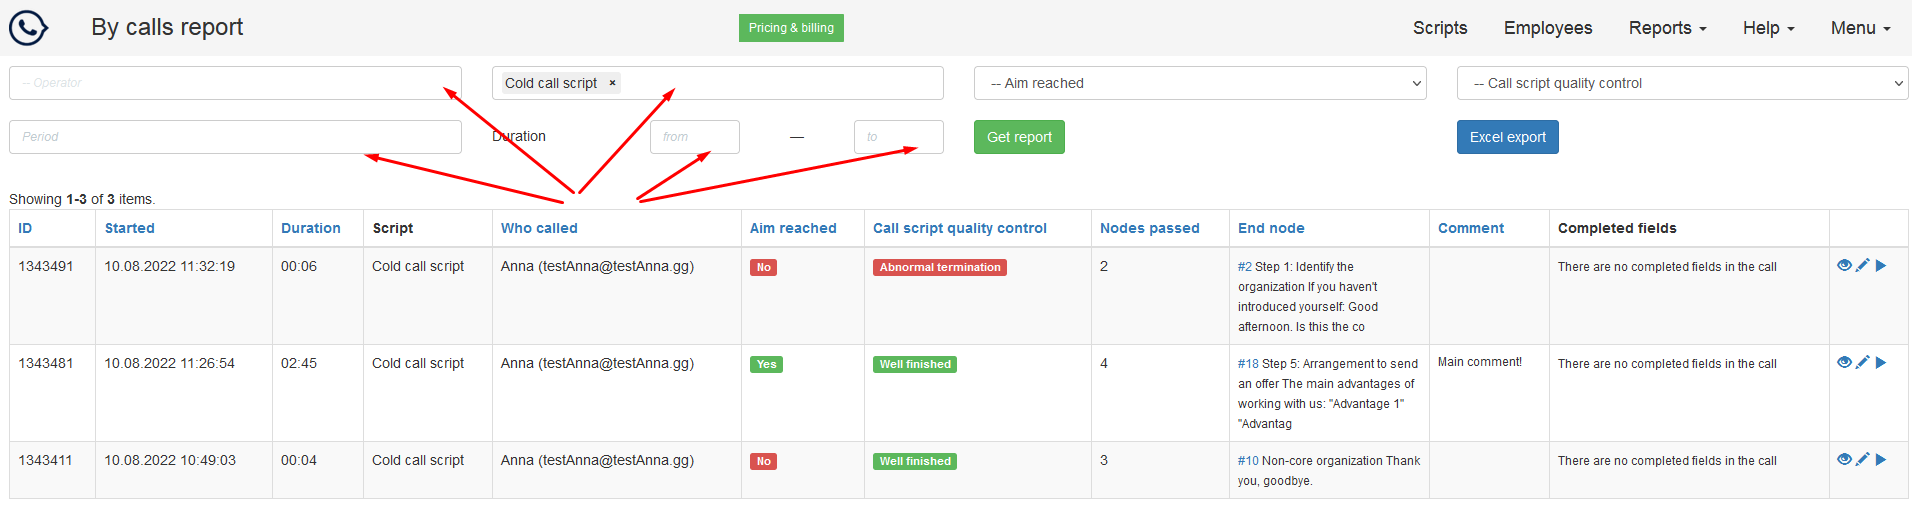
If you need to save data for further analysis and communication with employees, you can generate a report and export it to Excel.
In the event that you want to be able to view reports without authorization in the service (for example, allow employees of other departments or subordinates to view reports on their own), you can enable the "View call report without authorization" option in your personal account settings.
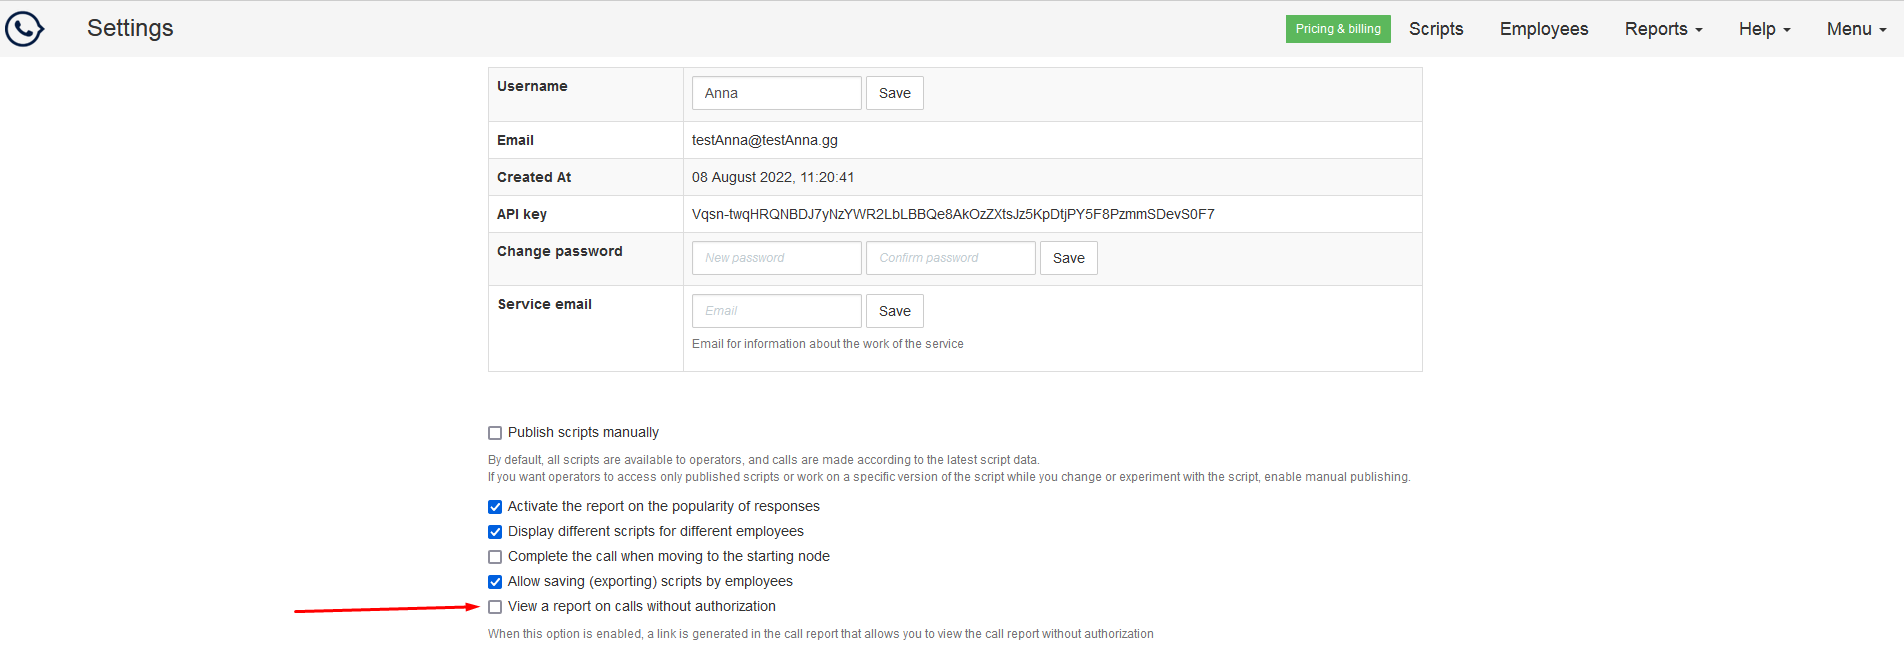
If you enable this option, a link to view the report without authorization will appear in the call report.
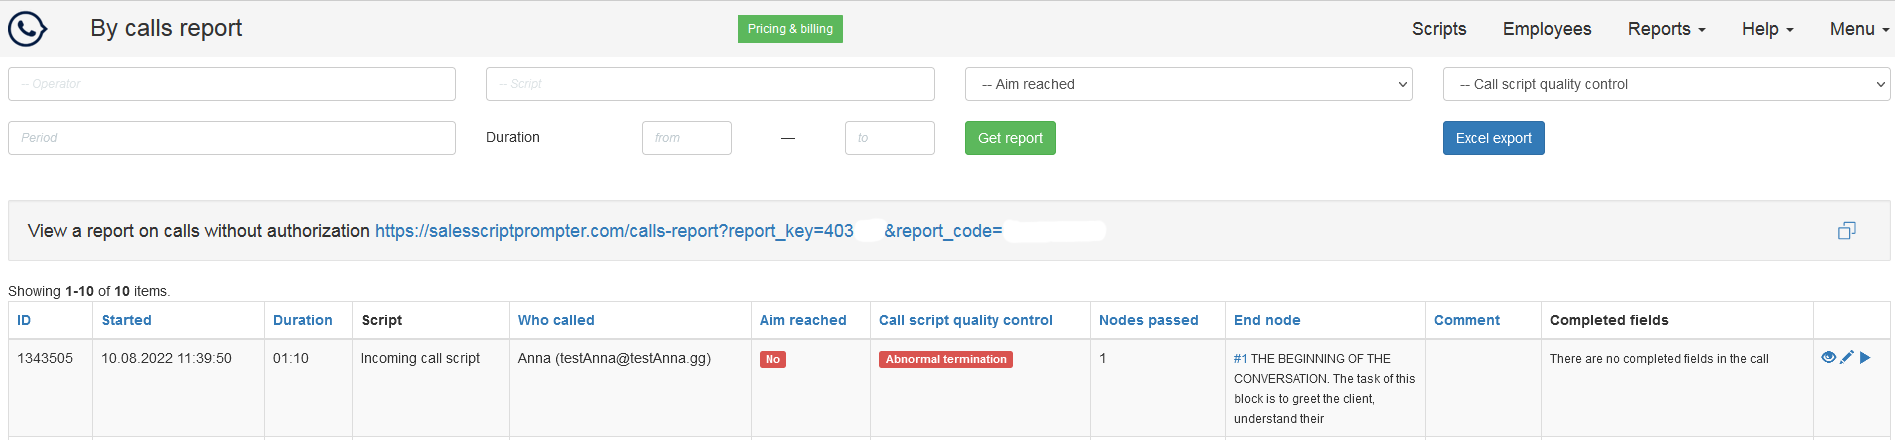
Copy the link, save it and send it to those persons to whom you consider it necessary. They will be able to view the report in a summary form, as well as for each call separately, but they will not be able to go into script editing mode and change anything in it.
Let's analyze the meaning of the block of icons in the line to the right of each call.
- The "eye" icon allows you to view each employee's call in detail, indicating the nodes passed and the answer choices used.
- The "pencil" icon allows you to go to the editor of the script on which the call was made.
- The "triangle" icon allows you to listen to the call, if the "Script Designer" service integration with your telephony is configured. Currently configured integration with the telephony from OnlinePBX. If you want us to make integration with your telephony - please write to chat or e-mail support@@salesscriptprompter.com.
- The icon with the image of a "paper clip" is visible if the call was from the CRM and it leads to the entity card (client, company, deal, etc.), from which the call was made.
Performance Report
The efficiency report allows you to see a comparative picture of employee productivity and efficiency for any period you are interested in.
You can generate a general report, or a report for a certain script, for a certain period of time. This will allow you to compare the work of your employees and, accordingly, motivate and train exactly those of them who show certain results.
Working with the voice trainer
What a voice trainer is for and how to work with it
The voice trainer mode in the sales script builder “Sales Script Prompter” will allow your managers to work out the script while communicating with the robot, and teach them to strictly follow the script during a real call to the client.
- Starting training in the voice simulator mode is possible only from the Google Chrome browser. Please log in to your account, in the list of scripts select the script you want to use for training. Before training, please read the rules for setting up the script for the voice simulator. In addition to following the rules of this manual, remember that the training script should be as simple as possible. Do not use hundreds of nodes and response groups in the training script, make the script as clear and simple as possible, this will allow the system to work quickly, and the manager to quickly get used to the new product and respond competently using the script.
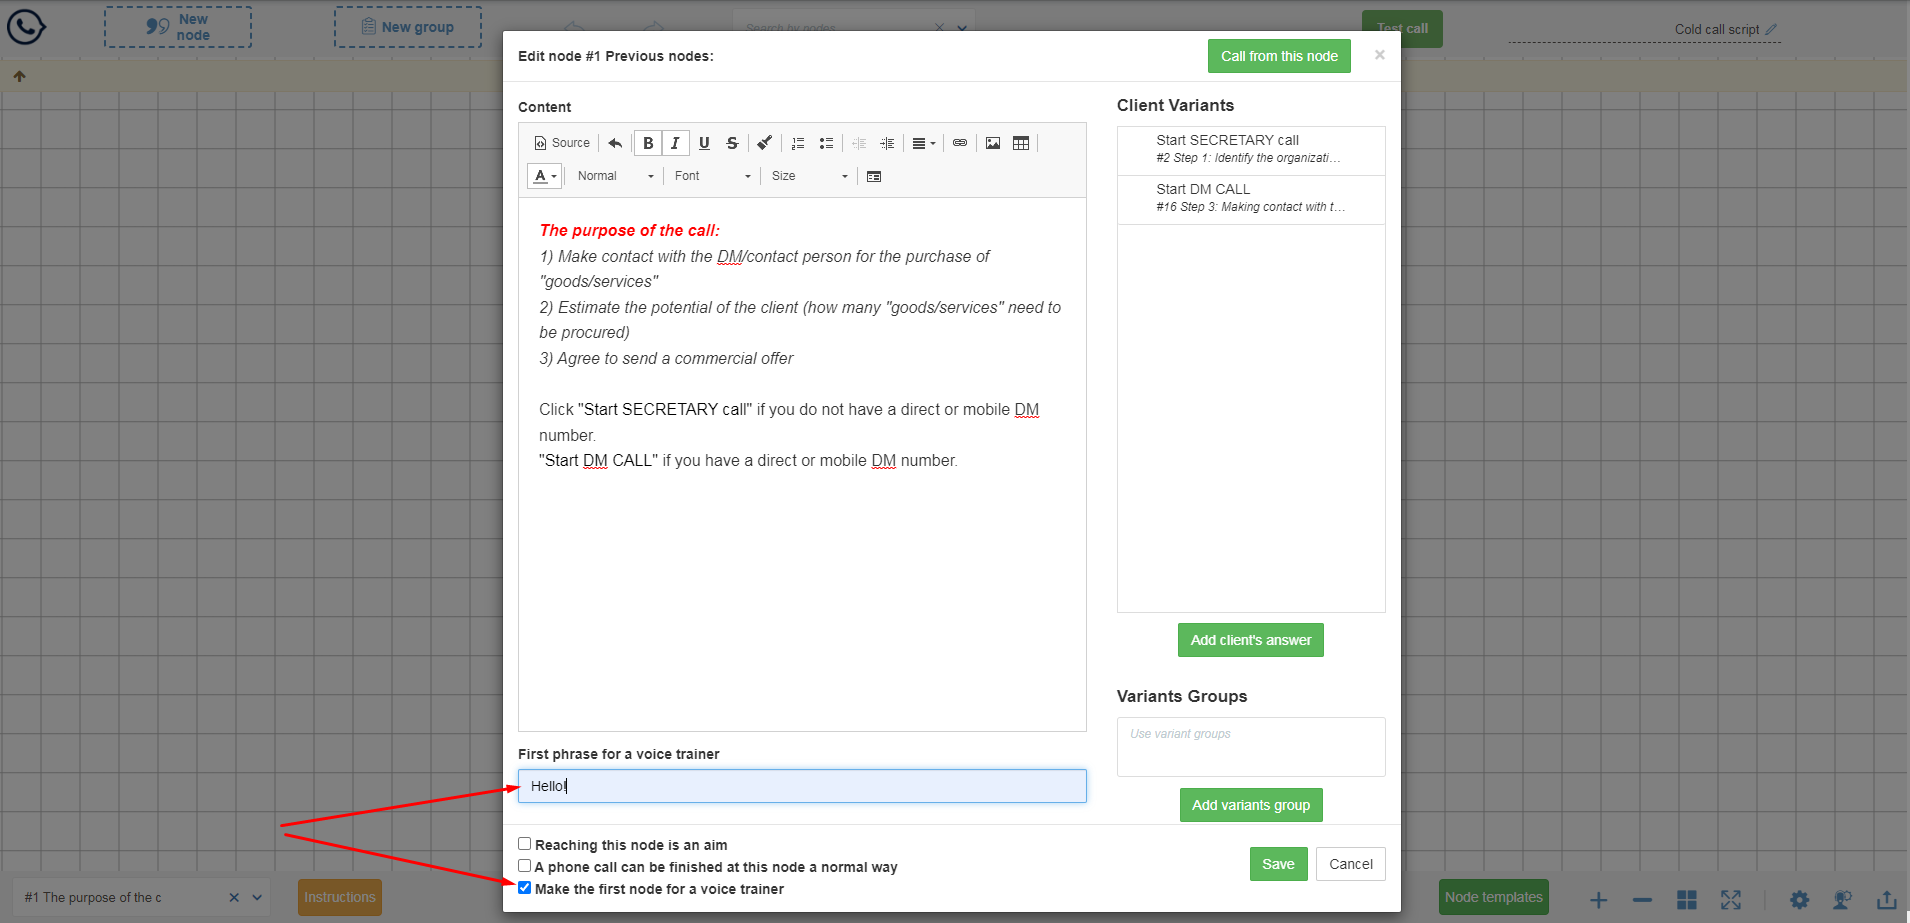
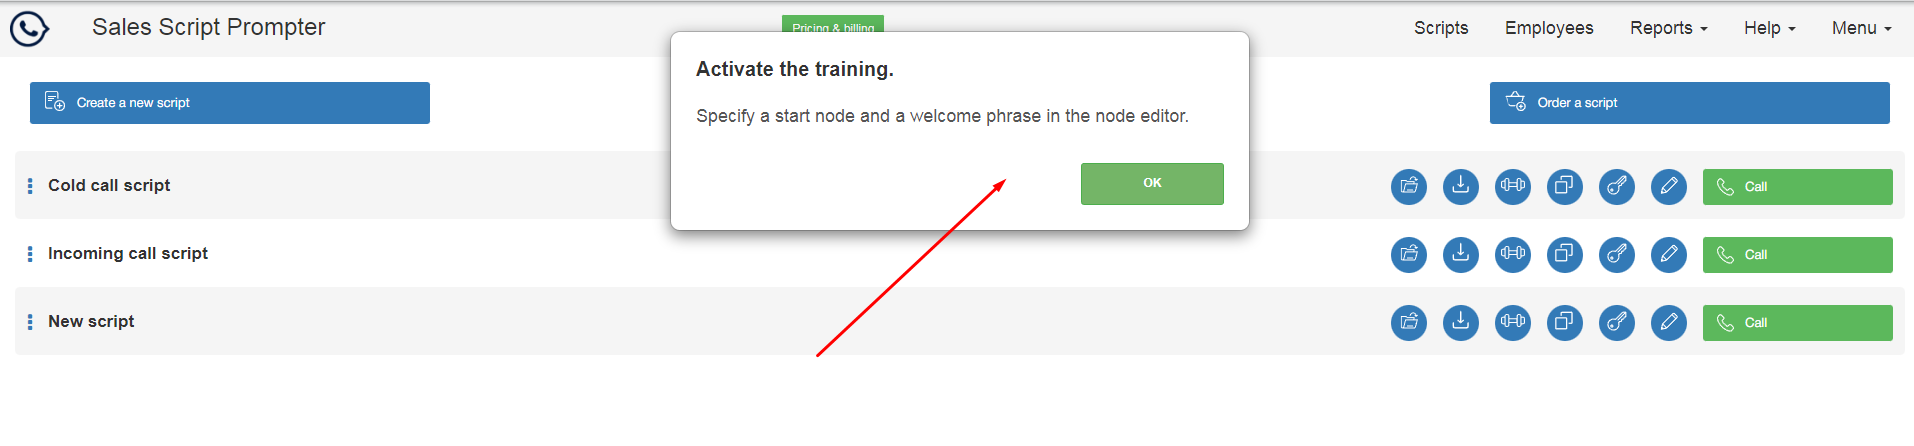
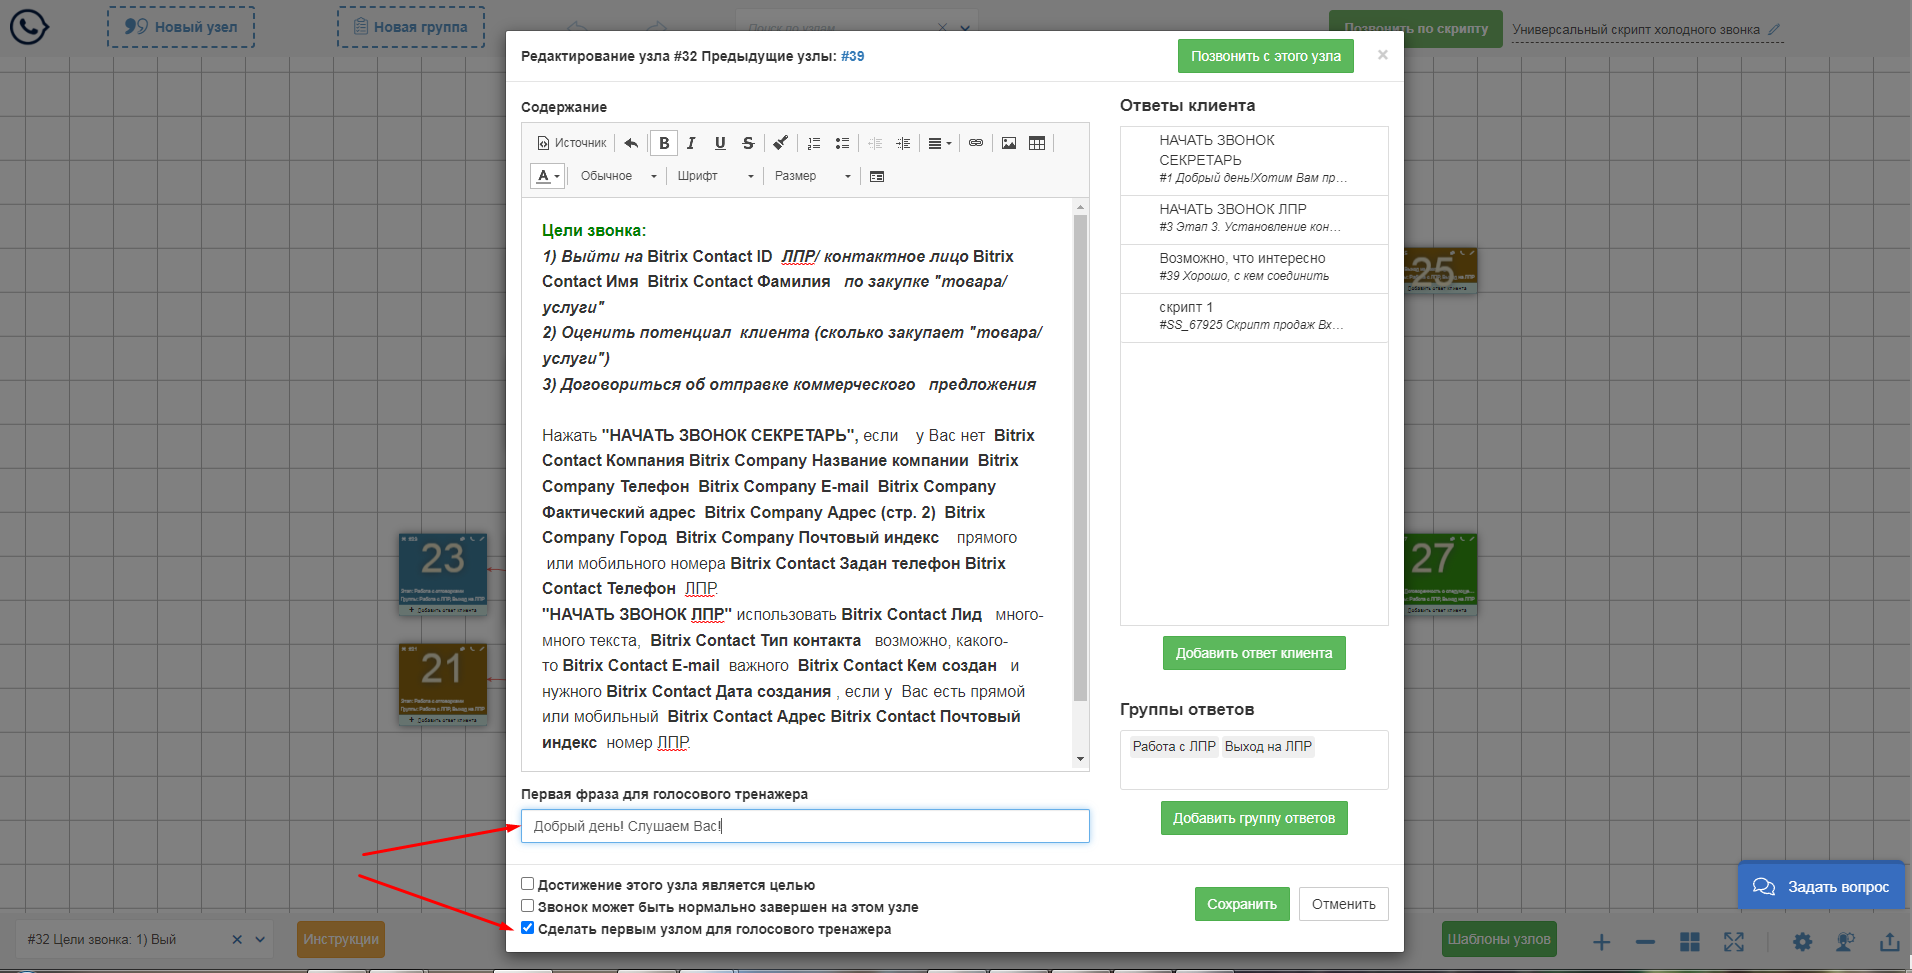
- Before starting training, you need to set up the script. Enter the script editor and open for editing the node from which you want to start training. Click the checkbox "Set as the first node for the voice trainer" and enter a greeting phrase that will imitate the interlocutor with whom the dialogue will be conducted. Save your changes.
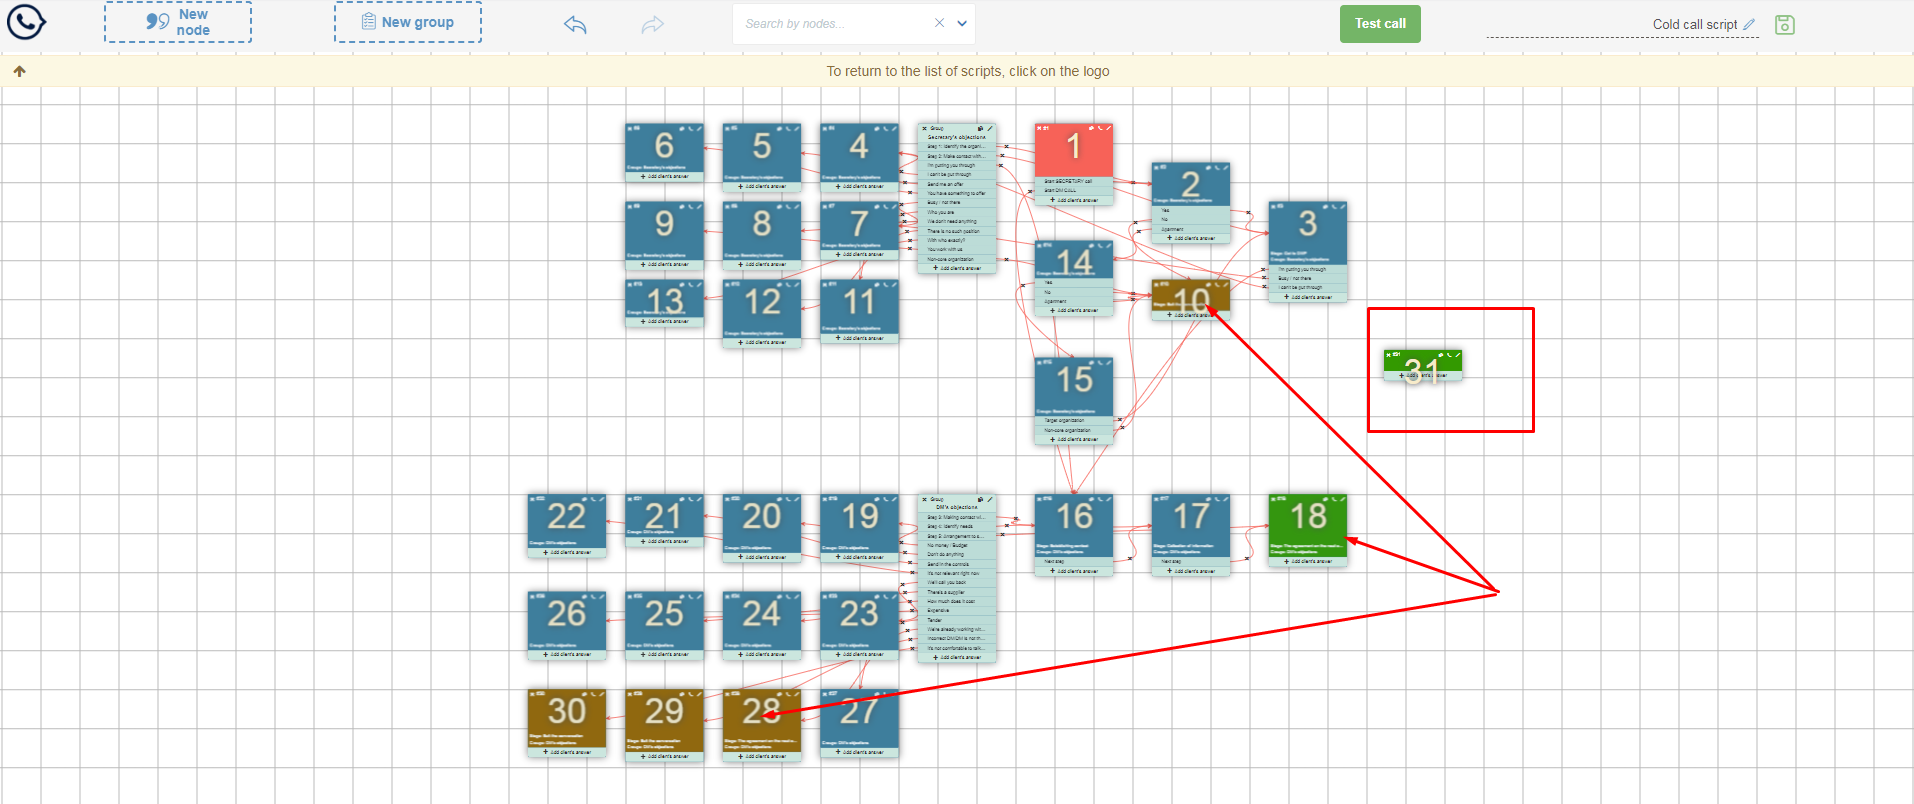
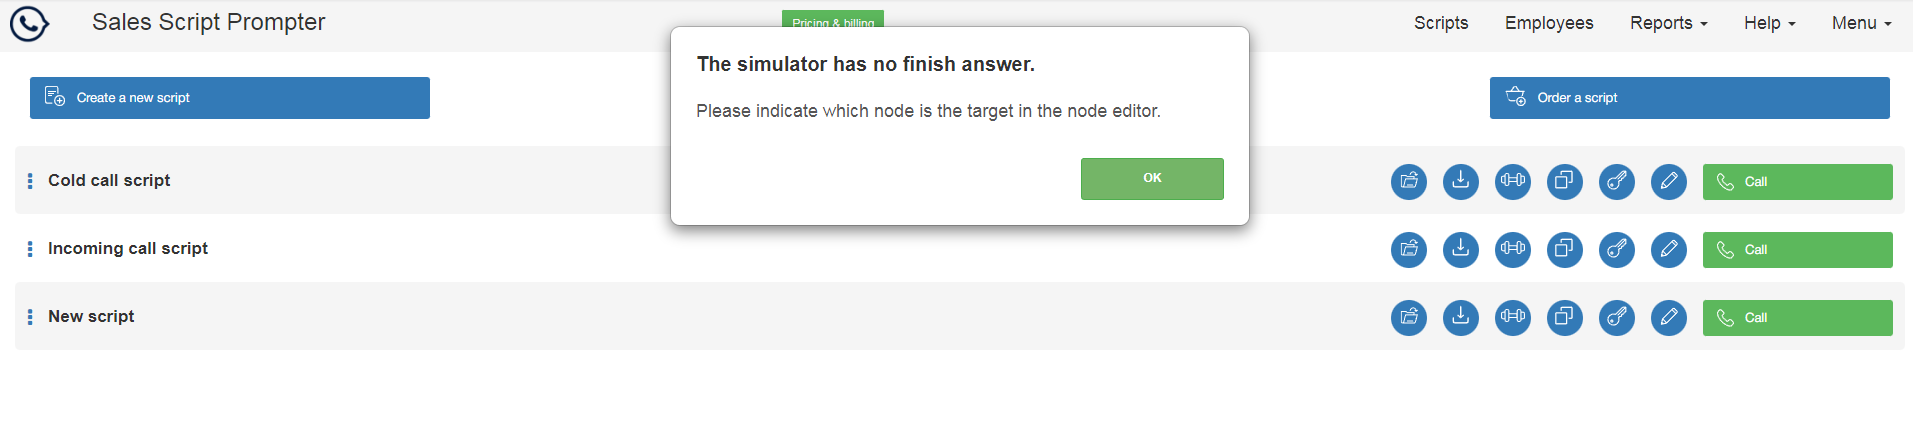
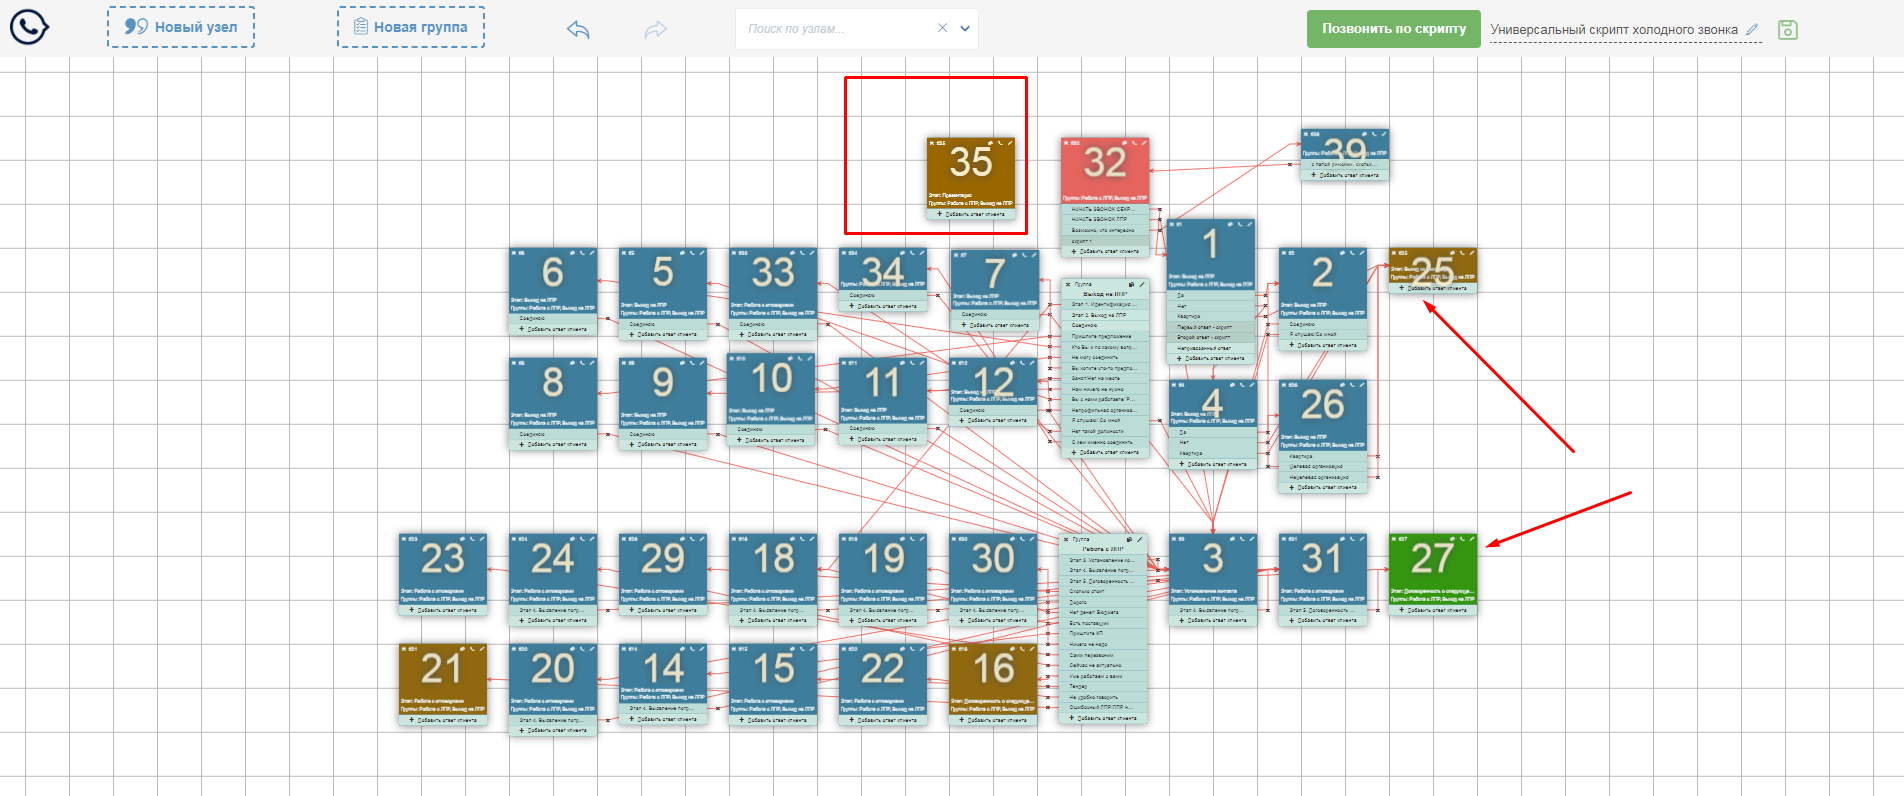
- Make sure that the script has end nodes (they are green or brown) and answer options go to them. Nodes like 35 that don't have a path to reach this dialog end option will cause an error when starting the training.
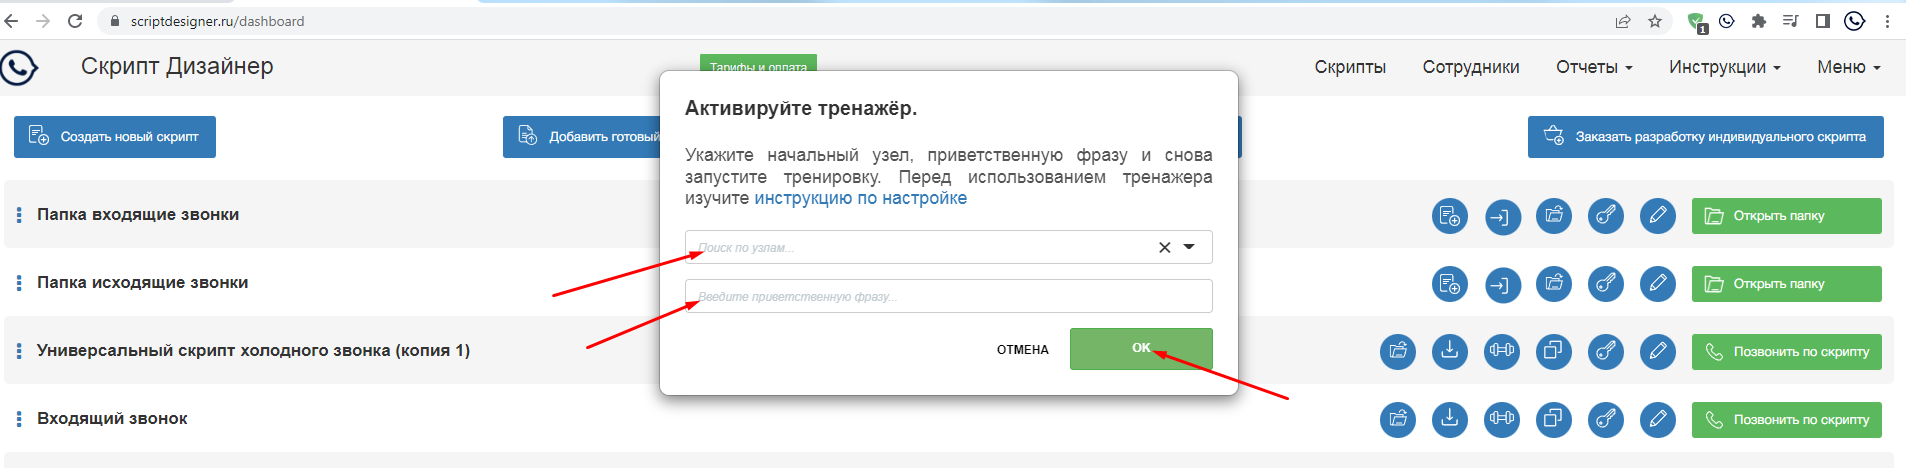
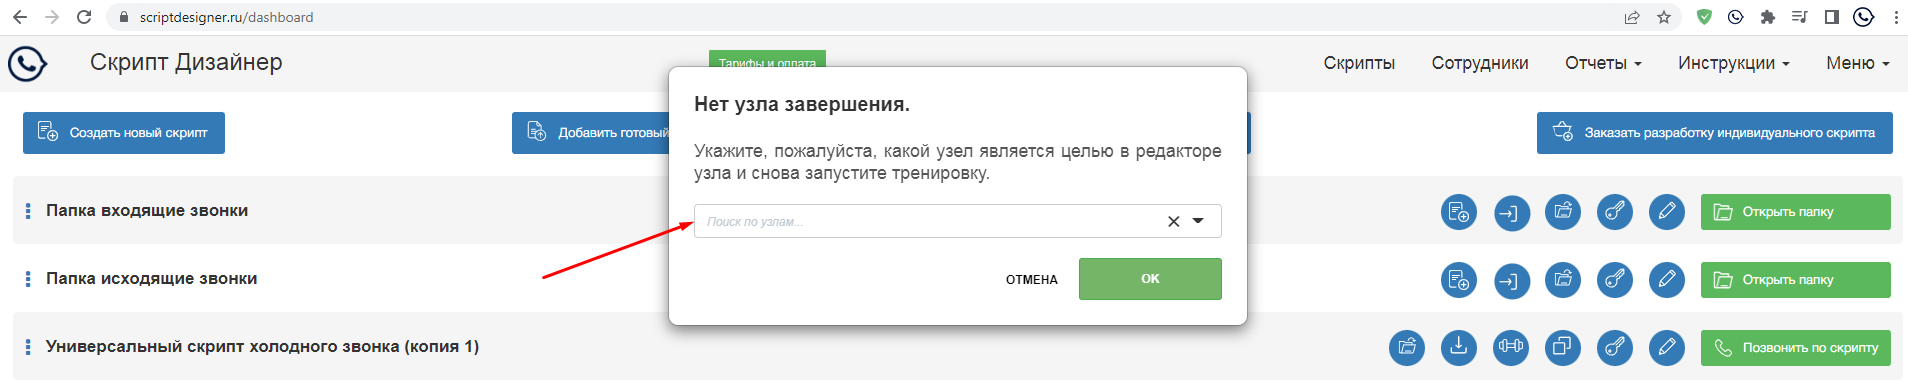
- In the event that you forgot to specify the start node and greeting phrase in advance, or the end node, which means success when the call ends, the system will prompt you to fill in these data when starting the training.
- When you have finished the preparatory work, you can start the training by pressing the "dumbbell" button to start the scripted training.
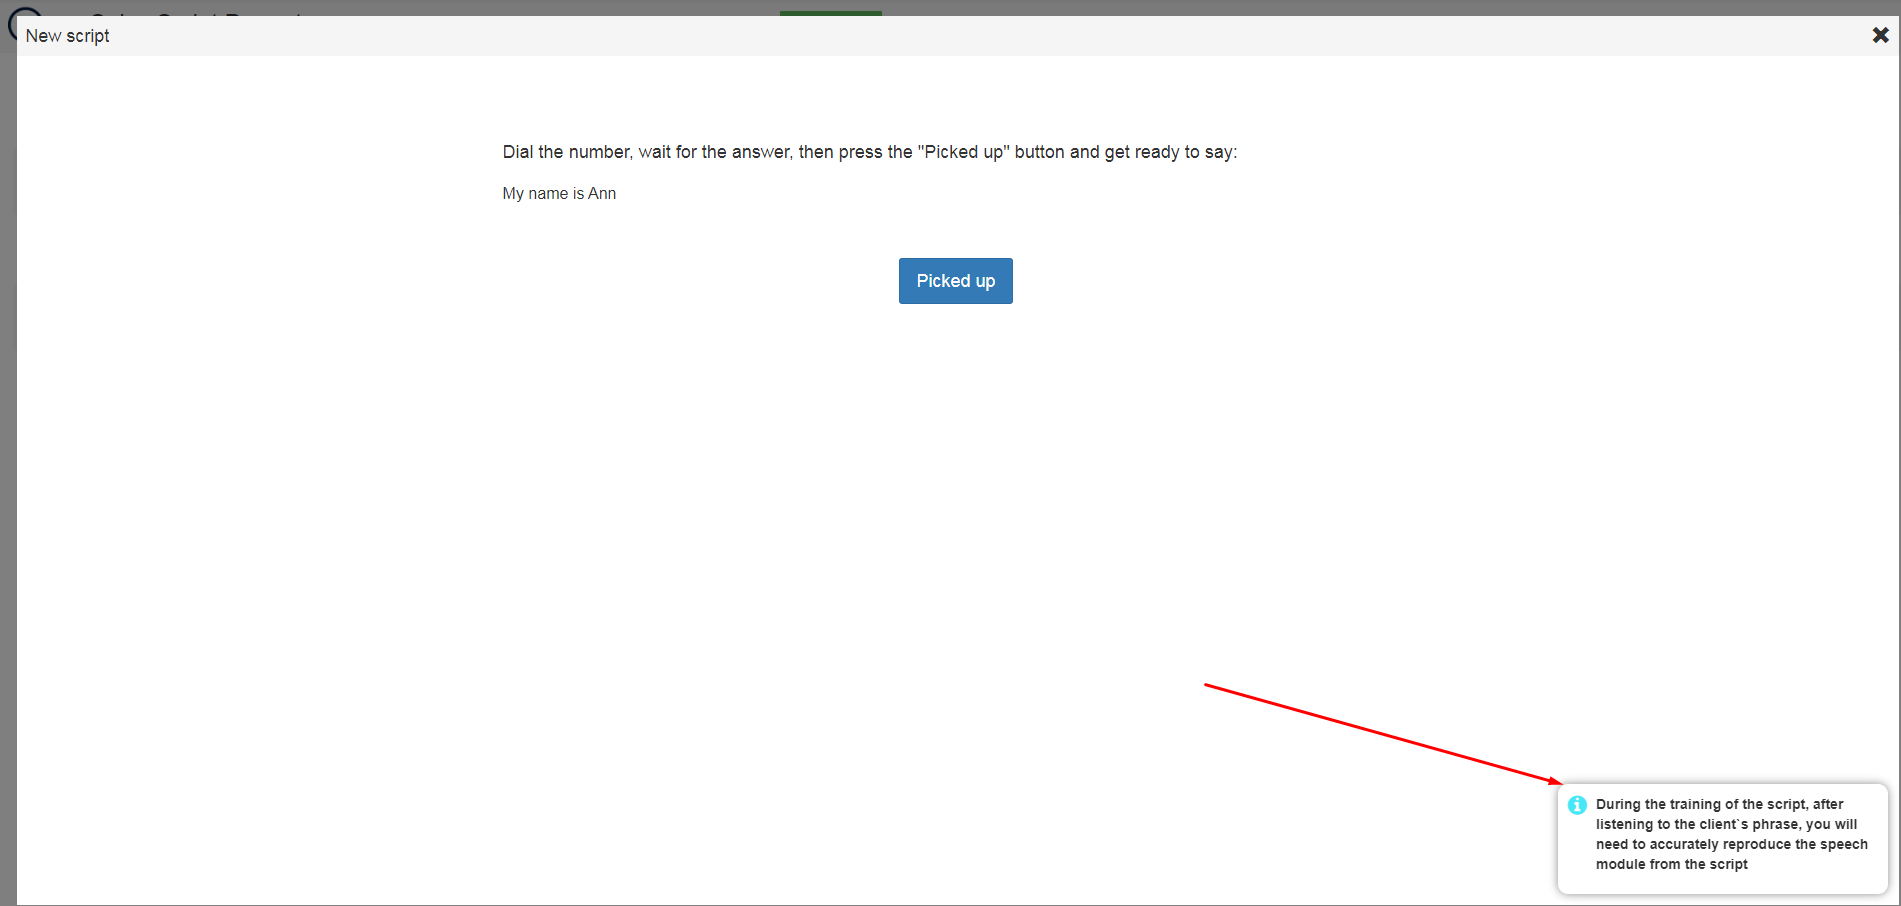
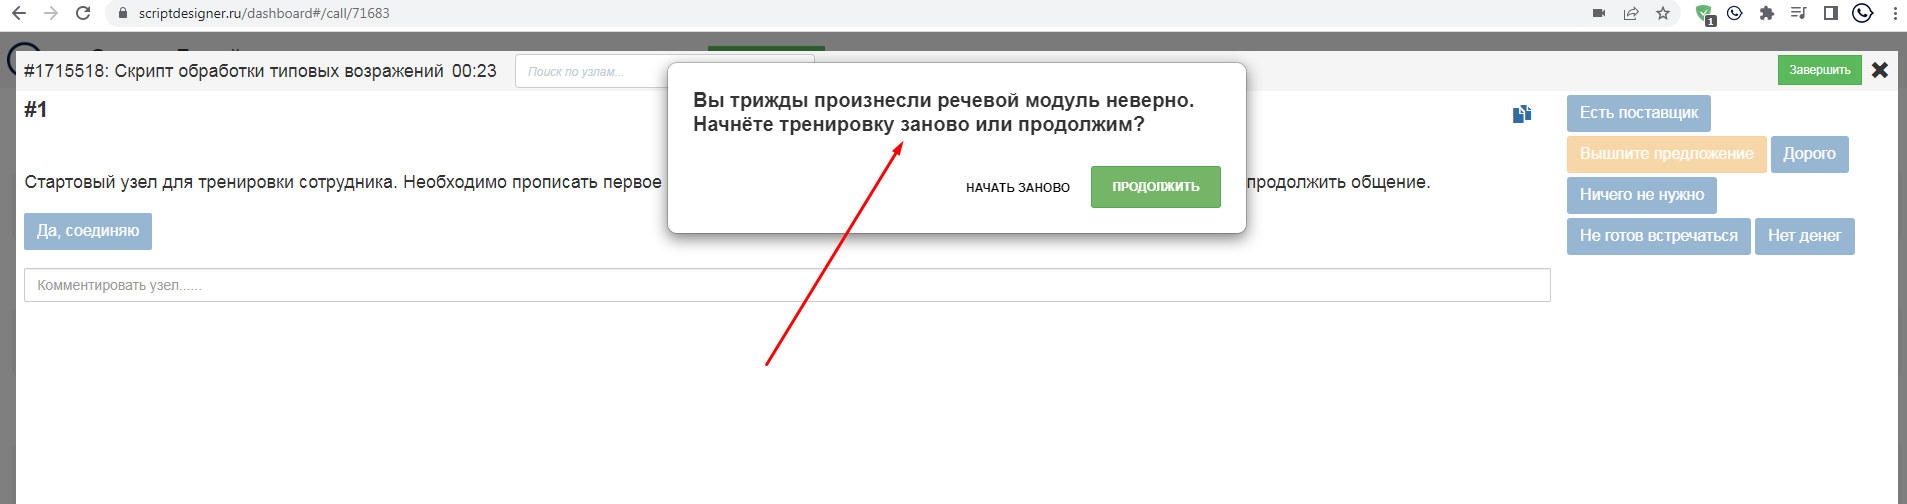
- In the event that the system cannot recognize the phrase that the operator says 3 times, a warning will be displayed.

- When you or an employee have reached the final node, the system will notify you of the successful completion of the training.


Work with employees
Designer's authority
- The interface of the designer's personal account
in the service looks like this:
- The designer can send a request to delete the
account by clicking on the "Recycle Bin" icon. The request will be sent to the manager’s
email specified during registration. In the event that the manager confirms the
deletion of the employee's account, it will be blocked and the employee will
not be able to use the service, his account will be marked deleted.

- The designer can use the voice simulator to train calls by script (it works in the Chrome browser). To start training, he needs to press the "Dumbbell" icon. The call training mode will start, where the system will select a random path through the script to achieve one of the set goals.
- The designer has the right to create, edit, copy, export, import and delete scripts, including creating, editing and deleting custom fields. In this, its functionality is identical to that of the account manager. The manager can restrict the designer's access to different scripts and folders. This is necessary if there are several different designers and they are responsible for scripts of different directions of different departments.
- The designer can view reports.
- Designers do not have access to the financial part of the service, they cannot select or adjust the tariff and pay for using the service. They also do not have access to certain functions, such as requesting a demonstration, working with employees (invitation/deletion/editing) and CRM accessing (they can only create integrations from a supervisor account).
Authority of the operator
-
The operator’s primary goal - the use of scripts to work with customers,
buyers and partners.

- The operator can send a request to delete the account by clicking on the
"Recycle Bin" icon. The request will be sent to the manager’s email specified
during registration. In the event that the manager confirms the deletion of the
employee's account, it will be blocked and the employee will not be able to use
the service, his account will be marked deleted.

- The operator can use the voice simulator to train communication by script (it works in the Chrome browser). To start training, he needs to press the "Dumbbell" icon. The call training mode will start, where the system will select a random path through the script to achieve one of the set goals.
- The operator can use the script by clicking on the "Handset"
icon. The passage through the selected script will start. During the call, the
operator can leave comments and fill in the fields if they are added to the
script. After the call, he can also leave his notes on the call and save the
results.
- In the event that the operator calls from CRM, a link to the report on this call will be indicated in the comment to the card of the entity from which the script call was made. In the report, the operator can view the data of the nodes and the answers that he has passed and the filled fields, if any. Operators cannot adjust scripts, including changing/adding fields.
How to add employees
Option 1 - by adding one employee.
-
Go to your account and go to the "Employees" menu. Select the type of employee you want to invite and click "Invite...".

- Fill in the fields of the form and click "Invite".
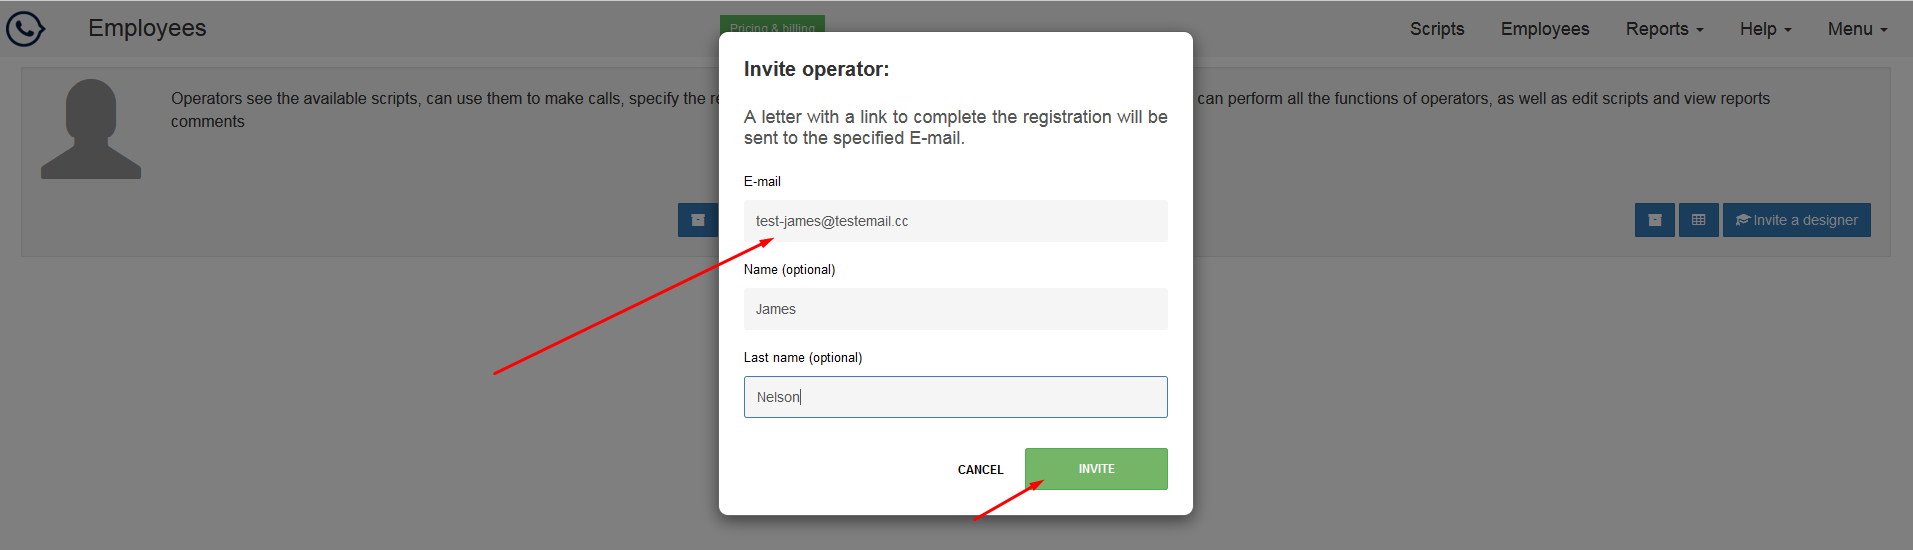
- The system will notify you that the invitation has been sent and the employee will appear in the list of employees with the status "Invitation sent".

- After receiving the letter, the employee must click on the link to complete the registration in the service. After filling in the fields, click on the "Complete Registration" button.

- If for some reason the employee did not receive an invitation letter to register in the service, you can send him the invitation link yourself by mail, skype or in any other way.

- After registration, the status of the employee will change to "Active" if your tariff plan allows you to have this number of active employees. Otherwise it will be in the "Blocked" status, and you will need to decide which employees should be left active and which should be blocked in accordance with the terms of the tariff plan. When an employee has the "Active" status, it means that he has access to the service and those scripts that you gave him access rights to.

Option 2 - by importing employees from Excel.
-
Go to your account and go to the "Employees" menu. Select the type of employee you want to invite and click the "Import Employees from Excel" button.

- Follow the instructions for importing employees when filling out the form, select the file to import, and click "Start Downloading".

- Employees will be imported and will appear in your employees list. An employee's email entered once remains in the system until it is deleted by the manager. Repeated additions of an employee with the same address are not possible. This circumstance may be the reason for the refusal to carry out this operation. If you have many employees, you can first check in the service database by the search form - if there are any employees you want to add.

- After receiving the letter, the employee must click on the link to complete the registration in the service. After filling in the fields, click on the "Complete Registration" button.
- If for some reason the employee did not receive an invitation letter to register in the service, you can copy and send him the invitation link by mail, skype or in any other way.
- After registration, the status of the employee will change to "Active" if your plan allows you to have this number of active employees. Otherwise it will be in the "Blocked" status, and you will need to decide which employees should be left active and which should be blocked in accordance with the terms of the tariff plan. When an employee has the "Active" status, it means that he has access to the service and those scripts that you gave him access rights to.
How to block and delete employees
Employee lockout
-
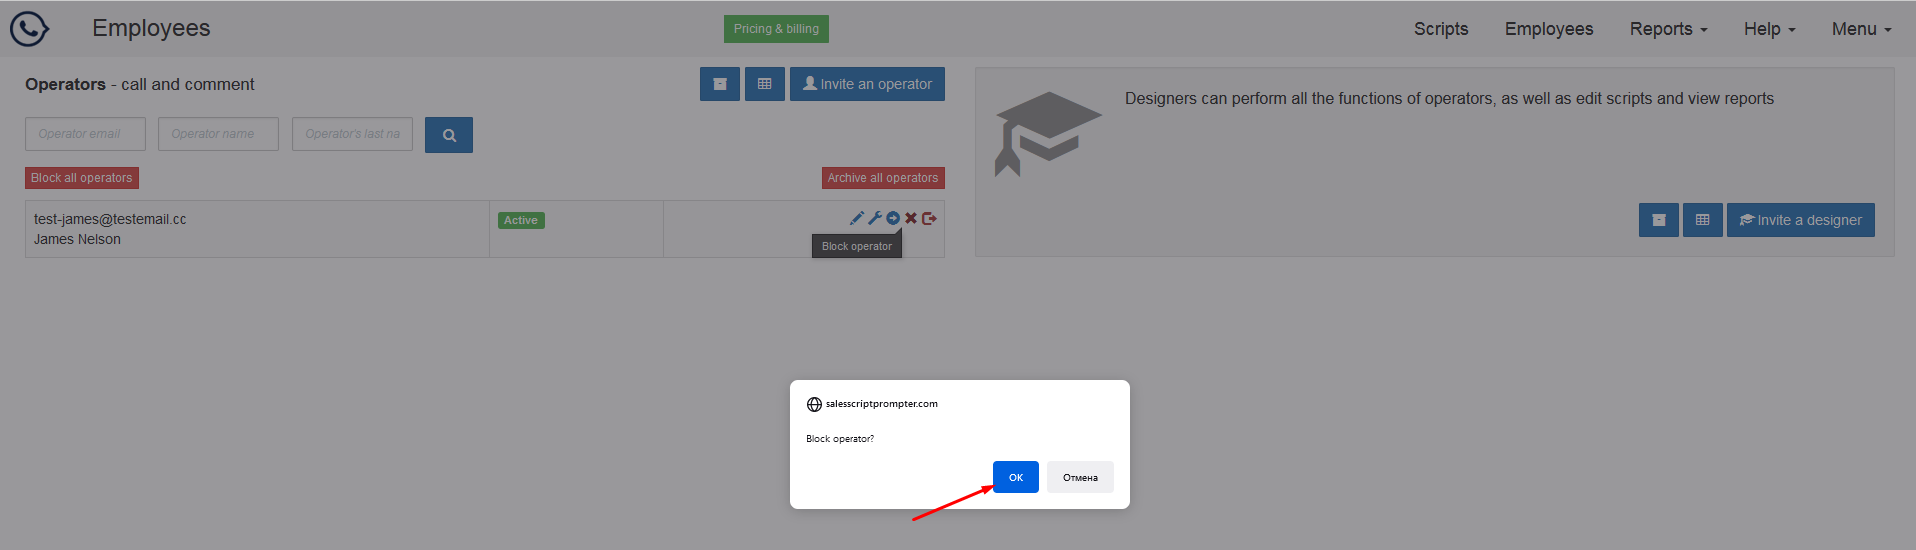
To lock an employee, go to the “Employees” menu and click on the lock button to the right of the employee's data to lock.

- After confirming the blocking, the employee will go to the blocked status. He will not be able to make calls or use the service. In order to unblock an employee, press the green head icon.

- If you want to lock all operators or designers, use the general lock button.

Removal of employees
-
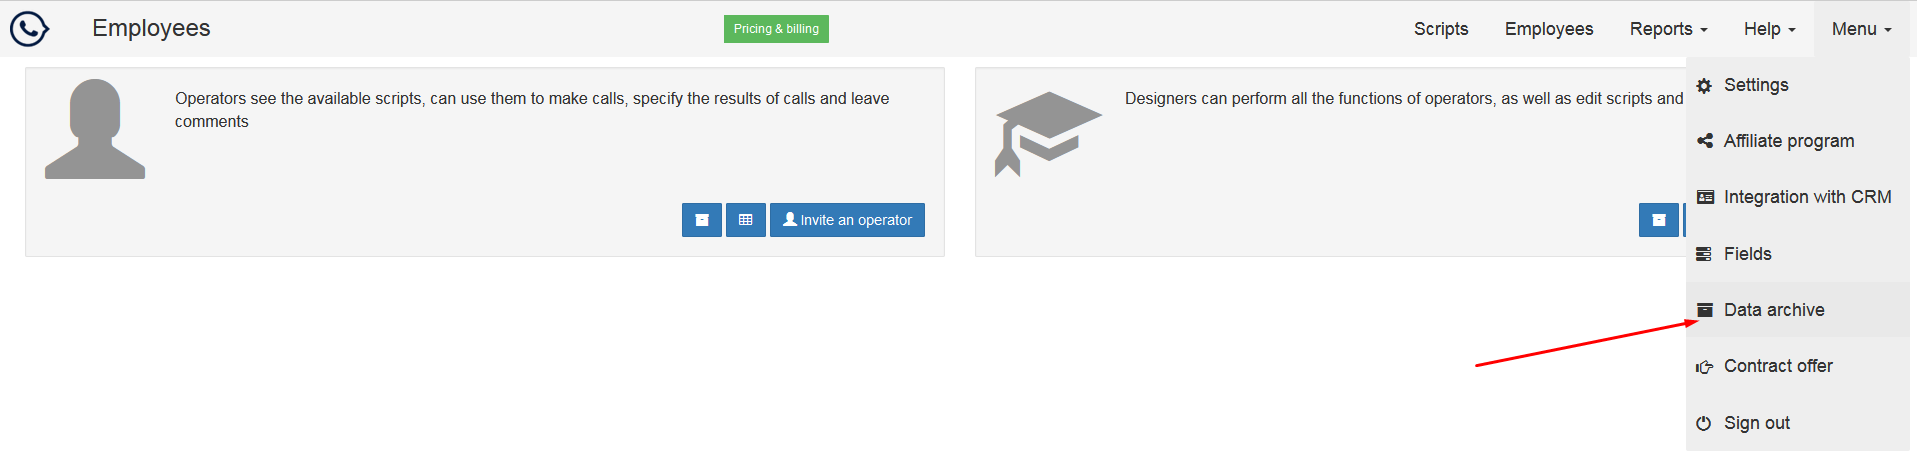
To remove an employee/employees, click on the "To archive employee"/"To archive all employees" button. This will block the account of the employee/employees and move them to the archive.

- Then go to Menu -> Data Archive.
- You can remove an employee from the archive or return him to the team (the returned employee will be in the "Blocked" status).

- If an employee is deleted, his account is marked as deleted (this is reflected in the reports, a mark of deletion is added to the email), the rights are revoked and you can not restore the employee, he must be invited to work in the service again.
How to provide rights for staff to use scripts
-
In order to grant rights to scripts and folders to employees, go to the "Employees" menu section and click on the "wrench" icon to the right of the data of the desired employee.

- A modal window opens with access to scripts and folders (if any).
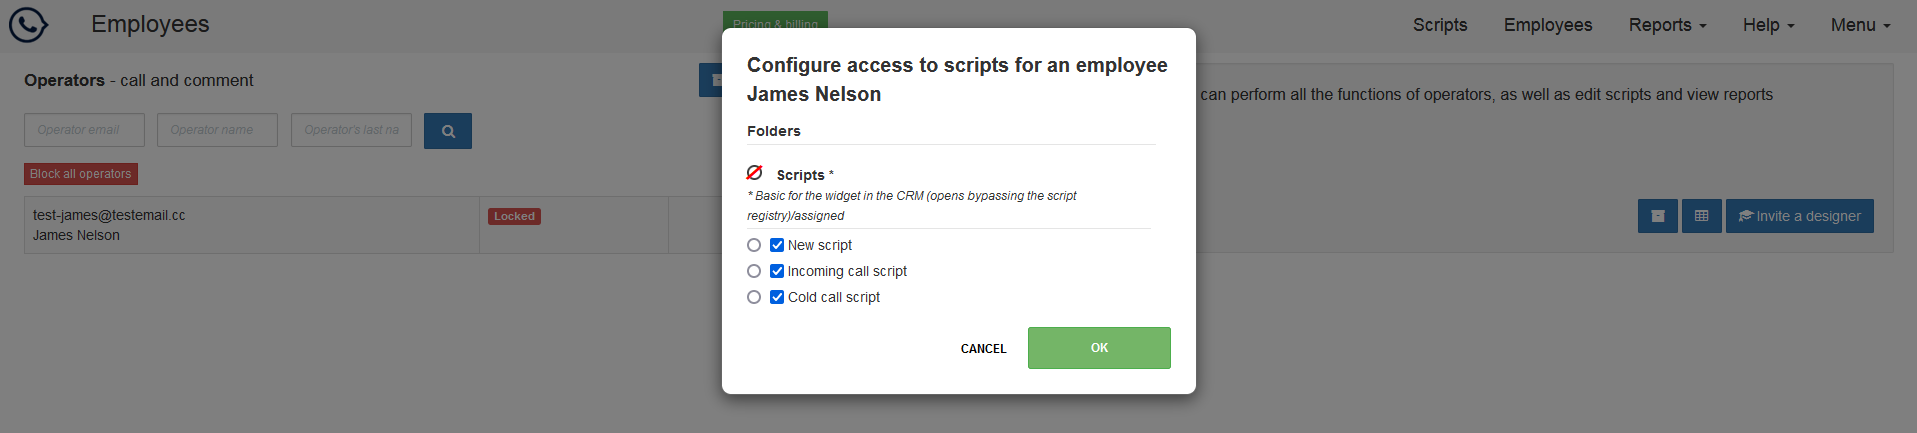
- The script access settings (the ability to call for operators and call/edit for designers) are controlled via checkboxes, as shown in the image. When you have given access rights to the scripts to an employee, click the "Save" button.
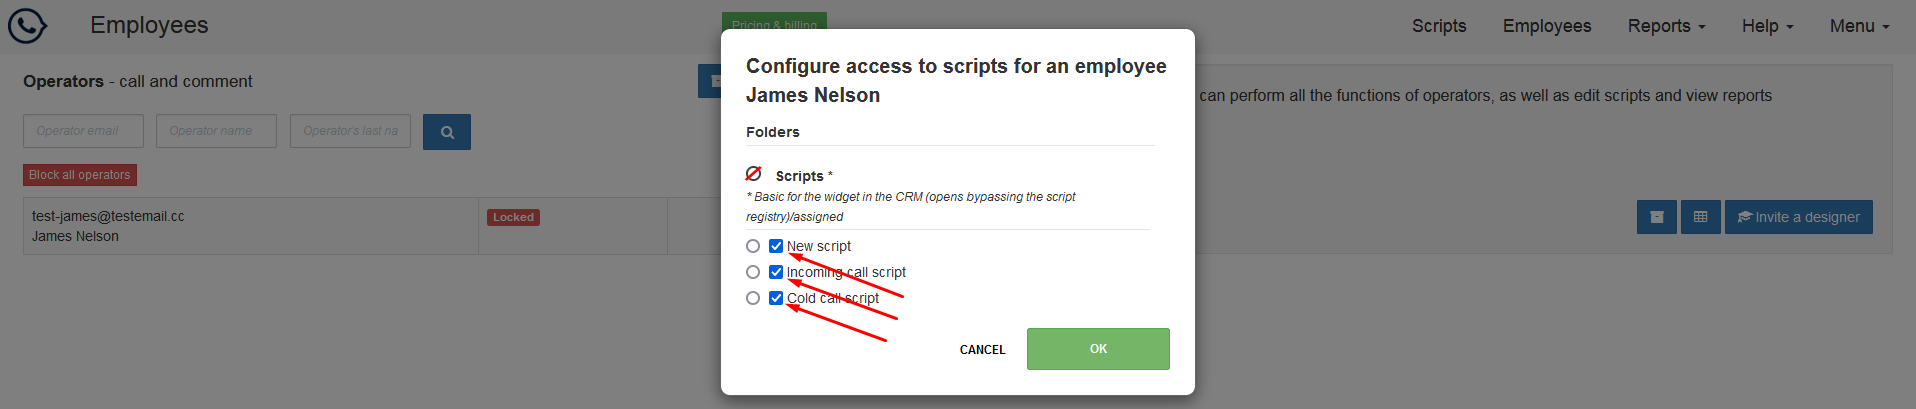
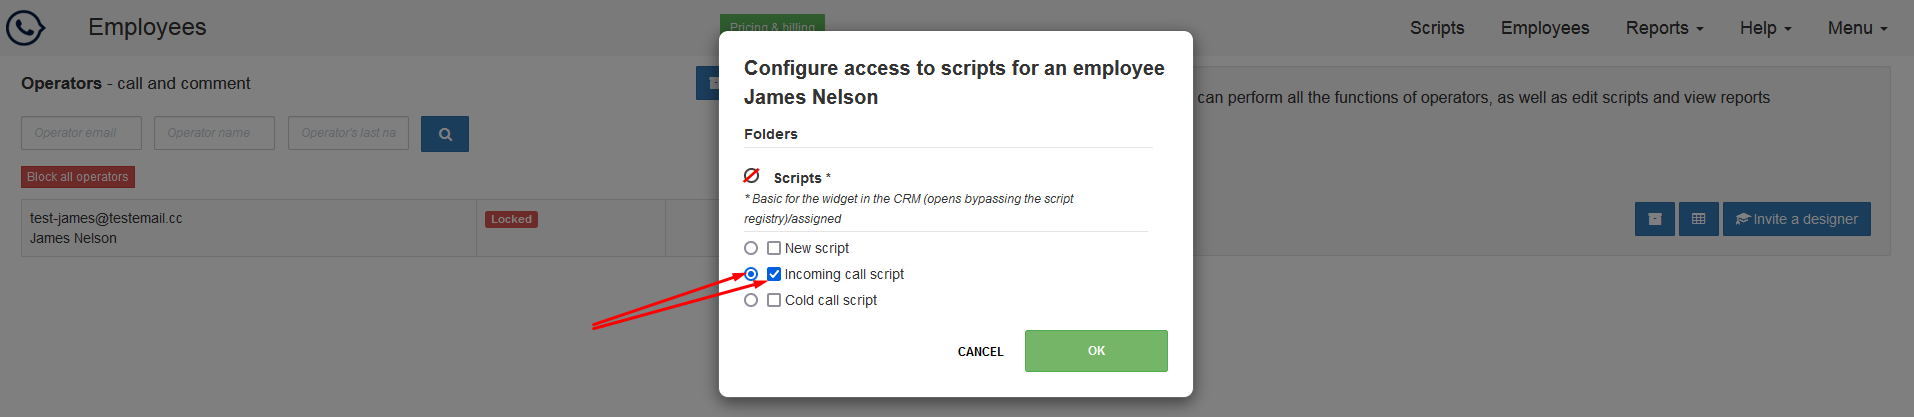
- If you work in CRM, you may need to speed up the work with the "Sales Script Prompter" widget in CRM if an employee makes a call using one script. In this case, you can set a script for autostart by giving the employee rights to it (item 3) and clicking on the radio-box button to the left of the selected script. In this case, the script registry will not be opened, and when the widget is launched, a call to the selected script will start immediately.
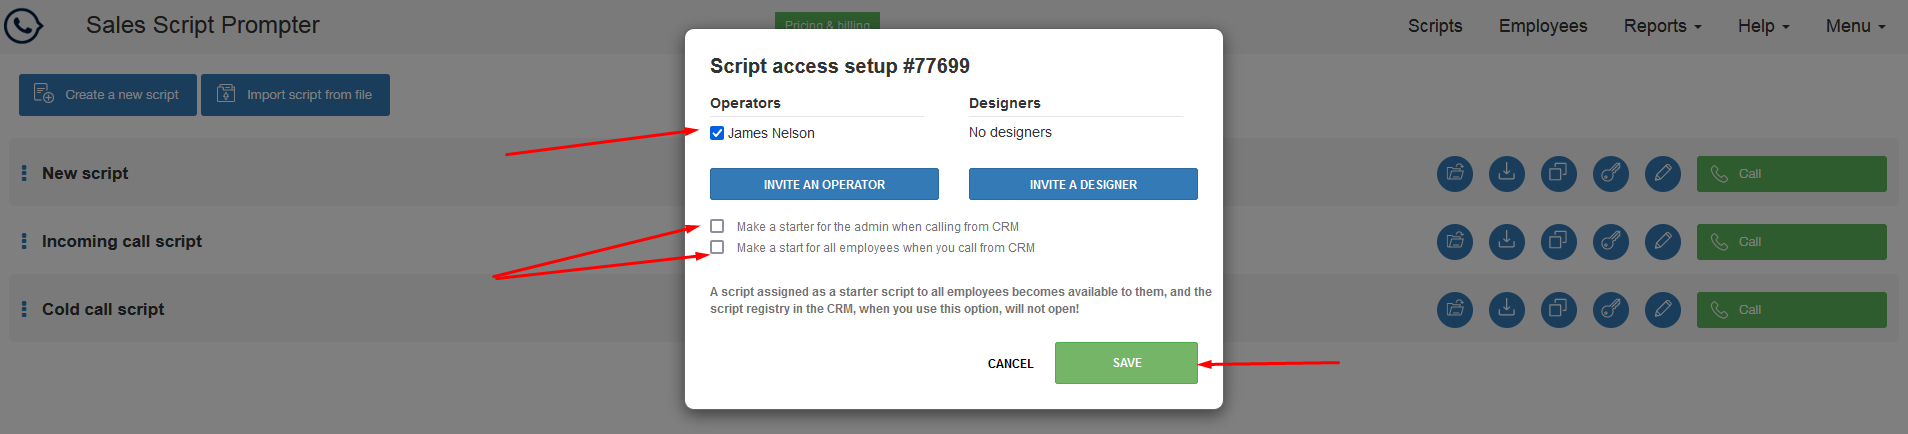
- In the event that you need to grant rights to scripts for all employees, you can use editing access rights in the script registry.
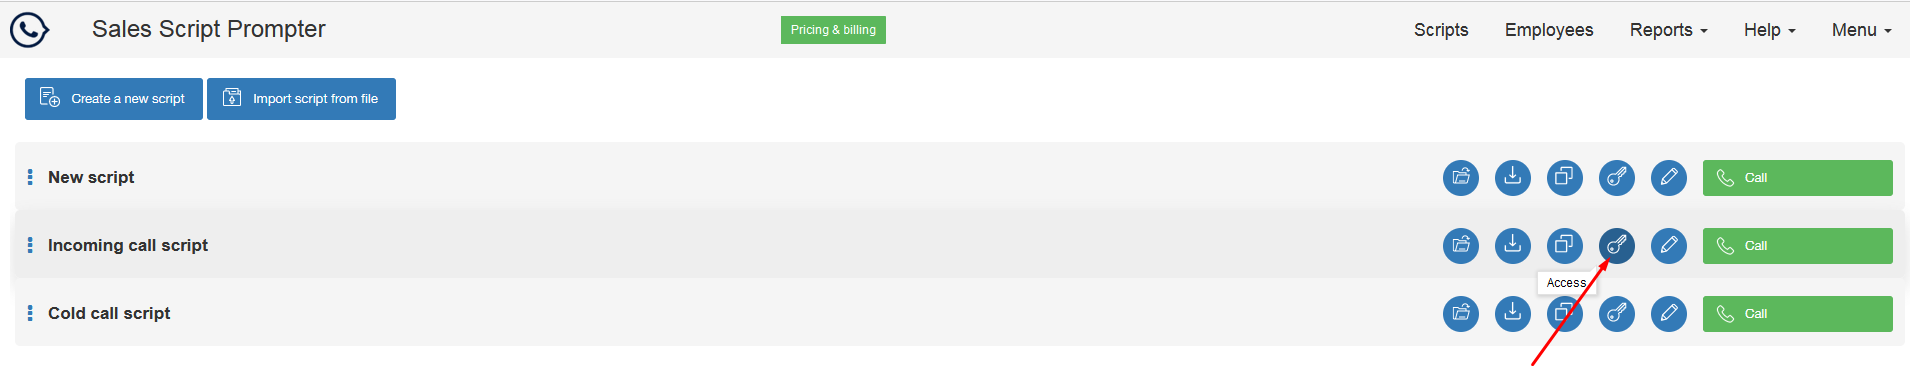
- The procedure for assigning rights is similar to the one described above, follow the instructions in the modal window and after you determine which of the employees can call using the script and who cannot, click on the "Save" button. Additionally, the script may be set as the opening one for both you and all other workers when making calls from CRM. Don't forget to provide access permissions to the script if you make it everyone's start script to prevent mistakes.
Service payment
How to pay for the service
To pay for the "Sales Script Prompter" service, click on the "Pricing & Billing" button in the menu and then on the "Payments & Discounts" button.

A modal window will open with a choice of payment options, number of users and payment period.

Option 1 - Payment by bank card
- Click on the number of users you need and the payment period for which you want to make a payment. Pay attention to the discount scale, it allows you to save up to 25% of the payment amount and fix the cost of the service for the selected period of time. If you want to recharge your account balance with any amount - just enter it in the "Recharge amount" field.
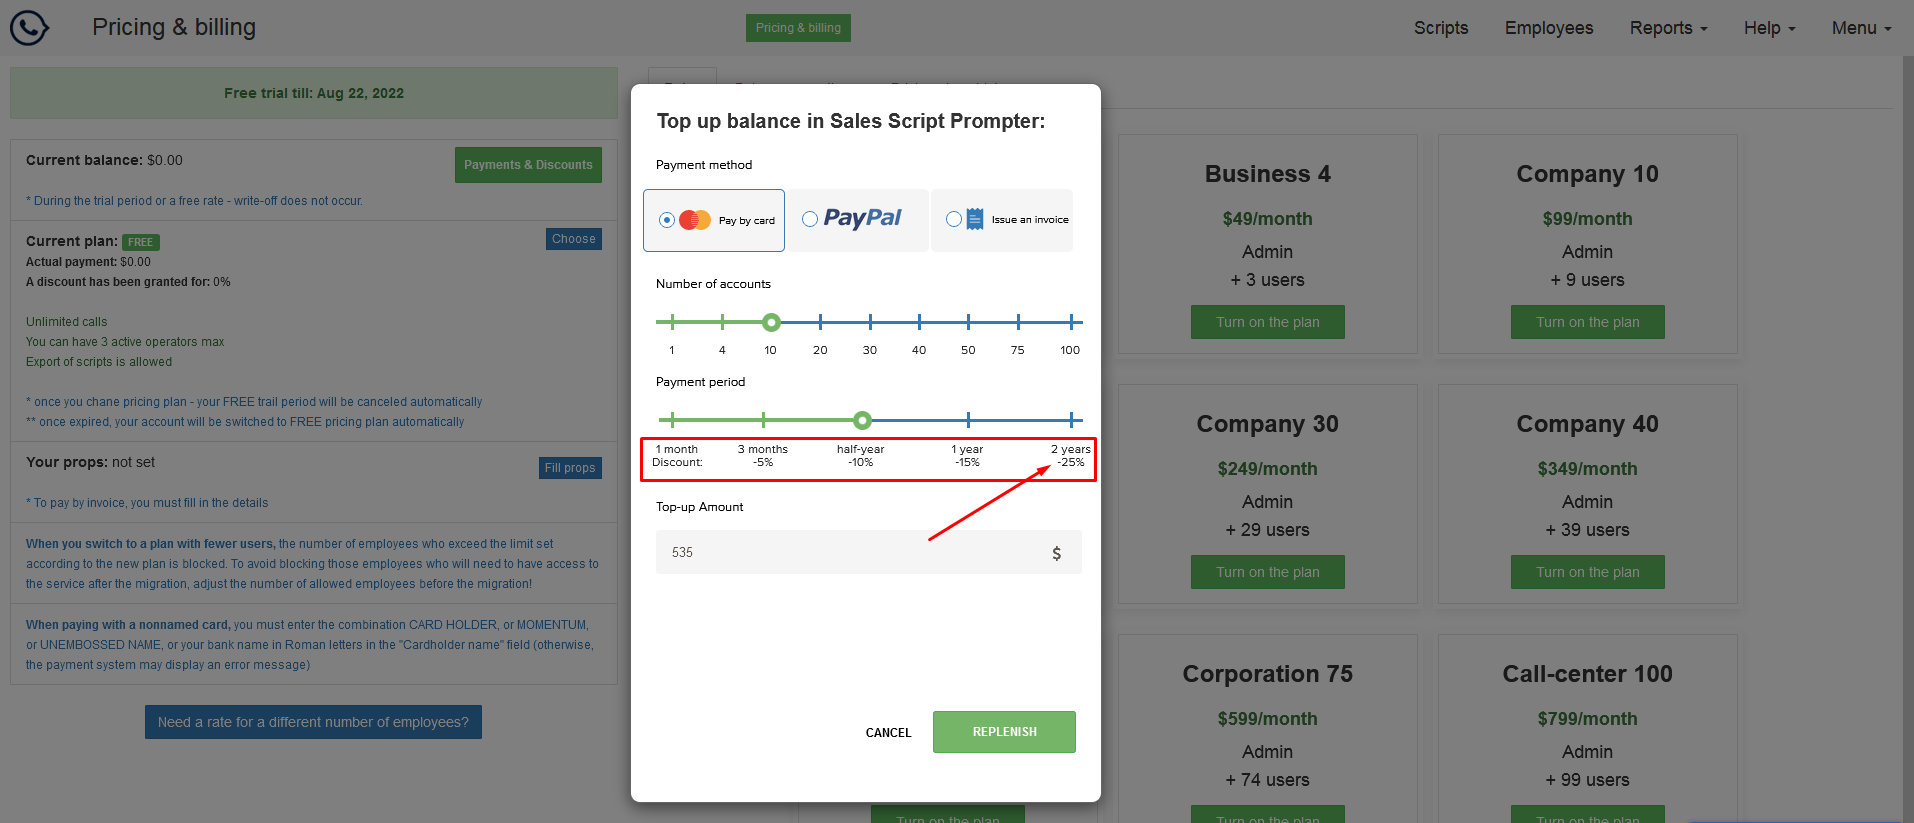
- After selecting all the options, click on the "Top up balance" button and you will be redirected to the site of the payment system you have chosen. Upon completion of the payment process, you will return to the site of our service, where you will receive a notification about the payment status and:
- crediting the balance in case of successful payment

- refuse to recharge in case of a payment error (for example, if there is no money on the card or you decided to change the method of payment in the process of payment), with an offer to try to recharge the balance again.

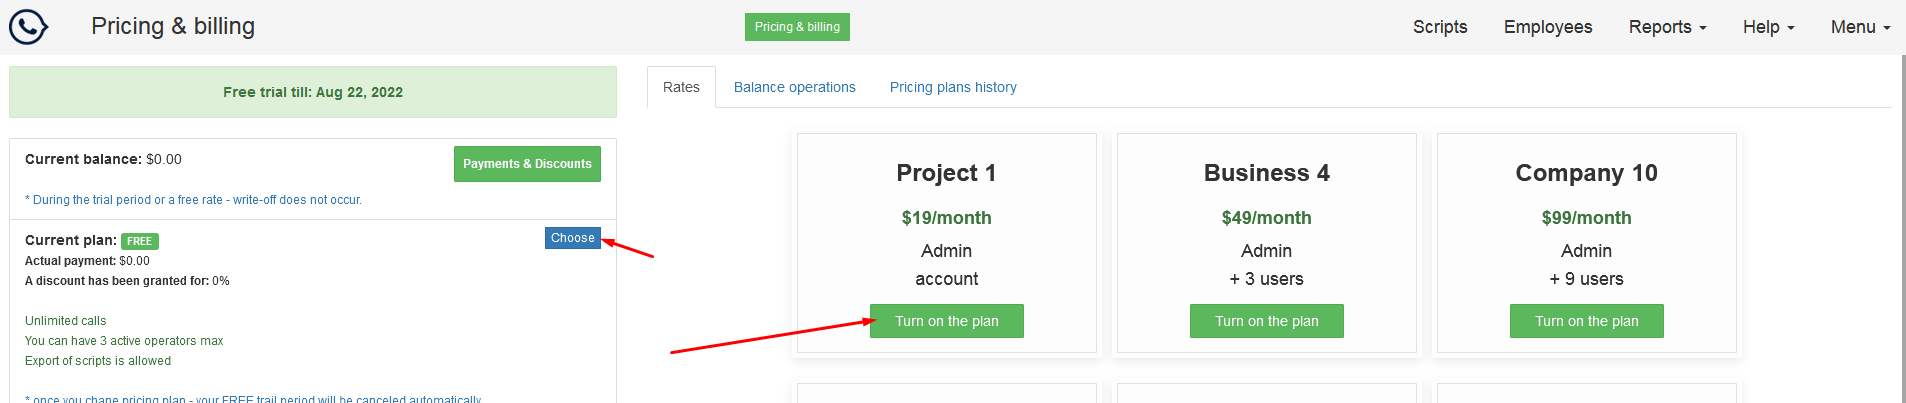
- If you didn't connect the tariff immediately after receiving the message about successful payment, you can always connect it by clicking the button "Choose tariff" or use the table of tariffs on the screen.
Account deleting
How to delete an administrator account
-
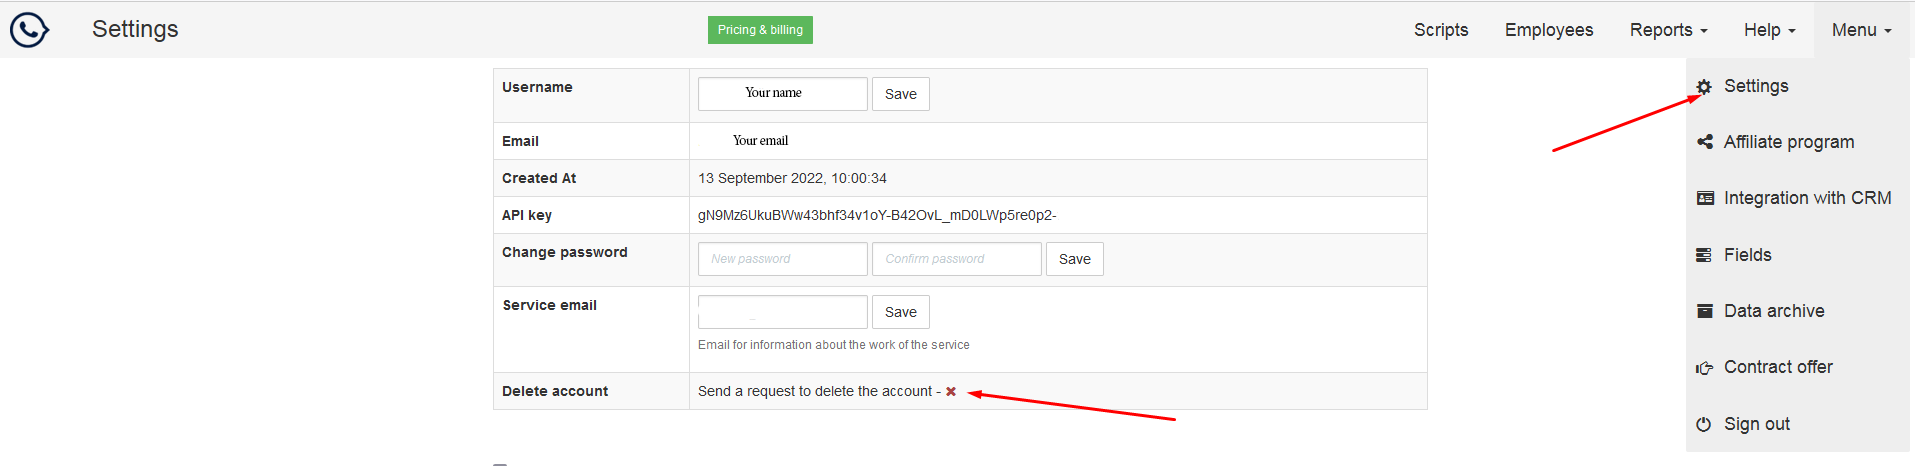
Log in to your "Sales Script Prompter" account in the menu section, click on the "Cross" icon to the right of the phrase "Send a request to delete an account".
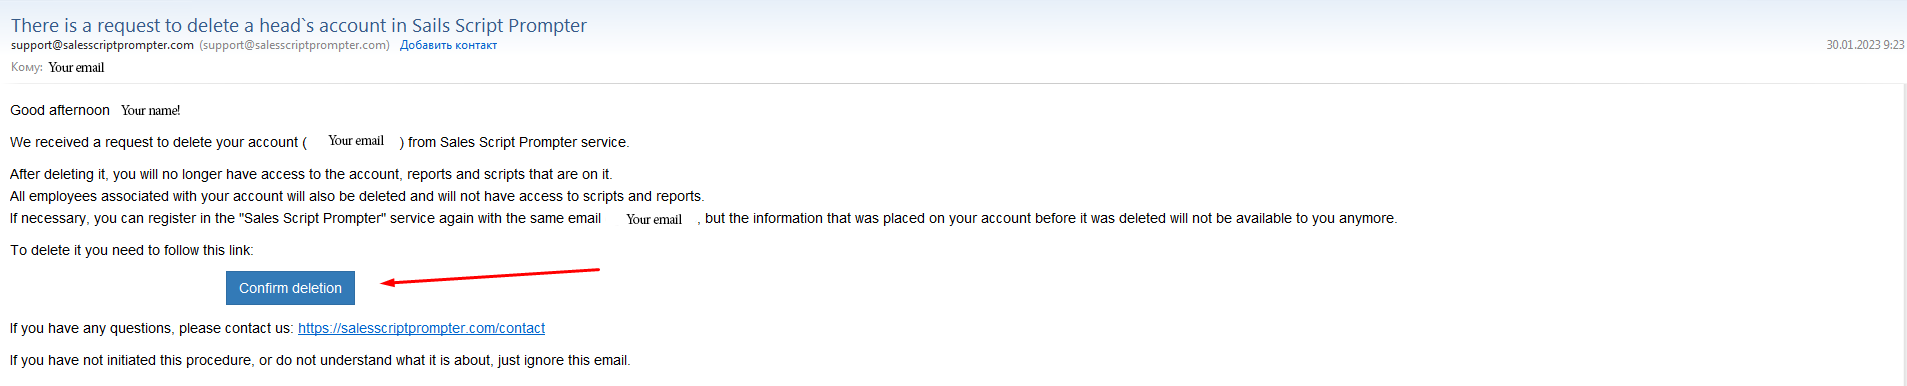
- Confirm the deletion of the account, a message will appear on the screen.

- Go to the mail, the address of which is the login and find a letter from "Sales Script Prompter" with the subject "Requested to delete the manager's account in «Sales Script Prompter». Please read this letter carefully! Click on the "Confirm deletion" button.
- After
confirming the deletion of the account, you will receive a system message

- The service specialist will receive your request and approve it or contact you to clarify the reasons for deletion within 2 days. Your account, as well as the accounts of your employees in the "Sales Script Prompter" service, will be deleted.
How to delete an employee's account
-
Log
into his "Sales Script Prompter"
account and click on the "Cross" icon at the bottom left (the
password, if necessary, can be changed in the manager's account, you can archive
and then delete employee accounts there).

- Confirm
the need to delete, a message will appear on the screen.

- The manager must open a letter sent to the address that is his login and approve the deletion of the account.